Fosscore's 2013 Suburban LTZ Build Thread

Disclaimer: Links on this page pointing to Amazon, eBay and other sites may include affiliate code. If you click them and make a purchase, we may earn a small commission.

OP
OP
Fosscore

Fosscore

Full Access Member
Joined
Apr 16, 2014
Posts
10,472
Reaction score
18,075
Took the Suburban for a spin early this morning to see if I could hear any more clunking and to make sure the links were good to go.

Filled up the thirsty tank with 89, gave it the quickest wash and dry before school. Then it rained... HARD immediately after as we were having breakfast. But at least it is clean!

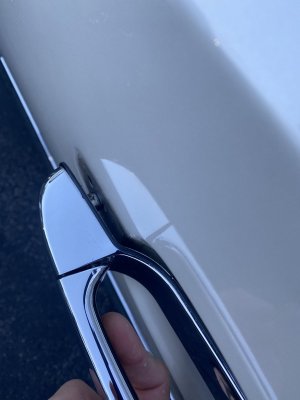
And then this happened.....the wife mentioned the driver's door was getting sloppy and sure enough it is toast as of this morning. A new one will be on order shortly. Grrr...only 1 door has not broken yet...

0ETkS%PORp6uS9tl3pYwuw.jpg
 

BADRIDES

Full Access Member
Joined
Dec 18, 2015
Posts
1,729
Reaction score
1,136
And then this happened.....the wife mentioned the driver's door was getting sloppy and sure enough it is toast as of this morning. A new one will be on order shortly. Grrr...only 1 door has not broken yet...

View attachment 233787
Those are a poor design by Chevrolet. We are constantly replacing those at the dealership I work at.
 
OP
OP
Fosscore

Fosscore

Full Access Member
Joined
Apr 16, 2014
Posts
10,472
Reaction score
18,075
Those are a poor design by Chevrolet. We are constantly replacing those at the dealership I work at.

Curious how much that invoice comes out for the handle and labor to replace a handle, which we all do on here for the $20 it costs for the handle?

And I know the Gruven inserts are an option too....but for every handle? That gets pricey too, but then replacing handles does too! :rolleyes:
 

Tonyrodz

Resident Resident
Joined
Feb 16, 2012
Posts
30,993
Reaction score
45,170
Location
Central Jersey
Curious how much that invoice comes out for the handle and labor to replace a handle, which we all do on here for the $20 it costs for the handle?

And I know the Gruven inserts are an option too....but for every handle? That gets pricey too, but then replacing handles does too! :rolleyes:
Damned if you do, damned if you don't.
 

swathdiver

Full Access Member
Joined
May 18, 2017
Posts
19,148
Reaction score
25,185
Location
Treasure Coast, Florida
OP
OP
Fosscore

Fosscore

Full Access Member
Joined
Apr 16, 2014
Posts
10,472
Reaction score
18,075
38,330 miles

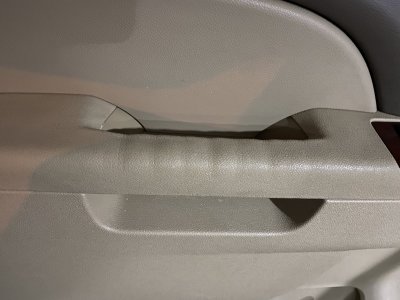
So the driver's door interior pull handle was added to the list of failures on my Suburban. This just adds to the other repeated failures that are echoed throughout the forum, online and numerous YouTube videos. Some with colorful commentary.

1. Driver's interior door pull - repaired
2. Exterior handles - replaced 3 doors including one handle twice
3. Cracked dash - 4 places - center speaker x 1 and Airbag x 3
4. Climate control buttons ink wearing off - I have there overlay stickers

The door pull went to jelly before the summer and I finally got around to making an attempt to repair it after seeing another post about it again here on the TYF.

I watched some videos and some guys took the entire handle apart, added some L brackets and spent a lot of time disassembling the door panel. Seeing that there is no direct replacement and you have to buy an entire door panel, you are really left up to your own ingenuity.

I followed along with the expanding foam option by pulling back the handle skin at the seam on the inside of the grab handle. Not a whole lot of room to work with and the skin itself doesn't really snap back together. The 2 seams just kind of overlap and slip together. And I wanted to be careful not to tear the skin or stretch it out too far.

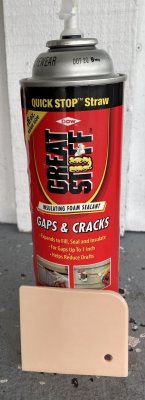
I used very little out of the Great Stuff can. I tried some sealant first that I already had on hand, but it never really cured properly. A good effort but zero for solution. I did cut up a plastic spreader in thin strips, drilled a hole on both ends and zip tied the pieces together to fit in the skinny, shallow void where the ultra thin white plastic pieces and foam used to live. Pretty flimsy design really, considering how much use that handle gets.

I tried numerous other options, e.g. some PVC pipe (too tall and wide and too much effort to cut it in half and shave it down), a carriage bolt, and some skinny flat metal brackets that would have taken time on the wheel to modify and fit that small gap. So I went with the spreader. Once it was trimmed down, it fit the width and height of that void quite nice and was hopeful it would give the handle some rigidity and strength once the foam expanded and dried.

I peeled the handle apart again and squeezed the trigger. The foam came out of the nozzle rapidly and started to flash off pretty quick in the heat and humidity. I didn't have much time to work with it and tried to shoot as much as I could into the void and get the top and bottom lips of the handle to match up. I quickly wiped up the extra gobs and used some denatured alcohol to get off the sticky residue before it dried in the texture of the handle.

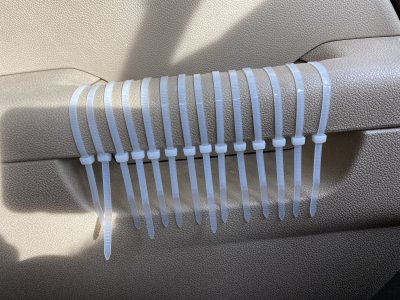
Then I grabbed about 14 zip ties (random number but yes I did count them after installation) and secured the handle tightly while evenly spacing the ties across the entire handle, but not too snug so as to try and prevent grooves in the handle once I removed them. I left the zip ties in place for 48 hours.

Voila!! The grab handle is fixed much better than it was. Not floppy. Not stretch Armstrong. Could you do pull ups with it? No, but you can now close it without fear of it ripping in half. The foam formed up nicely underneath and it appears that there are only very slight indents in the handle. Hopefully they will round out a bit more after some usage. Either way, it is better than it was before.

There was some foam seepage at the gap, which I expected. I took a brand new square razor blade and carefully trimmed the 2 edges flush and smooth and picked away any runs down the inside and underneath of the handle.

It feels pretty solid and much cheaper than a new door panel.


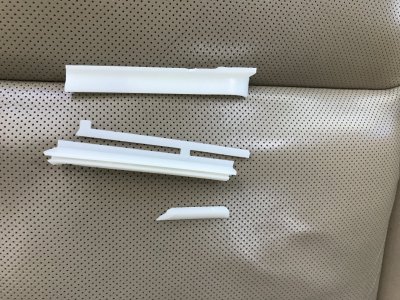
Broken plastic piece that runs the length of the grab handle and the foam that "fills" out the void with the plastic.
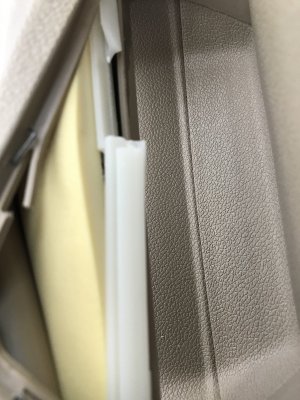
YYSBbGRnR66Clb68mlF8Rg.jpg

The carnage that went in the bin.
T22Ds1akQHagcV9AgtNLFg.jpg


The void after the plastic was taken out and I also ripped out that bit of foam so that I could put the cut up plastic spreader in that gap. The plastic bits looked like steak fries if you will. Long and skinny and stuck together as mentioned above.
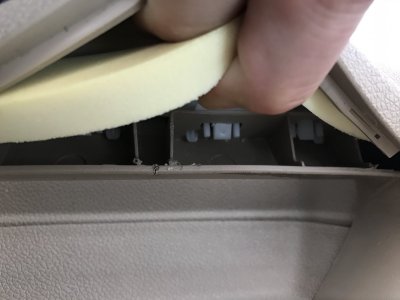
GWmxcTSHSbKs%sJEDcNLcQ.jpg


The trashed bits from the OEM build and 2 other ideas I tried to make work quickly, but in the interest of time and effort, moved on to the plastic spreader and foam to stiffen the grab handle and fill the void of the handle.
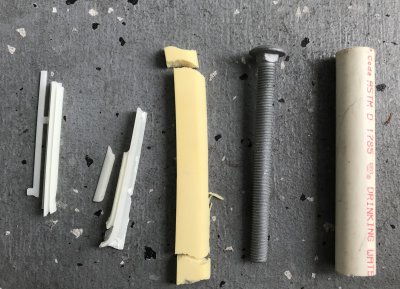
fullsizeoutput_8424.jpeg


The Great Stuff and plastic spreader I cut up in small strips.
fullsizeoutput_8550.jpeg
 
Last edited:
OP
OP
Fosscore

Fosscore

Full Access Member
Joined
Apr 16, 2014
Posts
10,472
Reaction score
18,075
14 zip ties. I know someone is going to count them to double check anyways!! :)
%t4arfMNT5aN23olNCet9A.jpg

A little bit of foam seepage that was shaved pretty damn clean and smooth after cutting the zip ties off.
fullsizeoutput_857f.jpeg


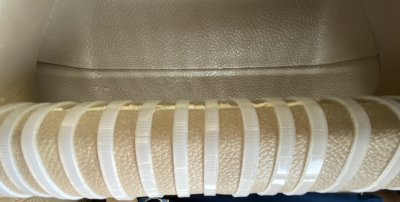
Some light indents in the handle from the zip ties while holding the two parts of the handle together while the foam cured. Hopefully it holds up under heavy use.
r7l9MN5dTLmeYpeWjMN5XQ.jpg
 

Tonyrodz

Resident Resident
Joined
Feb 16, 2012
Posts
30,993
Reaction score
45,170
Location
Central Jersey
14 zip ties. I know someone is going to count them to double check anyways!! :)
View attachment 233846

A little bit of foam seepage that was shaved pretty damn clean and smooth after cutting the zip ties off.
View attachment 233850


Some light indents in the handle from the zip ties while holding the two parts of the handle together while the foam cured. Hopefully it holds up under heavy use.
View attachment 233848
A customer wants me to try the same thing for an Explorer. They have similar issues, but with the door panel armrest. How exactly did you utilize the spreader? Also--maybe try some heat from a hair dryer on the area where the zip ties were holding. That might smooth the indents out a little bit more. Came out excellent. Good job :waytogo:.
 

BADRIDES

Full Access Member
Joined
Dec 18, 2015
Posts
1,729
Reaction score
1,136
Curious how much that invoice comes out for the handle and labor to replace a handle, which we all do on here for the $20 it costs for the handle?

And I know the Gruven inserts are an option too....but for every handle? That gets pricey too, but then replacing handles does too! :rolleyes:
We get half an hour installation $49.50 plus the price of the handle.
 

Forum statistics

Threads
129,250
Posts
1,812,839
Members
92,353
Latest member
Speardog
Top