What did you do to your NNBS GMT900 Tahoe/Yukon Today?

Disclaimer: Links on this page pointing to Amazon, eBay and other sites may include affiliate code. If you click them and make a purchase, we may earn a small commission.

Rocket Man

Mark
Supporting Member
Joined
Dec 25, 2014
Posts
25,966
Reaction score
50,662
Location
Oregon
The adapter is homemade from a Dorman reservoir cap, some rubber gasket material, brass fittings, epoxy and hose. I can understand the skepticism. But I bench tested my thread seals successfully. I've only pressurized it with air, so far. I didn't want it leaking brake fluid everywhere. By the time I get Motive on the phone after the holiday, I hope to already have this done. So it'll be a quick conversation about getting a refund.
I don’t think it will work unless you fill the Motive with fluid. From what I can tell, the rubber stopper needs to be submerged in the brake fluid. There’s a reason they designed it the way it is and if you don’t follow the instructions I seriously doubt it will work. But it’s your choice of course. You would be the first one that I’ve heard of that it didn’t work for. At least try adding fluid to it first. It won’t be shooting brake fluid everywhere. There would have to be fluid all the way to the top of the container, and if there was, you wouldn’t be able to pressurize it because there wouldn’t be room for air. If it starts to leak at all, just unscrew the cap and depressurize it. You have nothing to lose. I’m curious to see the outcome if you use it correctly.
 
Last edited:

Rocket Man

Mark
Supporting Member
Joined
Dec 25, 2014
Posts
25,966
Reaction score
50,662
Location
Oregon
The adapter is homemade from a Dorman reservoir cap, some rubber gasket material, brass fittings, epoxy and hose. I can understand the skepticism. But I bench tested my thread seals successfully. I've only pressurized it with air, so far. I didn't want it leaking brake fluid everywhere. By the time I get Motive on the phone after the holiday, I hope to already have this done. So it'll be a quick conversation about getting a refund.
I tested mine without fluid in it and it holds pressure. If I was betting, I would bet it’s the Dorman cap leaking at the threads. Dorman has always been crap. You could try plugging the hose itself to test the pump. Sorry you’re having issues. Everybody I know of who has one of these loves it.
 

the_tool_man

Full Access Member
Joined
Oct 15, 2018
Posts
749
Reaction score
1,703
Location
Upstate South Carolina
Finished the brakes today. I fiddled with the pressure bleeder some more. The instructions say to pressurize it with air first to check for leaks, and it leaked. So no bueno. I'll call Motive and give them a chance to send the rest of the parts that were missing. In the end, I don't trust the longevity or the leak integrity of my homemade adapter. I'm past the Amazon return cutoff. So if Motive doesn't make it right someone else can have it. Lesson learned; open the box right away even if I don't plan to use it soon.

I used a vacuum bleeder on round 2. But so much leaked past the bleeder screw threads, I couldn't tell when the air was out of the system. I ended up just using the reservoir without vacuum and using the old fashioned two-man method.

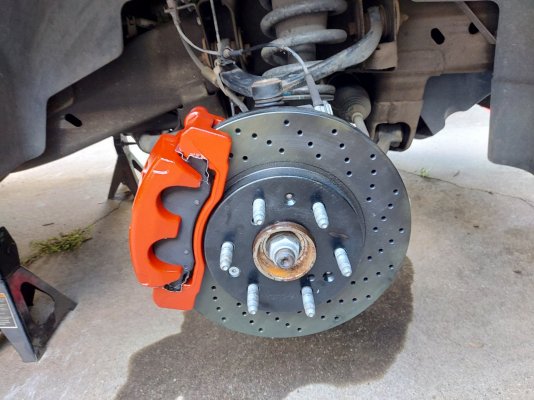
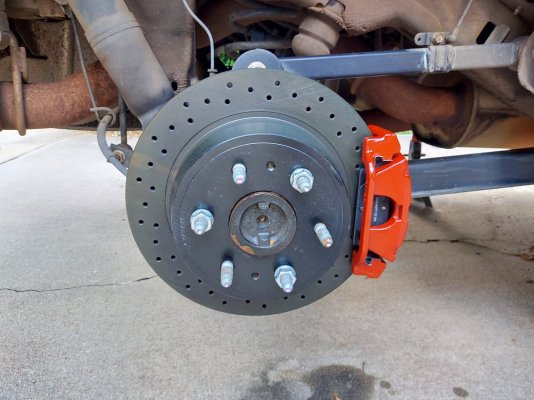
Anyhow, now my wife knows how to bleed brakes. Pics before bedding. Rotors are cryo-treated, cross-drilled black zinc coated from Brake Performance. And of course red calipers just because I like 'em.

Pedal is slightly spongier than before, so I must have a few bubbles left in there somewhere. I'll re-bleed when I replace the lines in a few months, hopefully with a functioning pressure bleeder. The lines I want are on backorder until late July. This is my daily, and I have other projects I need to finish this weekend. So it'll have to do.

20220530_091906.jpg

20220530_091915.jpg
 

Rocket Man

Mark
Supporting Member
Joined
Dec 25, 2014
Posts
25,966
Reaction score
50,662
Location
Oregon
Finished the brakes today. I fiddled with the pressure bleeder some more. The instructions say to pressurize it with air first to check for leaks, and it leaked. So no bueno. I'll call Motive and give them a chance to send the rest of the parts that were missing. In the end, I don't trust the longevity or the leak integrity of my homemade adapter. I'm past the Amazon return cutoff. So if Motive doesn't make it right someone else can have it. Lesson learned; open the box right away even if I don't plan to use it soon.

I used a vacuum bleeder on round 2. But so much leaked past the bleeder screw threads, I couldn't tell when the air was out of the system. I ended up just using the reservoir without vacuum and using the old fashioned two-man method.

Anyhow, now my wife knows how to bleed brakes. Pics before bedding. Rotors are cryo-treated, cross-drilled black zinc coated from Brake Performance. And of course red calipers just because I like 'em.

Pedal is slightly spongier than before, so I must have a few bubbles left in there somewhere. I'll re-bleed when I replace the lines in a few months, hopefully with a functioning pressure bleeder. The lines I want are on backorder until late July. This is my daily, and I have other projects I need to finish this weekend. So it'll have to do.

View attachment 371561

View attachment 371562
What was the part number of the kit you bought?
 

13UpInSmoke

Full Access Member
Joined
Jul 25, 2021
Posts
166
Reaction score
274
Finally got around to dropping the trans pan & swapping fluid/filter along with a deeper B&M pan. Wasn't as hard as I was assuming. Unbolted the trans brace & raised the trans about an inch & then used a jack to the frame & a ratchet strap to pull the crossover down for clearance.
 

iamdub

Full Access Member
Joined
Apr 23, 2016
Posts
20,780
Reaction score
44,687
Location
Li'l Weezyana
Pedal is slightly spongier than before, so I must have a few bubbles left in there somewhere. I'll re-bleed when I replace the lines in a few months, hopefully with a functioning pressure bleeder. The lines I want are on backorder until late July. This is my daily, and I have other projects I need to finish this weekend. So it'll have to do.

I use the classic method with a bottle and tubing and working the pedal, but I do it alone. Two people is unnecessary and complicates it.

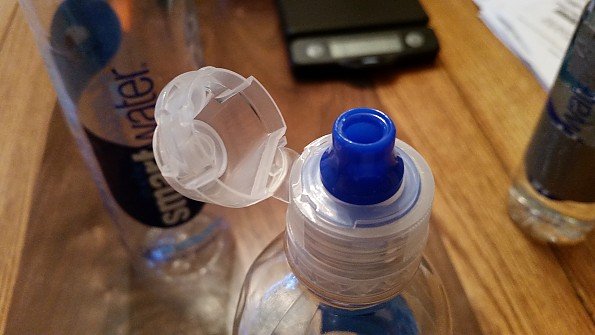
I use a 1-liter smartwater bottle that has the flip-cap and spout:

20160827_075817.jpg


I use a length of mechanic's wire wrapped tightly around the neck to hang it near the caliper. The clear tubing I got from Home Depot (or Lowe's?) fits firmly through the spout. I heated the other end of the tubing to soften it and pushed it over the bleeder screw to flare and form it so that it'd be easier to slip it onto the bleeder. Put the tube to the bottom of the bottle and add some fluid so that the end is submerged. Set up at the right rear corner. It might take a few tries, but you want the bleeder just loose enough to provide a bit of resistance when pushing the pedal. Not so firm that you have to put a lot of effort to stroke the pedal but no soft that it flows so freely. I'd say you want about the normal amount of sponginess that you're trying to get rid of. There's no need for the "pump, pump, hold" stuff. When you stroke the pedal, you want to remain within the normal range of stroke. Don't floor it or you might be needing a new master cylinder. Use a brick, 2x4 or your other foot to create a stop to prevent going too far. Stroke it slowly- no need to rush because this can cavitate the fluid. After 2-3 strokes like this, just as you start to make the 4th stroke, turn the key to "ON", right before the "START" position. The ABS solenoids are activated during the self-check. With a little pressure on the system (you pressing on the pedal), fluid is pushed towards that rear corner, carrying the air out of the ABS module. Leave the key on for 1-2 strokes, turn the key off for 2-3 more strokes, then repeat with the key on, etc. Do this until you have fresh fluid at that corner. You can go check the bottle and pour it out if it's getting full and you wanna pump more, but you shouldn't have to. Be sure to tighten the bleed screw before you move the bottle to dump it. No need to torque the bleeder down, just snug it for this step in case you wanna bleed it some more. You can leave the hose on the nipple with fluid in it to act as an air lock. Keep an eye on the reservoir. DO NOT let it run empty. If you'd feel more comfortable, have a helper monitor the bottle and reservoir. The first time I did this, I used my work phone to FaceTime my personal phone. I set up the work phone to watch the bottle so I could watch the color of the fluid change and for any air bubbles in the hose while I worked the pedal and key. Then I realized that there's not some huge amount of volume flowing through there and the bottle isn't gonna suddenly fill up and/or reservoir drain dry. So, watching it that closely was unnecessary. After you've pumped a good bit of new, clean fluid with no bubbles, tighten the bleeder and repeat for the next farthest corner- the left rear. There shouldn't be nearly as much old fluid in that one. Repeat for the right front and, finally, the front left.

Yes, you will go through a couple quarts of new fluid. But, you'll have replaced virtually every molecule of old fluid while bleeding the ABS module by yourself and with no special equipment. This process might sound like it'll take all afternoon. It actually only takes about 30 minutes. It's the standard driveway bleeding process, just with turning the key on at specific times to bleed the ABS module added in.

I'm not against using special equipment that would be easier and probably faster. I just don't bleed brakes often enough to make it worth me investing in anything like that. Taking 30 minutes to bleed brakes versus 15 every few years isn't gonna alter my life at all.
 

the_tool_man

Full Access Member
Joined
Oct 15, 2018
Posts
749
Reaction score
1,703
Location
Upstate South Carolina
What was the part number of the kit you bought?
Fronts: DB-66057
Rears: DB-66065

That's for rotors only, $427 with "free" shipping included. They sell kits with pads, too. They officially only warranty the rotors if you buy their pads. But their pads are soft and wear quickly. I've used their rotors on every vehicle I've owned for over 20 years, and never had to replace one. Be advised their stuff is always "on sale" for at least 35% off. A few times a year it goes to 45%. They may jack the "retail price" to compensate. I don't check anymore. I get them when I need them.
 

the_tool_man

Full Access Member
Joined
Oct 15, 2018
Posts
749
Reaction score
1,703
Location
Upstate South Carolina
I use the classic method with a bottle and tubing and working the pedal, but I do it alone. Two people is unnecessary and complicates it.

I use a 1-liter smartwater bottle that has the flip-cap and spout:

View attachment 371574


I use a length of mechanic's wire wrapped tightly around the neck to hang it near the caliper. The clear tubing I got from Home Depot (or Lowe's?) fits firmly through the spout. I heated the other end of the tubing to soften it and pushed it over the bleeder screw to flare and form it so that it'd be easier to slip it onto the bleeder. Put the tube to the bottom of the bottle and add some fluid so that the end is submerged. Set up at the right rear corner. It might take a few tries, but you want the bleeder just loose enough to provide a bit of resistance when pushing the pedal. Not so firm that you have to put a lot of effort to stroke the pedal but no soft that it flows so freely. I'd say you want about the normal amount of sponginess that you're trying to get rid of. There's no need for the "pump, pump, hold" stuff. When you stroke the pedal, you want to remain within the normal range of stroke. Don't floor it or you might be needing a new master cylinder. Use a brick, 2x4 or your other foot to create a stop to prevent going too far. Stroke it slowly- no need to rush because this can cavitate the fluid. After 2-3 strokes like this, just as you start to make the 4th stroke, turn the key to "ON", right before the "START" position. The ABS solenoids are activated during the self-check. With a little pressure on the system (you pressing on the pedal), fluid is pushed towards that rear corner, carrying the air out of the ABS module. Leave the key on for 1-2 strokes, turn the key off for 2-3 more strokes, then repeat with the key on, etc. Do this until you have fresh fluid at that corner. You can go check the bottle and pour it out if it's getting full and you wanna pump more, but you shouldn't have to. Be sure to tighten the bleed screw before you move the bottle to dump it. No need to torque the bleeder down, just snug it for this step in case you wanna bleed it some more. You can leave the hose on the nipple with fluid in it to act as an air lock. Keep an eye on the reservoir. DO NOT let it run empty. If you'd feel more comfortable, have a helper monitor the bottle and reservoir. The first time I did this, I used my work phone to FaceTime my personal phone. I set up the work phone to watch the bottle so I could watch the color of the fluid change and for any air bubbles in the hose while I worked the pedal and key. Then I realized that there's not some huge amount of volume flowing through there and the bottle isn't gonna suddenly fill up and/or reservoir drain dry. So, watching it that closely was unnecessary. After you've pumped a good bit of new, clean fluid with no bubbles, tighten the bleeder and repeat for the next farthest corner- the left rear. There shouldn't be nearly as much old fluid in that one. Repeat for the right front and, finally, the front left.

Yes, you will go through a couple quarts of new fluid. But, you'll have replaced virtually every molecule of old fluid while bleeding the ABS module by yourself and with no special equipment. This process might sound like it'll take all afternoon. It actually only takes about 30 minutes. It's the standard driveway bleeding process, just with turning the key on at specific times to bleed the ABS module added in.

I'm not against using special equipment that would be easier and probably faster. I just don't bleed brakes often enough to make it worth me investing in anything like that. Taking 30 minutes to bleed brakes versus 15 every few years isn't gonna alter my life at all.
Thanks for that. I watched a video on this method on YT last night, but it seemed like air bubbles in the tubing would get sucked back into the bleeder when you let off the brake pedal. I'll give it a shot next time. 30 minutes? It takes me that long to get the truck on jackstands and get the wheels off, lol.
 

Rocket Man

Mark
Supporting Member
Joined
Dec 25, 2014
Posts
25,966
Reaction score
50,662
Location
Oregon
Fronts: DB-66057
Rears: DB-66065

That's for rotors only, $427 with "free" shipping included. They sell kits with pads, too. They officially only warranty the rotors if you buy their pads. But their pads are soft and wear quickly. I've used their rotors on every vehicle I've owned for over 20 years, and never had to replace one. Be advised their stuff is always "on sale" for at least 35% off. A few times a year it goes to 45%. They may jack the "retail price" to compensate. I don't check anymore. I get them when I need them.
Lol. Sorry, I meant for the Motive. I have Wilwood brakes on both my trucks. :)
 

Rocket Man

Mark
Supporting Member
Joined
Dec 25, 2014
Posts
25,966
Reaction score
50,662
Location
Oregon
I use the classic method with a bottle and tubing and working the pedal, but I do it alone. Two people is unnecessary and complicates it.

I use a 1-liter smartwater bottle that has the flip-cap and spout:

View attachment 371574


I use a length of mechanic's wire wrapped tightly around the neck to hang it near the caliper. The clear tubing I got from Home Depot (or Lowe's?) fits firmly through the spout. I heated the other end of the tubing to soften it and pushed it over the bleeder screw to flare and form it so that it'd be easier to slip it onto the bleeder. Put the tube to the bottom of the bottle and add some fluid so that the end is submerged. Set up at the right rear corner. It might take a few tries, but you want the bleeder just loose enough to provide a bit of resistance when pushing the pedal. Not so firm that you have to put a lot of effort to stroke the pedal but no soft that it flows so freely. I'd say you want about the normal amount of sponginess that you're trying to get rid of. There's no need for the "pump, pump, hold" stuff. When you stroke the pedal, you want to remain within the normal range of stroke. Don't floor it or you might be needing a new master cylinder. Use a brick, 2x4 or your other foot to create a stop to prevent going too far. Stroke it slowly- no need to rush because this can cavitate the fluid. After 2-3 strokes like this, just as you start to make the 4th stroke, turn the key to "ON", right before the "START" position. The ABS solenoids are activated during the self-check. With a little pressure on the system (you pressing on the pedal), fluid is pushed towards that rear corner, carrying the air out of the ABS module. Leave the key on for 1-2 strokes, turn the key off for 2-3 more strokes, then repeat with the key on, etc. Do this until you have fresh fluid at that corner. You can go check the bottle and pour it out if it's getting full and you wanna pump more, but you shouldn't have to. Be sure to tighten the bleed screw before you move the bottle to dump it. No need to torque the bleeder down, just snug it for this step in case you wanna bleed it some more. You can leave the hose on the nipple with fluid in it to act as an air lock. Keep an eye on the reservoir. DO NOT let it run empty. If you'd feel more comfortable, have a helper monitor the bottle and reservoir. The first time I did this, I used my work phone to FaceTime my personal phone. I set up the work phone to watch the bottle so I could watch the color of the fluid change and for any air bubbles in the hose while I worked the pedal and key. Then I realized that there's not some huge amount of volume flowing through there and the bottle isn't gonna suddenly fill up and/or reservoir drain dry. So, watching it that closely was unnecessary. After you've pumped a good bit of new, clean fluid with no bubbles, tighten the bleeder and repeat for the next farthest corner- the left rear. There shouldn't be nearly as much old fluid in that one. Repeat for the right front and, finally, the front left.

Yes, you will go through a couple quarts of new fluid. But, you'll have replaced virtually every molecule of old fluid while bleeding the ABS module by yourself and with no special equipment. This process might sound like it'll take all afternoon. It actually only takes about 30 minutes. It's the standard driveway bleeding process, just with turning the key on at specific times to bleed the ABS module added in.

I'm not against using special equipment that would be easier and probably faster. I just don't bleed brakes often enough to make it worth me investing in anything like that. Taking 30 minutes to bleed brakes versus 15 every few years isn't gonna alter my life at all.
Hey now, we all buy cool tools that we use once every blue moon, nothing wrong with it. I understand you have your method but every time I’ve bled brakes, it was a hassle. I don’t like a hassle. I like simple and for me, that is a pressure bleeder. It’s already paid for itself in my mind, just keeping me sane and calm while I did both trucks. And knowing that I can and will flush my brakes every couple years because it’s easy and not a hassle makes it pay for itself over and over because honestly, if it weren’t for the Motive, I’d dread that chore so much that I probably wouldn’t do it. Life altering? Come on man you’re killin me! Exactly what tool is life altering except maybe a pacemaker? :lol2:
 

Forum statistics

Threads
129,265
Posts
1,813,016
Members
92,367
Latest member
agmanw8n
Top