Kbuskill's 2008 Burb LTZ "MOD" Thread

Disclaimer: Links on this page pointing to Amazon, eBay and other sites may include affiliate code. If you click them and make a purchase, we may earn a small commission.

Joined
Apr 11, 2018
Posts
6,364
Reaction score
12,490
Location
St. Louis
I've been debating with myself if it'd be better in the top or bottom.

In the bottom it would do like you said and keep the oil condensate in the bottom, but as it fills it will be sitting in the oil and not be doing anything except taking up volume in the bottom reservoir of the can.

In the top it has a greater chance of letting the oil condensate get sucked out through the hose. There isn't much space in the top part of the can, or between the two hose ports for that matter, but then the condensate is heavier and should flow down through the screen and into the bottom.

Who knows? Maybe I'll just leave it as is

2001 Yukon SLT
2012 Yukon XL Denali
2011 Yukon Denali RIP 5/20/18

Sent from my SM-G930V using Tapatalk
 

iamdub

Full Access Member
Joined
Apr 23, 2016
Posts
20,780
Reaction score
44,686
Location
Li'l Weezyana
I consistently drained 2.x ounces at every oil change. I use 3 ounce plastic cups and the oil was right at a molded-in line on the cup every time. Since adding a stainless scrubber pad, the cup is about an 1/8" from the rim. I've had 3 oil changes with the scrub pad and those results have been consistent.

And the term for how the catch can works is "coalesce", not "condense". Different actions.

Oh, I have mine at the top. The way I see it, as long as the outlet path is after the reservoir and the reservoir is after any and all means of coalescing, that's about as good as you can have it.
 
OP
OP
kbuskill

kbuskill

***CAUTION*** I do my own stunts!
Joined
Mar 11, 2017
Posts
5,229
Reaction score
8,115
Location
NE. FL.
I consistently drained 2.x ounces at every oil change. I use 3 ounce plastic cups and the oil was right at a molded-in line on the cup every time. Since adding a stainless scrubber pad, the cup is about an 1/8" from the rim. I've had 3 oil changes with the scrub pad and those results have been consistent.

And the term for how the catch can works is "coalesce", not "condense". Different actions.

Oh, I have mine at the top. The way I see it, as long as the outlet path is after the reservoir and the reservoir is after any and all means of coalescing, that's about as good as you can have it.

Tomato... tomotto... lol
rps20181208_154452_968.jpg
rps20181208_154539_854.jpg
 

iamdub

Full Access Member
Joined
Apr 23, 2016
Posts
20,780
Reaction score
44,686
Location
Li'l Weezyana
Isn't it grand how we just HAVE to analyze simple concepts and complicate everything?! lol

Surely, everything we touch on our rigs can be improved in SOME way with stuff we can get online or have kicking around our garages.

Where my fellow shadetree engineers at up in here?!
 
OP
OP
kbuskill

kbuskill

***CAUTION*** I do my own stunts!
Joined
Mar 11, 2017
Posts
5,229
Reaction score
8,115
Location
NE. FL.
Isn't it grand how we just HAVE to analyze simple concepts and complicate everything?! lol

Surely, everything we touch on our rigs can be improved in SOME way with stuff we can get online or have kicking around our garages.

Where my fellow shadetree engineers at up in here?!

I'm with you.... I try to improve everything I touch if possible.
 
OP
OP
kbuskill

kbuskill

***CAUTION*** I do my own stunts!
Joined
Mar 11, 2017
Posts
5,229
Reaction score
8,115
Location
NE. FL.
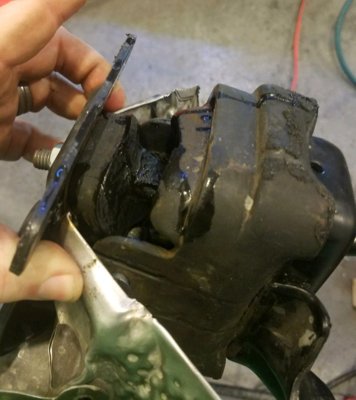
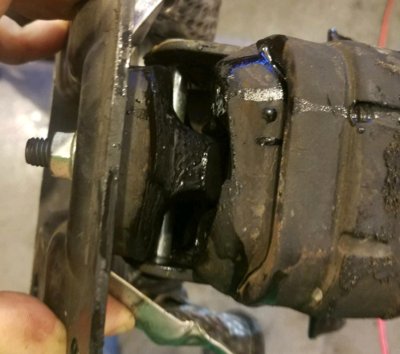
Not what I did but rather what my Brother and 12 year old son did to the Burb today.

1.Replaced drivers side engine mount with the H3 mount.
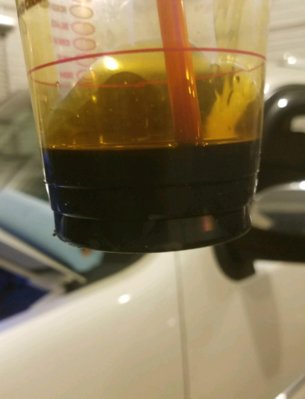
2.Oil/filters changed, catch can drained.
3.Reinstalled my HIDs in the low beams because one of my LED bulbs crapped out.
4.Drained and refilled the rear end with M1 75w90 synthetic.
5.Fixed a leak in one of my air bladders in the rear springs.
6.Replaced 2 bolts and nuts that evidently came out of the lower control arm relocation bracket of the drop kit. Not sure how they came out. Locktite was used when they were installed. Regardless they have been replaced and locktite was used again.
7. All fittings were greased to include upper and lower ball joints, tie rod ends, DJM sway bar end links, Spohn panhard bar end links.
8.Brake fluid completely flushed and refilled with synthetic DOT4 fluid.

I think that was it. I did a lot of supervising... lol
rps20181216_004023_938.jpg rps20181216_004057_988.jpg
I would say this one was shot. It was only about2 years old.
rps20181216_004129.jpg
And the results of my catch cans capture.

I also had them grab me a sample of the used oil to send to Blackstone for analysis.
 
OP
OP
kbuskill

kbuskill

***CAUTION*** I do my own stunts!
Joined
Mar 11, 2017
Posts
5,229
Reaction score
8,115
Location
NE. FL.
As some of you may know I had Morimoto HID low beam bulbs in the Burb and was quite content.

Then @08HoeCD Got busted by "the man" (Virginia DOT inspector) and had to remove all of his aftermarket LED bulbs and replace them with stock lighting in order to pass inspection.

So since he was selling his Supernova V3 for the low beams, and I had been looking to try a pair, I scooped them up.

Fast forward to the other day and the drivers side low beam decided it was tired and didn't want to work any more so it quit.

I looked on headlight revolutions website and saw that they came with a 2 year warranty and I knew that DJ had purchased them in Sept. of 2017. So I called HR and told them what happened and they said no problem they would replace it.

I then told them that the Supernova V4 might not fit because they have a cooling fan instead of the flexible heat sink like the V3s did. So I asked if I could get the replacement in a 9005 (high beam) instead of the H11 (low beam) again... no problem.

Long story short he told me they probably wouldn't arrive until around new years because they were out of stock. I said no problem and went ahead and swapped my Morimotos back into the low beams because we are going out of town for Christmas.

Today I got a package. It was the new Supernova V4 9005s. So I went ahead and checked to see if they fit without modifying the core support and they do... so win win.

https://headlightrevolution.com/supernova-v-3-led-headlights-9005-9145-bulbs/

rps20181218_155207_658-jpg.212547

rps20181218_155229_097-jpg.212548


Here is a pic to show the clearance of the back of the fan to the core support with the headlight installed.
rps20181218_155304-jpg.212549


And a pic of the old V3 to show the heat sink.
rps20181218_155545_913-jpg.212550


I guess I will have to wait until dark to see how I like them. I am happy to.get rid of the old dingy yellow looking high beams though.
 

Forum statistics

Threads
129,253
Posts
1,812,880
Members
92,355
Latest member
Laurents10
Top