Power Stop 1 Click Z23 Evolution Sport Brake Kit Upgrade.
29 March 2015
73K miles
Just finished my 4 corners brake rotors and pads upgrade. Looks really good.
I did a bit of research on the TYF and online then decided to go with the Power Stop 1 Click Z23 Evolution Sport Brake Kit.
This includes a complete set of cross-drilled and slotted rotors and high performance Evolution Sport Carbon Fiber/Ceramic pads.
http://www.powerstop.com/product/power-stop-z16-kit/#y=2006&mk=CHEVROLET&mo=TAHOE 2WD
FRONT : Z23-785REAR : Z23-974A for the 2WD model only. The 4WD model requires a different size rear pad. The drop down menu on Power Stops site will denote as such. I actually ordered via Amazon Prime as it was about $15 cheaper at the time. About $310 for everything which is the price point I wanted to be at.
My buddy offered to give me a hand as he has his own storage unit that he turned into a workshop for his own vehicles with every tool you could need.
Last week we put in a few hours on Sunday afternoon, only to get stumped with stubborn Torx bolts on the front calipers, broke an extension, found out we had the wrong size pads for the rear wheels then decided to regroup.
I ordered a new T55 Torx 1/2" socket driver for more torque from Amazon for $5.00, the correct 2WD size pads, replacement caliper guide pin bolts ($7.50 for a 2 pack from Advance Auto Parts) that have a normal bolt head, not the OEM frustrating Torx heads and we put the Tahoe up on his lift in his shop to have better access to everything from underneath.
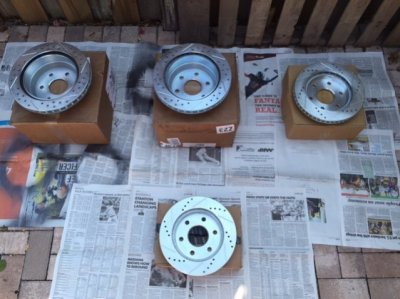
You can see the hardware that came in the kit. Everything needed to do the change over. New rotors, new pads, new clips, new pin bushings (I utilized the OEM rubber boots as they were still in good condition) and high temperature lubricant that was included. Everything was labelled and packed well with installation instructions, break in instructions and the brake pads came in separate boxes with all associated hardware.
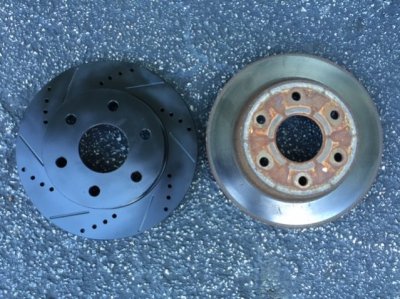
I unpacked the boxes and decided to paint the rotors as per Tony (NorcalSS) thread noted here to help retard the rust. See my OEM rotors for how bad they looked after 73K.
http://www.tahoeyukonforum.com/forum/showthread.php?t=49870
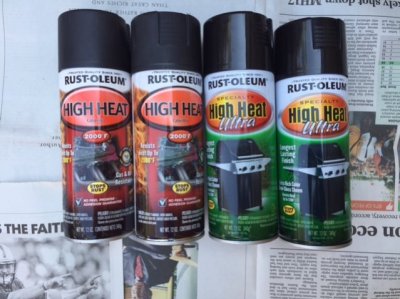
I used high temp Rustoleum with some matte black that I already had on hand for the base coats x 2 front and back and then top coated with 2 more coats of semi-gloss.
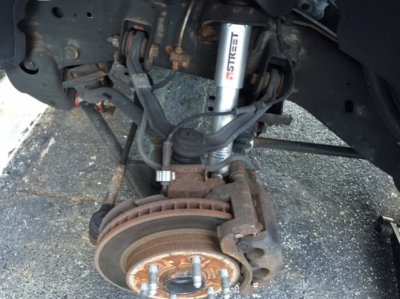
Everything came apart and went back together as it should, double checked and greased as needed. We ditched the Torx bolts for the above mentioned replacement guide pin bolts (even lowered on Tony's 3/5 kit, there is plenty of clearance with the new guide pin bolt heads and the upper control arm), had to bleed off a little brake fluid to retract the caliper pistons to accept the new brake pads. There wasn't a tremendous amount of wear, but the rear rotors did have some rust on the rotor and the pads on the inside of the rotor did not appear to be utilizing the entire rotor for stopping power. The bleed off only turned out to be a minimal amount as even after the break in runs, the master cylinder was still topped off.
I painted the calipers Duplicolor Silver to give them some pop.
After putting everything back together, I headed out for the break in procedure as outlined on the Power Stop box.
5 aggressive decelerations from 40mph to 10mph.
5 moderate decelerations from 35mph to 5mph.
Then I drove around for 5 minutes at low speed with very minimal braking to let the brakes cool off and then returned to my buddy's shop.
**As a further note, all the black spray paint that was on the face of the rotors, was gone after the break in period leaving the rotors clean, but the non-touched areas coated in semi-gloss black.**
The brakes felt better on the way home and they sure look great. There is a better feel on the pedal and at the wheels, but I still think it needs to have the brake fluid and power steering fluid flushed completely as many have noted on the TYF from other brake jobs. I hope to get that taken care of in the next few weeks.


")