Engine cover revived

Disclaimer: Links on this page pointing to Amazon, eBay and other sites may include affiliate code. If you click them and make a purchase, we may earn a small commission.

iamdub

Full Access Member
Joined
Apr 23, 2016
Posts
20,776
Reaction score
44,647
Location
Li'l Weezyana
What I'd like to see is someone modding the stock air intake by cutting baffles and putting that on a dyno test.
Then compare to the high dollar stuff. I did my own intake mod on a 2005 Triumph SpeedMaster and dyno proved I did a better job then the high dollar stuff being sold.
And way cheaper! Not that I'm cheap but you better prove I'm getting what I pay for.

The baffles in the stock system are to keep the noise down as far as I've found.
So no reason we can't just cut them off and patch them with in reason.

What I mean by 'with in reason' is do it in a way that does not create an air dam.
The stock system creates air dams that suck up the sounds you get from the after market systems. Anyone that has done air flow work with flow metering systems understands that effect and why it's used.

I believe it was Black Bear that tested the MIT against the full "cold air" kits. IIRC, the MIT resulted in the most gain or it was a very close second place or something like that. Either way, it was the best bang-for-the-buck method. There is nothing wrong with the factory filter box design. It's already sealed from engine bay heat and the filter flows more than well enough. The only area it could be improved upon performance-wise is the tube between the filter box and throttle body. The "accordion tube" and resonator chambers create turbulence that very mildly affect the flow. As you have found, those resonator tubes ("baffles") are there just for sound cancellation. They are a multiplied fraction of the wavelength of a particular center frequency that resonates and creates a noise above a determined volume threshold. The sound wave travels down the tube, reflects off the end end and travels back. It colliding with itself cancels out the wave and mutes that sound frequency. As with many other aspects on vehicles, the engineers didn't add something just to be dicks and decrease potential power. They sacrificed a negligible amount of power to attain a flexible intake duct that met a volume and sound parameter they figured would appease the average purchaser. For vehicles with an exhaust that drones at a certain RPM, this same measure can be applied. A resonator tube of a calculated length can be added perpendicularly to the exhaust pipe to focus on eliminating that particular drone frequency rather than just further muffling the whole sound range with a larger or different style of muffler.

Deleting the intake resonators in the stock ducting for increased flow is an intelligent and thrifty idea. If you're after a little more flow and power, chances are you're one that wouldn't mind hearing a meatier growl under throttle.

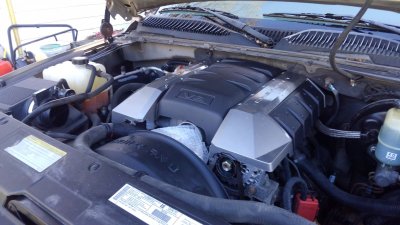
Looked at the Hoe real close to see how it's getting air. I'll be adding a wing to the area near the front wheel to scoop in more air. It's actually in a near dead air space as it is and if I put the front dam on? It will be worse!

I'd bet that this is yet another engineered sacrifice. Sure, what could essentially be a "ram air" intake could produce a minimal power increase at speed. It was probably decided against for aerodynamic purposes and to reduce the chance of water intrusion from rain or leading cars splashing up puddles. Having it ducted in from a dead, but safe place was the compromise.
 
Last edited:

Jeff Groves

Retired Demo Expert. I don't need to run anymore!
Supporting Member
Joined
Mar 26, 2019
Posts
520
Reaction score
551
Location
Nevada, Ohio
Fantastic way to state it Mate. :winner_first_h4h:

Now. I stumbled on a part in my basement work shop that makes the rear attachment problem easier!
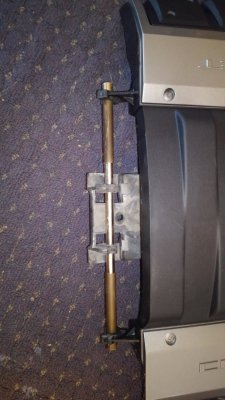
I found a brass rod that fits the attachment areas on the new cover and the mount on the engine! So I cut a piece off and tested it. All I need to do is drill new holes in the engine mount to move it forwards just a bit!
 

Jeff Groves

Retired Demo Expert. I don't need to run anymore!
Supporting Member
Joined
Mar 26, 2019
Posts
520
Reaction score
551
Location
Nevada, Ohio
The brass rod fits the Camaro cover perfectly but is a little large for the stock mount on the engine.
So it's into the basement to turn it down on the lathe.
 

Jeff Groves

Retired Demo Expert. I don't need to run anymore!
Supporting Member
Joined
Mar 26, 2019
Posts
520
Reaction score
551
Location
Nevada, Ohio
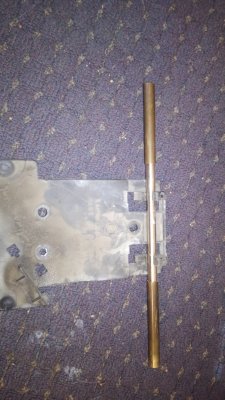
So here's the rod turned down to fit the stock mounts.
brass.JPG

The rod was scrap I brought home and now I know why I kept it. I could have made the part out of Delrin rod.
I was actually looking for some stainless steel rods I have around somewhere.
 
Last edited:

Jeff Groves

Retired Demo Expert. I don't need to run anymore!
Supporting Member
Joined
Mar 26, 2019
Posts
520
Reaction score
551
Location
Nevada, Ohio
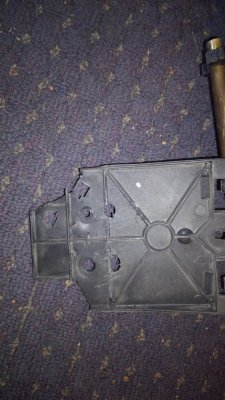
Now the stock mount is made to be idiot proof. I had to remove ribs on the bottom to slide it forwards.
I used the proven scientific method of grabbing them with channel locks and snapping them off.
They were made in Canada so what the hell.
idiot-proof.JPG

Also cut the corners to clear the wiring better.
 

Jeff Groves

Retired Demo Expert. I don't need to run anymore!
Supporting Member
Joined
Mar 26, 2019
Posts
520
Reaction score
551
Location
Nevada, Ohio
Working on the front mount now. I've got a few more measurements to get but I'll be making a bracket that bolts to the original mount for the old cover. That bracket will span from side to side and a couple SS bolts will hold it on each side.
Those bolts will be in the places where fake bolts are now so It will blend very nicely.
The bracket will be made out of 2" x 1/8" mild steel and then bent and cut as needed.
I have a nice bender in the basement work shop.
 
Last edited:

iamdub

Full Access Member
Joined
Apr 23, 2016
Posts
20,776
Reaction score
44,647
Location
Li'l Weezyana
Working on the front mount now. I've got a few more measurements to get but I'll be making a bracket that bolts to the original mount for the old cover. That bracket will span from side to side and a couple SS bolts will hold it on each side.
Those bolts will be in the places where fake bolts are now so It will blend very nicely.
The bracket will be made out of 2" x 1/8" mild steel and then bent and cut as needed.
I have a nice bender in the basement work shop.

Nice that you found a way to not drill a hole in the front center of it. :thumbsup:

If I ever run across a Camaro cover for cheap, I'm gonna jock your entire project.
 
Top