BADRIDES
Full Access Member
- Joined
- Dec 18, 2015
- Posts
- 1,825
- Reaction score
- 1,278
FINALLY!!!!!!! Exact wheel I would have put on there. That has always been my favorite GM wheel if they are OEM or replicas
Disclaimer: Links on this page pointing to Amazon, eBay and other sites may include affiliate code. If you click them and make a purchase, we may earn a small commission.
@BADRIDESFINALLY!!!!!!! Exact wheel I would have put on there. That has always been my favorite GM wheel if they are OEM or replicas

 dura-coating.com
Looks great and I hope you have better luck with the Dura Dressing than I did. DO NOT let it get on your new wheels cause it's he!! getting off. Shine is nice but I didnt like having to be so dern careful applying it.
That there is a mystery. And that wheel too...He was perplexed and why he thought it was the wheel being loose, as the bearing was replaced 1 year ago and a bit? The interior was pretty hum-hum loud at those speeds. My daughter and wife even complained lol, which above their chatter and always loud music, is truly amazing that they would complain about the truck being noisy lolol..Wow. Crazy how this rig goes through wheel bearings so fast. Wonder why that is?
@PG01I wonder, is it the side that you were unable to debadge? Maybe that little fender bender knocked something outta whack in the front suspension leading to it eat up bearings?
After that PDR, I seriously felt like we were driving a brand new rig at that point.@PG01
Good thought but doubtful. It was such a low speed impact and happened behind the A pillar and in front of the C pillar, never hitting the panels in front or behind those pillars. I can't imagine any alignment or weirdness would be causing it, but good thought. If you did not know, you would not know that there used to be a dent there. @07Burb PDR guy did a killer job!
Exactly! Hard pressed to believe that the long body is 13 years old!!After that PDR, I seriously felt like we were driving a brand new rig at that point.

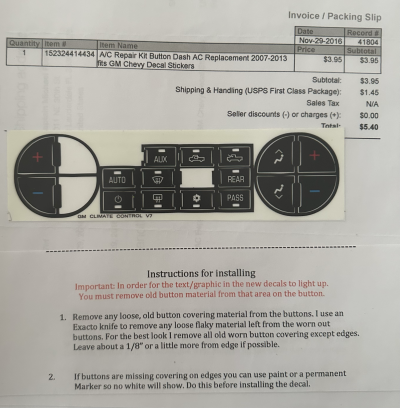
I need to do that to my son's truck but what is the prep work like?Had these stickers since 2016. eBay special < $6.
Tackled this massive project this morning while it was raining.
Recirc button looks new again. Did the fan buttons a few years ago.
Looks like the driver’s side cold - will be next. I’ll allow it for now.
View attachment 467869
‘Bout timeHad these stickers since 2016. eBay special < $6.
Tackled this massive project this morning while it was raining.
Recirc button looks new again. Did the fan buttons a few years ago.
Looks like the driver’s side cold - will be next. I’ll allow it for now.
View attachment 467869

@BADRIDESI need to do that to my son's truck but what is the prep work like?
I'll rephrase...I had stickers in the build binder since 2016. The recirc button has been/was missing paint since.... IDK 2020-2022? Mystery....TBD....‘Bout time

How well does the light shine through the sticker at night?@BADRIDES
Here are the stickers. I took an Exacto knife, scraped off the OEM paint, leaving the edges (maybe 1mm?) so no bleed thru. Or if the paint is already gone to the edges, just Sharpie it before you apply the sticker.
You can pull it off and reapply if it is not straight. The stickers are so small and getting the edges to line up perfectly took a few tries. I used the magnifier on my iPhone to see it properly.
You can see I've used 3 stickers. The rest of the buttons are still in good shape.