02 Base for my son

Disclaimer: Links on this page pointing to Amazon, eBay and other sites may include affiliate code. If you click them and make a purchase, we may earn a small commission.

Sam Harris

Elite Member
Supporting Member
Joined
Sep 26, 2018
Posts
7,445
Reaction score
14,977
Location
Texas
A week ago I bought an LED light strip for my 3rd brake light just like @Speedslow. My factory LED only lights up on the drivers side and the other half is dead.
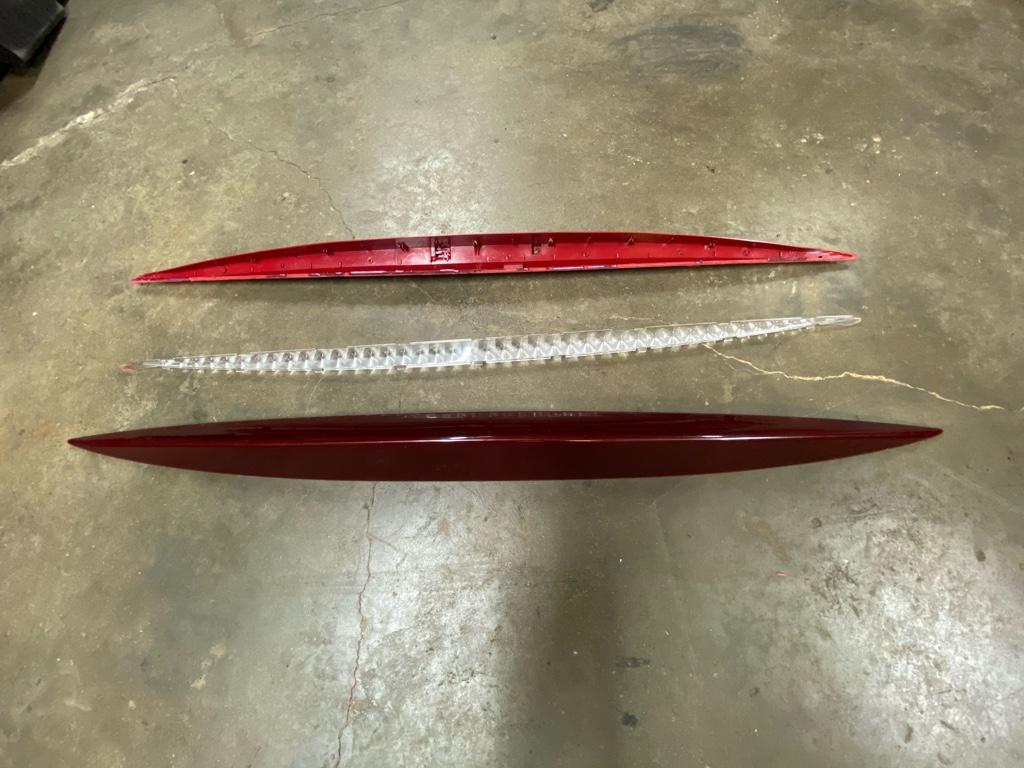
Today after work I didn’t feel like doing anything that requires me to stand, lift or move anything heavy or just think for that matter. I’m tired. I can’t sit around and do nothing so I tackled the 3rd brake light. Tried using a heat gun to separate the housing with no luck. This thing is like glued together and was never designed to take apart. I ended up scoring it with a utility knife over and over and over and over and over again. It took me about 3 hrs to get this thing apart and at the end I was getting medieval on that thing but I got it apart without breaking it.
1ac0c047e990ac49b4e949bc81deee31.jpg


I wanted to see what the issue is before I just replace it with a $30 light strip. I found the issue, a bad solder on the power wire going to the passenger side.
4634a2f7c18686b868795259a01b6900.jpg


I fixed the solder joint and now it works.
a81f23894b06e15e280dcc7febc822db.jpg

2ea78686b29fe1d6f20a7838d325a0d1.jpg


So now my dilemma is, do I leave it as is or do I put the new light strip in. I do like the sequential turns and flashing stop but I don’t want to do this again if the $30 light strip fails. Here’s Speedslow video if you guys haven’t seen it.


What do you think? I could possibly put the sequential light strip in and just leave the factory light strip unplugged. If the one goes out I could just plug in the factory again. I’d have to mount the strip so it doesn’t block the other light and I’m not sure if I can do that but I can try I guess. Or just leave the factory light? Thoughts/feedback?


Sent from my iPhone using Tapatalk
For me, the new strip is too busy. I like the simple, factory style. But you should use the one you like.
 
OP
OP
Snowbound

Snowbound

Jim
Joined
Nov 23, 2016
Posts
1,058
Reaction score
2,496
Location
Chicagoland (Lockport)
Looks like the consensus is to use one or the other or both, or maybe just use the one you like most, or maybe don't. But you should definitely use one of them at least.
I think your right! [emoji23][emoji1787]

There’s no way the strip could go in without blocking the factory lights.

b1432a0effa0c0fa12340f6975bc2ca5.jpg


b8828871afb389b490db879034046c8d.jpg


What makes it harder is the adhesive strip is on the front so you’d have to attach it under the clear lens or on the red outside lens. But having under the clear lens would be more secure if it came loose and wouldn’t flop around and possible lay face down.

Of course, I’m not geared that way. I’ll make it work with both strips because that’s what I do.
Time to cut this thing open and see what I have to work with.
7eef9ffa800192ac10bc0a96a45cc442.jpg


The backside of this strip doesn’t have any contacts or ribbon exposed but I still added some electrical tape to it for added insurance. Then I put in it on top of the factory lights so they will still work if I decide to go back to factory if this one fails. I might even try both at same time so I have the brake light while the sequential turn is going. But I’m not sure how that will look with just hitting the brakes because one will light solid where the other will strobe before going solid. [emoji848]
a434ba639a0a2d1d12086132e5b8b5ae.jpg


Securing it was simple enough. When duct tape doesn’t work, zip ties will.
21d928aaa4ecb7acab58ab556e8c15fd.jpg


Put the clear lens back in and loosely set the red lens over it to test it out. I only tested the new strip because I know the factory will still shine like it’s suppose to.
e06e21b89518546a8f1548b18a3869e2.jpg


Picked up some Loctite plastic bonding 2 part something or other. Never used it before but what’s the worst that can happen? Lens falls off and get run over?
b045422eb57561a2b5e78df13fac4814.jpg


This stuff sets up in 20 minutes but doesn’t fully cure for 24hrs so I had to work fast. What sucks is it doesn’t have a mixing tube, you gotta put it on a piece of cardboard and mix it like you do epoxy. So getting it from the mixing board to the lens was time consuming. I did it with a small screwdriver and then set the lens on and used some squeeze clamps. I’ll leave it until 2mrw. Once cured I’m not sure if I wanna seal it with silicone or I was thinking maybe use a hot glue gun.
d8d177be92774e9233d42af449aeab89.jpg


Done for now. I’ll report back how this stuff bonds and holds.


Sent from my iPhone using Tapatalk
 
Last edited:

adventurenali92

Full Access Member
Joined
Feb 16, 2015
Posts
7,737
Reaction score
9,210
Location
Big Bear Lake, ca
Not gonna lie, I don’t like the look of the factory light behind the strip. It just looks odd and like there’s too much going on. But if you like it roll with it!
 

Tonyrodz

Resident Resident
Joined
Feb 16, 2012
Posts
33,328
Reaction score
51,796
Location
Central Jersey
I think your right! [emoji23][emoji1787]

There’s no way the strip could go in without blocking the factory lights.

b1432a0effa0c0fa12340f6975bc2ca5.jpg


b8828871afb389b490db879034046c8d.jpg


What makes it harder is the adhesive strip is on the front so you’d have to attach it under the clear lens or on the red outside lens. But having under the clear lens would be more secure if it came loose and wouldn’t flop around and possible lay face down.

Of course, I’m not geared that way. I’ll make it work with both strips because that’s what I do.
Time to cut this thing open and see what I have to work with.
7eef9ffa800192ac10bc0a96a45cc442.jpg


The backside of this strip doesn’t have any contacts or ribbon exposed but I still added some electrical tape to it for added insurance. Then I put in it on top of the factory lights so they will still work if I decide to go back to factory if this one fails. I might even try both at same time so I have the brake light while the sequential turn is going. But I’m not sure how that will look with just hitting the brakes because one will light solid where the other will strobe before going solid. [emoji848]
a434ba639a0a2d1d12086132e5b8b5ae.jpg


Securing it was simple enough. When duct tape doesn’t work, zip ties will.
21d928aaa4ecb7acab58ab556e8c15fd.jpg


Put the clear lens back in and loosely set the red lens over it to test it out. I only tested the new strip because I know the factory will still shine like it’s suppose to.
e06e21b89518546a8f1548b18a3869e2.jpg


Picked up some Loctite plastic bonding 2 part something or other. Never used it before but what’s the worst that can happen? Lens falls off and get run over?
b045422eb57561a2b5e78df13fac4814.jpg


This stuff sets up in 20 minutes but doesn’t fully cure for 24hrs so I had to work fast. What sucks is it doesn’t have a mixing tube, you gotta put it on a piece of cardboard and mix it like you do epoxy. So getting it from the mixing board to the lens was time consuming. I did it with a small screwdriver and then set the lens on and used some squeeze clamps. I’ll leave it until 2mrw. Once cured I’m not sure if I wanna seal it with silicone or I was thinking maybe use a hot glue gun.
d8d177be92774e9233d42af449aeab89.jpg


Done for now. I’ll report back how this stuff bonds and holds.


Sent from my iPhone using Tapatalk
I'd go with silicone. You'll be able to go thin, and smooth it out with your finger--and can squeeze it into any cracks if need be. Not so much with a glue gun, plus when it's liquid hot, it's HOT!
 
OP
OP
Snowbound

Snowbound

Jim
Joined
Nov 23, 2016
Posts
1,058
Reaction score
2,496
Location
Chicagoland (Lockport)
Not gonna lie, I don’t like the look of the factory light behind the strip. It just looks odd and like there’s too much going on. But if you like it roll with it!
The factory light is below the new strip and the pic with it lit up was only the new strip. It looked busy because the clear diffuser lens and the outside lens were only sitting on top and not where they needed to be. I’ll show a video 2mrw after I get the lens sealed up, tinted and put back on. If it still looks busy or chaotic, I can just unplug it and plug the factory back in and you’ll never know it’s there. I appreciate all feedback, thanks.


Sent from my iPhone using Tapatalk
 
OP
OP
Snowbound

Snowbound

Jim
Joined
Nov 23, 2016
Posts
1,058
Reaction score
2,496
Location
Chicagoland (Lockport)
I'd go with silicone. You'll be able to go thin, and smooth it out with your finger--and can squeeze it into any cracks if need be. Not so much with a glue gun, plus when it's liquid hot, it's HOT!
Yeah, that’s the route I’m gonna take. I was just concerned about this plastic bonding stuff but it really seems like it’s solid. I was just thinking that the hot glue gun might help with strength as well as seal it. Clear silicone it is!!


Sent from my iPhone using Tapatalk
 
OP
OP
Snowbound

Snowbound

Jim
Joined
Nov 23, 2016
Posts
1,058
Reaction score
2,496
Location
Chicagoland (Lockport)
My furnace motor showed up Tuesday while i was at work so yesterday i had to install that before work. Got it all back together and the damn motor didn’t spin!! I got it to work today before I had to leave for work but it’s not spinning fast. Still need more testing but that’s another story.
I figured i would be able to get the housing sealed up and put on at work but I walked into a nightmare yesterday. Our big quarry pump needed to be rebuilt and it was not fun. Didn’t get that back together until 9:30pm last night and I was beat.
49e347996295f4e1d8be1ce9301d12c7.jpg

451b1a0459265f9654bc88c900c0b617.jpg


So today I got the housing sealed, installed and wires ran. Didn’t have time to wire it in yet and I’m heading back up north 2mrw so it’ll have to wait until next week. But I did plug the factory light back in so at least I have my 3rd brake light again.
032db3a01f85c0c322931d4136a892d6.jpg

64cb95cb8ea28d37a5e659b14629d352.jpg

23c8f03e0d4647ed84b42e7cc110d209.jpg


I have to test that 12v outlet and see if it is a keyed power source. I hope it is because that’s what I intend to use to power this light. If it isn’t keyed, I’ll find out where it is at fuse block and splice in a relay so it is a keyed source. It’s either that or use my tail light power but I don’t know if that is hot with DRLs or only when it’s dark. Need to look at wiring schematic.
To be continued.........


Sent from my iPhone using Tapatalk
 

Tonyrodz

Resident Resident
Joined
Feb 16, 2012
Posts
33,328
Reaction score
51,796
Location
Central Jersey
My furnace motor showed up Tuesday while i was at work so yesterday i had to install that before work. Got it all back together and the damn motor didn’t spin!! I got it to work today before I had to leave for work but it’s not spinning fast. Still need more testing but that’s another story.
I figured i would be able to get the housing sealed up and put on at work but I walked into a nightmare yesterday. Our big quarry pump needed to be rebuilt and it was not fun. Didn’t get that back together until 9:30pm last night and I was beat.
49e347996295f4e1d8be1ce9301d12c7.jpg

451b1a0459265f9654bc88c900c0b617.jpg


So today I got the housing sealed, installed and wires ran. Didn’t have time to wire it in yet and I’m heading back up north 2mrw so it’ll have to wait until next week. But I did plug the factory light back in so at least I have my 3rd brake light again.
032db3a01f85c0c322931d4136a892d6.jpg

64cb95cb8ea28d37a5e659b14629d352.jpg

23c8f03e0d4647ed84b42e7cc110d209.jpg


I have to test that 12v outlet and see if it is a keyed power source. I hope it is because that’s what I intend to use to power this light. If it isn’t keyed, I’ll find out where it is at fuse block and splice in a relay so it is a keyed source. It’s either that or use my tail light power but I don’t know if that is hot with DRLs or only when it’s dark. Need to look at wiring schematic.
To be continued.........


Sent from my iPhone using Tapatalk
Just can't catch a break!
 

05Single

afraid of the dark
Joined
Feb 26, 2015
Posts
8,244
Reaction score
11,648
Nice work on the light . I was gonna recommend silicone or retrorubber. But looks like you got it figured out .

I was curious how the line-of-fire would look in that housing for a full output but with no individual leds for a seamless look.
063046BB-1D34-4462-84BF-C296B0594B9C.jpeg
 
OP
OP
Snowbound

Snowbound

Jim
Joined
Nov 23, 2016
Posts
1,058
Reaction score
2,496
Location
Chicagoland (Lockport)
Haven’t gotten anything accomplished. Been working 3p-3a and having to get up at 8am to get the daughter going on this e-learning crap. It’s a full time job in itself. I didn’t realize I was going to have to sit there with her while doing the schooling on zoom. This is crazy! I can’t keep going like this and get anything done on this house to get it ready to sell.

I went back up to northern Wisconsin a few weeks ago and I did manage to get a few things done. All new wiring and color matched like it should be and no more corrosion clips on wires! Those stupid wire piercing clip on splices suck!

The LED lights make a world of difference.

fea631bbf26bbc37a8eb4184340c7910.jpg

d0f570e4d8993e3fbae93e2b34f32629.jpg


Installed a spare tire holder up in the front. Just an x-clip bracket with a stud to secure the spare. At least it’s not in the way any longer and won’t bounce around.
78fc540b8ce6d26fb85a7165a4fcd5c6.jpg


I removed those ugly Ski-Don’t decals from the inside walls and it’s getting a white paint job to get me by this winter. I don’t have the time nor the energy to pull all the panels, insulate the walls and ceiling and install FRP panels this year. But it will get done next summer.

New junction boxes installed, one at the front to make my connections and one at the rear. Makes it easier to diagnose any problems should they arrive and also any add-ons that may happen. Hint* exterior flood lights and motion light.
d98ba0fd0a999aefbdd34c91b7b05881.jpg

c9263ff8b0ad0ea957cb16fe5cb4e0de.jpg


Pulled a wheel to inspect the brakes and get some numbers off seal and bearings. It looked ok. As much as I want to throw new brakes on there, I’m gonna let it go another year. No pics, my brother did that part for me. But I did order all new bearings and seals so that will get done this weekend when I go back up.

I did find a screw in a tire so we put the spare on and I brought the wheel home with me. I just grabbed a new tire today and dropped it off with the wheel and tire at my dad’s so he can bring it to the school and mount and balance it. Hopefully he knows to throw a new valve stem in also. I’m sure he does.

I wanted some reverse lights on there so I cut the holes and put some clear LED lights in. I put the clear ones where the park/stop/turn lights were and mounted them higher. The backup camera has night vision but it’s good to let others know your backing and also can see a little better when looking down the sides thru the mirrors.
ef6f5594be63bbc452224d596ffb0f66.jpg


So this weekend my plan is pack new bearings, new seals, paint the interior walls, install electric tongue jack, make some sort of hinge for the rear ramp door transition flap and then drag this thing home to use it to move my parents out and my stuff into their house.
Besides the trailer, I have to get oil and filter changed on my sled, change the chaincase oil, im adding some stiffening plates to the skid, chasing down no power issue to my USB ports, grease job, track tension and alignment and pulling the clutch to bring it home for a rebuild and upgrade. Then on Jacks sled I have to fix a chaincase leak, adjust his track, and grease it. Josh might be driving that this year if he can get his snowmobile license with all this Covid shit going on. I’m gonna grab another sled this year to add to the arsenal. I found an 07 Yamaha Nitro that I think Jack will do good on and it’ll double as a sled for Jess to ride on the occasions she comes up. We are running out of room again for sleds so maybe a 3rd garage? Or I might get a shipping container to store the majority of our toys in. I don’t see that portable garage/tent lasting more than one season.

That’s where I’m at. If I don’t get a chance to check back in I hope everyone has a safe and wonderful Labor Day weekend.


Sent from my iPhone using Tapatalk

 
OP
OP
Snowbound

Snowbound

Jim
Joined
Nov 23, 2016
Posts
1,058
Reaction score
2,496
Location
Chicagoland (Lockport)
Gonna stop and take a look at it while we are heading up on Friday. If I buy it, I’ll pick it up on my way home Monday since I’ll have the trailer.
7f9734f62cc837bc1d7fd3f583c2ec99.jpg

3a32ce9b04fd63d01dc97c35cbdfe115.jpg

6e2a4d750a82ba8d4a20fdc5df2fc3bc.jpg


I almost bought one of these brand new in 07. I think it will be perfect for Jack and Jess. Little bit more power than he should have, about 130hp, but I think he will be fine because he only rides with us as a group. Yeah, my kids are spoiled but they know it can be taken away faster then it was given.


Sent from my iPhone using Tapatalk
 

Tonyrodz

Resident Resident
Joined
Feb 16, 2012
Posts
33,328
Reaction score
51,796
Location
Central Jersey
Haven’t gotten anything accomplished. Been working 3p-3a and having to get up at 8am to get the daughter going on this e-learning crap. It’s a full time job in itself. I didn’t realize I was going to have to sit there with her while doing the schooling on zoom. This is crazy! I can’t keep going like this and get anything done on this house to get it ready to sell.

I went back up to northern Wisconsin a few weeks ago and I did manage to get a few things done. All new wiring and color matched like it should be and no more corrosion clips on wires! Those stupid wire piercing clip on splices suck!

The LED lights make a world of difference.

fea631bbf26bbc37a8eb4184340c7910.jpg

d0f570e4d8993e3fbae93e2b34f32629.jpg


Installed a spare tire holder up in the front. Just an x-clip bracket with a stud to secure the spare. At least it’s not in the way any longer and won’t bounce around.
78fc540b8ce6d26fb85a7165a4fcd5c6.jpg


I removed those ugly Ski-Don’t decals from the inside walls and it’s getting a white paint job to get me by this winter. I don’t have the time nor the energy to pull all the panels, insulate the walls and ceiling and install FRP panels this year. But it will get done next summer.

New junction boxes installed, one at the front to make my connections and one at the rear. Makes it easier to diagnose any problems should they arrive and also any add-ons that may happen. Hint* exterior flood lights and motion light.
d98ba0fd0a999aefbdd34c91b7b05881.jpg

c9263ff8b0ad0ea957cb16fe5cb4e0de.jpg


Pulled a wheel to inspect the brakes and get some numbers off seal and bearings. It looked ok. As much as I want to throw new brakes on there, I’m gonna let it go another year. No pics, my brother did that part for me. But I did order all new bearings and seals so that will get done this weekend when I go back up.

I did find a screw in a tire so we put the spare on and I brought the wheel home with me. I just grabbed a new tire today and dropped it off with the wheel and tire at my dad’s so he can bring it to the school and mount and balance it. Hopefully he knows to throw a new valve stem in also. I’m sure he does.

I wanted some reverse lights on there so I cut the holes and put some clear LED lights in. I put the clear ones where the park/stop/turn lights were and mounted them higher. The backup camera has night vision but it’s good to let others know your backing and also can see a little better when looking down the sides thru the mirrors.
ef6f5594be63bbc452224d596ffb0f66.jpg


So this weekend my plan is pack new bearings, new seals, paint the interior walls, install electric tongue jack, make some sort of hinge for the rear ramp door transition flap and then drag this thing home to use it to move my parents out and my stuff into their house.
Besides the trailer, I have to get oil and filter changed on my sled, change the chaincase oil, im adding some stiffening plates to the skid, chasing down no power issue to my USB ports, grease job, track tension and alignment and pulling the clutch to bring it home for a rebuild and upgrade. Then on Jacks sled I have to fix a chaincase leak, adjust his track, and grease it. Josh might be driving that this year if he can get his snowmobile license with all this Covid shit going on. I’m gonna grab another sled this year to add to the arsenal. I found an 07 Yamaha Nitro that I think Jack will do good on and it’ll double as a sled for Jess to ride on the occasions she comes up. We are running out of room again for sleds so maybe a 3rd garage? Or I might get a shipping container to store the majority of our toys in. I don’t see that portable garage/tent lasting more than one season.

That’s where I’m at. If I don’t get a chance to check back in I hope everyone has a safe and wonderful Labor Day weekend.


Sent from my iPhone using Tapatalk
You def have your hands full! Trailer looking good too.
 
OP
OP
Snowbound

Snowbound

Jim
Joined
Nov 23, 2016
Posts
1,058
Reaction score
2,496
Location
Chicagoland (Lockport)
Quick update. Traffic was horrible heading up on Friday. Bumper to bumper at times. Called guy with sled and told him I’m running late and he asked if we could postpone until after the holiday because he was going out of town. I told him I would rather try again on Monday late afternoon if possible because I would have trailer and be coming back past his town on my way home. Didn’t work out so I’ll have to make a special trip to look at it one of these days. In my non existent spare time. We had the trailer loaded down with treated lumber anyway. Long story short, we brought a shit load of lumber up to build 2 decks and didn’t use anywhere near what we had so my brother wants to build a deck so we figured bring that wood back home since we can’t burn it and it’ll just sit there anyway. The load had my 2500HD rear springs flat. She rode good but I could tell the load was back there. My brothers Ram 1500 eco diesel couldn’t handle it. Sat his suspension right down on the bump stops!
Anyway, took me 6hrs and 38 minutes to go 330 miles which usually only takes 5-1/2 hrs with 2 short stops for fuel, potty and food. Home took just under 7 hrs. Holiday weekends suck.
Took 2 heavy coats of primer to cover the yellow and orange paint on interior walls of trailer. Then one good coat of paint and it’s white now. So happy that’s done.
94a21562c75563cba3506178389b67cc.jpg


4679699bd34244d93c4eb3c83c38be9f.jpg


Finished paint and brother put another strip of LEDs down each side. Stupid bright in there now. Just have to get that ugly decal off the cabinet up front.
64f2778179496ef67a2a522a156baf09.jpg


Figuring out what my plan is for floor. I’m gonna clean it and coat it in epoxy but I need to make up my mind on what ski guide and track system I want to use to keep the carbides from ruining the floor. Then I need to attach a transition flap on the drop down door because the original piano hinge broke and we just used a 2x10 last year but I need to attach something permanently. Coming soon.

The weather was great all weekend. High 60’s low 70’s and got down to 30° Saturday night. Got my oil and filter changed on sled, chain case oil and repaired my USB ports and added a few LED lights for nighttime trail side visibility. Found a cracked oil injection tank on the old Jag. That’s proving impossible to find, one I found they want $80 plus $10 shipping. That’s almost what I paid for the sled. I might try that plastic epoxy stuff to repair the plastic tank.
e8a3d10d90309e8039f4b1e9a2183cbf.jpg


Sent from my iPhone using Tapatalk
 
OP
OP
Snowbound

Snowbound

Jim
Joined
Nov 23, 2016
Posts
1,058
Reaction score
2,496
Location
Chicagoland (Lockport)
Dealing with this HVAC company still. I tell them that I can’t get any speed out of the motor they sent me and they are telling me it should be fine. I’m getting pissed and aggravated every day because they either won’t or can’t tell me what wire on the module needs to get 24v in order to speed the motor up. Then I send them pictures of my module and they tell me I ordered the wrong motor. The part number is right there on the motor, so I don’t know what they are talking about. Here’s what I’m dealing with.
54dd326544313a1fc2fcf7caf4e7b6d0.jpg


9d3843d27218827cf83c07fe9d8ba059.jpg


489df8ef27f87e0bb4292753fb5ee4eb.jpg


799174952fc523b866b9b510185ed2c7.jpg


So I guess now I have to send this POS back to them, wait 6 weeks for a refund and in the meantime find another replacement. If it weren’t for bad luck....
So that’s on my priority list right now. I might even find some capacitors and just solder them in and get this old unit back up and running. I’m getting out of this house in a few months anyway. I’m overwhelmed by all the stuff I still need to do before I can sell this house. Not to mention painting and replacing carpets at my parents before moving in. I promised Jess new bedroom furniture and couch too. Kicking myself for that considering how much this move is already gonna cost me. I’m looking at $38k to tear down the 2-1/2 car garage and put up a 46x32 4 car with lift after all the concrete and materials. I’m running out of time and weather to make it happen. That price also includes tearing out bushes at end of driveway and making it double wide all the way to street.
Circled in white are the bushes that will be coming out.
4702138464d77da9c362b161cc3d30d7.jpg


And above pic you can see the garage with attached shed. New garage will be almost across the entire width of back yard and 6’ deeper. Right now it’s 28x28.

Better view of the bushes that are coming out. I don’t understand why he didn’t do a double wide driveway when he did the concrete driveway about 10 years ago. And my dad is goofy about trees and shade. A lot of that is getting chopped down when I get settled in.
85d498bc702202813cf6f7a6095dc252.jpg

186d3d1373617c8437df6580c87148bf.jpg


Sent from my iPhone using Tapatalk
 

Tonyrodz

Resident Resident
Joined
Feb 16, 2012
Posts
33,328
Reaction score
51,796
Location
Central Jersey
Damn! You're a busy dude. When do you sleep?? Trailer is coming out great. I've always said I'll rest when I'm dead lol. At least you'll have a nice big garage--once you build it--with a lift. That's always been my dream. Hopefully by this time next year you'll be lounging, or working in your new garage.
 
OP
OP
Snowbound

Snowbound

Jim
Joined
Nov 23, 2016
Posts
1,058
Reaction score
2,496
Location
Chicagoland (Lockport)
Since this rig is sitting on stands until new rims come in at the end of the month, I decided I need to get some of these new parts installed. I’ll post a picture of the new rims on the other build when I’m done here.

I pulled the brake caliper, bracket and then removed the diff cover and pulled the c-clips. Slid the axle out and then removed the 4 bolts holding the backing plate and support bracket. Rusty mess.
f056ab1385e8db2088795b400f34c661.jpg


Just to give details on how the axle bearings come out, this is how the tool works. The end folds over and you slide it thru the bearing after removing the seal.
9e7a4675e761d7ffe1065c3fe1e4da30.jpg

d0da7f7d611341066cafbf0c64faf967.jpg


Tighten the washer and nut up against the bearing and use a slide hammer to pull the bearing out of the axle tube. Simple job when you have the tools to do it.
c3c8db84f7dc380b82cec4921983b17a.jpg

5b2fb88604796fd5ee070bd2f4a10837.jpg

e81250ece7dbb92438a7c0185e752632.jpg


New Yukon bearing and seal.
9365f41799a16d2896abea893bf75559.jpg


To install the new bearing I just use a seal/bearing driver and it goes in without issue. There’s a lip on the inside of the tube so it’ll stop and you don’t have to worry about setting the depth. Just go until it stops.
d4ada47b010b3a346502191d17817f50.jpg


When installing the seal, I always use this anaerobic gasket maker to help it seal. The seals come with a coating and I’ve seen them seal without any help but I always do it for added insurance.
722c1cf61dcb3ce988e7fc56125f741f.jpg

2de3af17ffed94fbb82d6a360e42cd53.jpg

7a373bf26dbdf6dfd33c8cf575d0c6fc.jpg


I ran the parking brake bracket thru the sandblast cabinet and spray bombed it. I can’t stand the rust. I even did the bolts while I was at it.
1d9b298c03cd7e2401f54e7456fbbef6.jpg


4c3acb672d2775204ccc43d2b1a1d3be.jpg


Next I installed the parking brake arm and new boot onto the bracket and then put the backing plate and bracket on.
a7f7335c0a962ad81c03b3e76d6eb9bd.jpg

12441f6b13c815b0904f15a62d68b500.jpg


Next was the clip for the adjuster.
7de1ffd200f5278908aff54a3aaa0959.jpg


As you can see above, I used white lithium grease on the adjuster sleeve.
This was the adjuster I ordered when I ordered all the parking brake and backing plate parts. It’s wrong and I knew it when it came.
2dc06b144b5cdf4eef19a974690039ce.jpg


The correct parts for adjuster.
bdfe85dada3d517575bea03bdf31edb5.jpg


This is how it goes together. One for each side.
47525f579e8311b3d03e20fc869e7860.jpg


Sent from my iPhone using Tapatalk
 

Forum statistics

Threads
138,047
Posts
1,997,846
Members
102,985
Latest member
TexasTaz
Back
Top