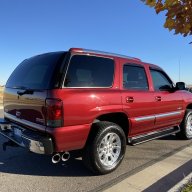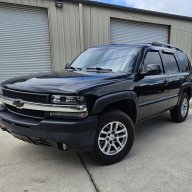
2003 z71 tahoe

Disclaimer: Links on this page pointing to Amazon, eBay and other sites may include affiliate code. If you click them and make a purchase, we may earn a small commission.

OP
OP
ncalvo

ncalvo

Full Access Member
Joined
Jun 17, 2019
Posts
243
Reaction score
657
Location
FL
Next projects to knock out in the next couple..
Minor patching on the passenger rocker with a cover
2500hd conversion new front bumper/bumper pad/grille, may get some black foglights
tint the windshield and rear hatch glass
clay bar/polish/wax

not in a rush for these next ones but have them on the radar for later this year or next..
new gm exhaust manifolds, gaskets, bolts.. I have two broken bolts.. going to have a shop do it.. may have them do motor mounts at the same time
new maf sensor, starter, oil pan gasket, pick up tube o ring, oil level sensor, crankshaft sensor
I got a nylon fuel line kit off ebay, will replace the original lines and also new fuel pump
Replace the remaining brake lines from the kit I have
 

Scott in AZ

Full Access Member
Joined
Mar 23, 2023
Posts
194
Reaction score
363
Location
Arizona
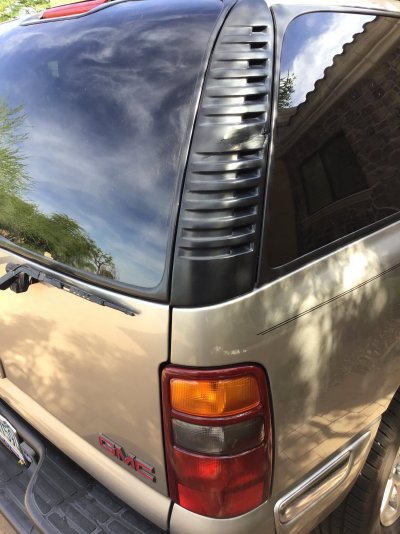
With those Esky corner vents and those tails, combined with that rear glass, I had to do a double take because I thought I was looking at an S10 Blazer for a second.
View attachment 395151
View attachment 395152

See the resemblance? Lol!
Those back rear corner vent louvers.…. I have one that’s cracked on my 2001 Yukon SLT. Does anyone have an extra passenger side rear cover trim vent for sale? Or know a good source? How do I remove them? Thanks in advance.
 

Attachments

  • image.jpg
    image.jpg
    291.9 KB · Views: 23
OP
OP
ncalvo

ncalvo

Full Access Member
Joined
Jun 17, 2019
Posts
243
Reaction score
657
Location
FL
Those back rear corner vent louvers.…. I have one that’s cracked on my 2001 Yukon SLT. Does anyone have an extra passenger side rear cover trim vent for sale? Or know a good source? How do I remove them? Thanks in advance.
I have both my original vent covers if you were interested in them. $20 plus cost of shipping.
 

Scott in AZ

Full Access Member
Joined
Mar 23, 2023
Posts
194
Reaction score
363
Location
Arizona
Sure, I'll Zelle you $20 plus fair shipping, sent you a DM, pic would be great, any tips on removing / replacing? Thanks a lot.
 

Fless

Staff member
Moderator
Joined
Apr 2, 2017
Posts
16,619
Reaction score
34,396
Location
People's Republic of Colorado
They're called appliqués. This guy shows how they come off and where the clips are, he starts the removal around 2:30 into it. Using a plastic trim removal tool will help, since they do take some persuasion. I'd recommend letting yours warm up in the sun for a bit before doing any prying. The audio is pretty low, so be ready to turn it up.


Here's the back side of the Esky piece, they're in the same exact place as the Tahoe's. The circles show the plastic clips on one side and the metal clip on the other; the arrow shows the hole at the top, after the screw is removed as shown in the video.

Esky applique clips.jpg
 
Last edited:

555hp

TYF Newbie
Joined
May 3, 2023
Posts
27
Reaction score
30
I have both my original vent covers if you were interested in them. $20 plus cost of shipping.
Is Scott doesn't take them, them pks add me as a back up.

I have the Surburban version of yours (2003, Z71) and decided to give it a major makeover, though maybe not as much as yours. I am very interested in your factory sub replacement (box size and how you got everything to fit) and how hard is was to replace the fram isolators.

I'm trying to keep most things factory original (OEM radio, 17 inch wheels( but will do many of the other upgrades you did (E?efans are my next project).
 
OP
OP
ncalvo

ncalvo

Full Access Member
Joined
Jun 17, 2019
Posts
243
Reaction score
657
Location
FL
Is Scott doesn't take them, them pks add me as a back up.

I have the Surburban version of yours (2003, Z71) and decided to give it a major makeover, though maybe not as much as yours. I am very interested in your factory sub replacement (box size and how you got everything to fit) and how hard is was to replace the fram isolators.

I'm trying to keep most things factory original (OEM radio, 17 inch wheels( but will do many of the other upgrades you did (E?efans are my next project).
Took the seats out, and the console out, gutted the inside of the console from factory amp and hacked away at the frame.
I grabbed an 8" sub and calculated minimum volume for the box, used cardboard to build a mockup that would fit, and then made it out of MDF.
There isn't sound isolators there isn't room, but the box is wrapped in sound carpet cloth and it sits on carpet, the console frame almost hugs it for support. It's legit and solid but not 100% pretty.
 

Scott in AZ

Full Access Member
Joined
Mar 23, 2023
Posts
194
Reaction score
363
Location
Arizona
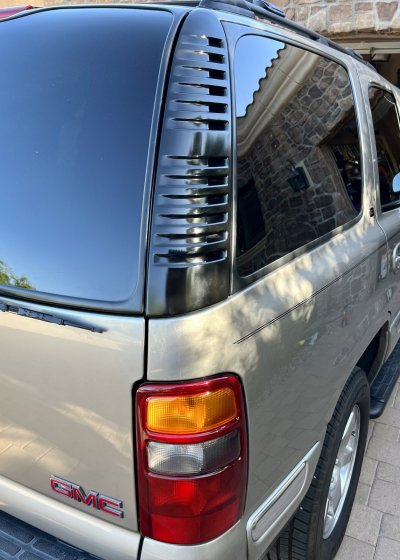
Ncalvo’s rear corner vent louver appliqués showed up and he was true - they are in great shape. I cleaned them up with Meguiar’s cleaner wax and a toothbrush, buffed them out, and the result was great. I will end up using his on the other corner too.

You don’t have to remove the lift gate piston to do this job but I will probably replace the lift gate pistons when I do the other side. (Anybody got a recommendation for lift gate pistons? I’ll probably just use OEM Stabilus).

Turns out the rear corner vent appliqués are functional - they vent cabin air out the back. (Makes me wonder about half-blocking them to keep the conditioned air inside in the hot Arizona summer….). I used single-sided foam tape to supplement the existing foam gasket installed around the clips. Wire to wire time was under an hour and that included the toothbrush treatment and a deep clean on the normally-covered body panel under the functional vent appliqué! Good project, fixed a problem I’ve lived with for years, but this would be a good clean-up project even if replacing is not needed.
 

Attachments

  • DBEF7EE3-5370-4FBA-8986-98B1DBB9B5EE.jpeg
    DBEF7EE3-5370-4FBA-8986-98B1DBB9B5EE.jpeg
    292.8 KB · Views: 50
  • 583E05B8-33BD-482A-9526-CC62BD3F4F99.jpeg
    583E05B8-33BD-482A-9526-CC62BD3F4F99.jpeg
    488.9 KB · Views: 44
Last edited:

Scott in AZ

Full Access Member
Joined
Mar 23, 2023
Posts
194
Reaction score
363
Location
Arizona
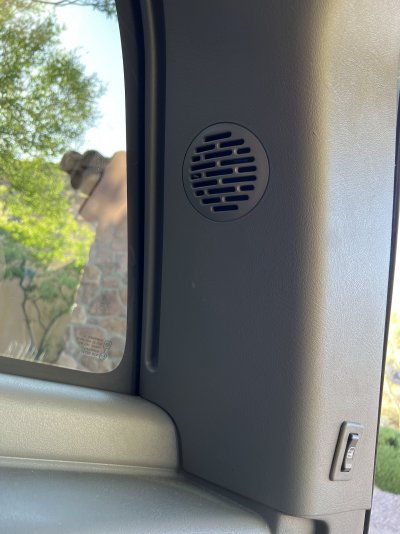
After I removed the old rear corner vent louver I can actually see another rubber internal vent louver under it that passes into the cabin through the rear pillar and behind the trim panel. It seems like this is an air flow path through this speaker grill out to daylight that will flow pretty good when the truck is moving down the road. I should have taken a picture of the body panel under the rear corner vent louver to show the internal vent louver but I’m almost certain that is what the internal and external rear corner vent louver system is for.
 

Attachments

  • image.jpg
    image.jpg
    321.7 KB · Views: 23
Last edited:

Fless

Staff member
Moderator
Joined
Apr 2, 2017
Posts
16,619
Reaction score
34,396
Location
People's Republic of Colorado
You don’t have to remove the lift gate piston to do this job but I will probably replace the lift gate pistons when I do the other side. (Anybody got a recommendation for lift gate pistons? I’ll probably just use OEM Stabilus).

Strongarm brand. I used #4557 for the liftgate and #4185 for the glass struts. Now I have to be careful to be able to back up quickly when I pull the latch.
 
OP
OP
ncalvo

ncalvo

Full Access Member
Joined
Jun 17, 2019
Posts
243
Reaction score
657
Location
FL
Ncalvo’s rear corner vent louver appliqués showed up and he was true - they are in great shape. I cleaned them up with Meguiar’s cleaner wax and a toothbrush, buffed them out, and the result was great. I will end up using his on the other corner too.

You don’t have to remove the lift gate piston to do this job but I will probably replace the lift gate pistons when I do the other side. (Anybody got a recommendation for lift gate pistons? I’ll probably just use OEM Stabilus).

Turns out the rear corner vent appliqués are functional - they vent cabin air out the back. (Makes me wonder about half-blocking them to keep the conditioned air inside in the hot Arizona summer….). I used single-sided foam tape to supplement the existing foam gasket installed around the clips. Wire to wire time was under an hour and that included the toothbrush treatment and a deep clean on the normally-covered body panel under the functional vent appliqué! Good project, fixed a problem I’ve lived with for years, but this would be a good clean-up project even if replacing is not needed.
I bought a cheap pair off amazon maybe $20 or 30 just look for some with good reviews, they won't last forever but mine are going on 5 yrs.
If you replace the lift gate struts and then want the same results for your hatch glass like I did... be cautious replacing the struts for your glass... I would recommend against it.
Inspect your hinges, as they are simply molded into the plastic and are weak, the new struts will add much more force to them. My hinges broke shortly after replacing them. My friend gave me his hatch glass that he repaired the hinges on, and at that point I took the struts out and stopped using the glass.
See earlier posts in this thread where I permanently fixed the weak point recently and put the upgraded hatch glass in.


Below is pic of the hinge my buddy repaired.
20230510_102246.jpg
 

Sam Harris

Elite Member
Supporting Member
Joined
Sep 26, 2018
Posts
7,445
Reaction score
14,977
Location
Texas
I bought a cheap pair off amazon maybe $20 or 30 just look for some with good reviews, they won't last forever but mine are going on 5 yrs.
If you replace the lift gate struts and then want the same results for your hatch glass like I did... be cautious replacing the struts for your glass... I would recommend against it.
Inspect your hinges, as they are simply molded into the plastic and are weak, the new struts will add much more force to them. My hinges broke shortly after replacing them. My friend gave me his hatch glass that he repaired the hinges on, and at that point I took the struts out and stopped using the glass.
See earlier posts in this thread where I permanently fixed the weak point recently and put the upgraded hatch glass in.


Below is pic of the hinge my buddy repaired.View attachment 398915
Actually, as @Rocket Man pointed out in another thread, the hinges are indeed glued onto the glass (I was under the same assumption as you). With that said, I have decided not to replace my glass struts (did the lift gate yesterday), as I rarely use the glass, and would rather not take the chance of detaching them from the glass..

Post in thread 'What did you do to your NBS GMT800 Tahoe/Yukon Today?'
https://www.tahoeyukonforum.com/thr...s-gmt800-tahoe-yukon-today.12502/post-1779257
 
OP
OP
ncalvo

ncalvo

Full Access Member
Joined
Jun 17, 2019
Posts
243
Reaction score
657
Location
FL
She's mounted, only the top brackets are bolted in.
I have to drill new holes on the outside brackets 1.5" higher and get two nuts to throw in there. Also need to make a 1.5" spacer and grab two longer bolts for the inside then all 6 mounting points are good to go.
New black led foglights on the way.


20230519_211216.jpg
20230519_211220.jpg
20230519_213518.jpg
20230520_104959.jpg

20230520_111754.jpg
 
Last edited:
OP
OP
ncalvo

ncalvo

Full Access Member
Joined
Jun 17, 2019
Posts
243
Reaction score
657
Location
FL
Pics of the finished conversion. All bolts are in, I could have done something different than spacers in the center but they are acceptable to me like they are. Foglights are in.
Next up having a shop replace my exhaust manifolds and engine mounts next week with my parts, I have two broken bolts.
20230525_113027.jpg

20230525_113048.jpg

20230525_115613.jpg

20230525_115626.jpg
 

Forum statistics

Threads
138,040
Posts
1,997,656
Members
102,976
Latest member
Capybarbro
Back
Top