Rear main seal

Disclaimer: Links on this page pointing to Amazon, eBay and other sites may include affiliate code. If you click them and make a purchase, we may earn a small commission.

Peeledpeas

Member
Joined
Oct 22, 2023
Posts
44
Reaction score
43
I recently swapped my transmission and while I had it out I decided to do the rear main seal. I was unaware that an alignment tool was required to reinstall the cover properly and it leaks, so I need to do it again. I'm wondering if there is enough room to pull the transmission back without having to drop it to the floor. I really don't want to have to fully remove the trans again. 2005 Yukon AWD 5.3
 

justirv

Full Access Member
Joined
Dec 28, 2011
Posts
281
Reaction score
352
I recently swapped my transmission and while I had it out I decided to do the rear main seal. I was unaware that an alignment tool was required to reinstall the cover properly and it leaks, so I need to do it again. I'm wondering if there is enough room to pull the transmission back without having to drop it to the floor. I really don't want to have to fully remove the trans again. 2005 Yukon AWD 5.3
I'll let others comment on whether it can be done without dropping it, but from my experience I don't think it's probable. While there, you should do the rear cover gasket as well. I used the Sac City RMS alignment tool with great results. Side note, if you dropped the trans last time, it will go so much quicker this time. Make sure you file the flats on the neutral safety switch for easy re-use.
 

West 1

Full Access Member
Joined
Jan 20, 2023
Posts
699
Reaction score
1,503
I have the installation tool but it is only necessary to use to center the plate with no main seal installed in the plate. The plate gasket is many times the actual RMS leak so it is ALWAYS best to remove the plate. Clean it, install the new Rear Main seal and reinstall the seal and plate as one unit with the brand new plate gasket. I use Fel Pro for the RMS and the Plate Gasket. Have yet to see one leak.

The crankshaft should be cleaned perfectly before install. A light sand with some 600 grit wet and dry sand paper to remove the old teflon on the shaft and to make damn sure there is no possible sharp nick or lip on the crank that could scratch the new teflon rear main seal when you install it.

Clean all the gasket surfaces equally well. Block, Oil Pan bottom, RMS Plate so they are ready for a good install.

All the rear main LS style seals I have installed I put the new seal in the rear main plate and then install the RMS plate with the seal in place. Let the seal center the plate perfectly.
The teflon seal will do its best to center itself if you just let it and then carefully tighten the cover into place.
A little tricky to do as you slip the plate and seal on. No Oil or grease of any kind is used to lubricate a Teflon Seal or the crankshaft seal surface for install.

Most teflon seals are sold with a plastic installation tool that holds the teflon seal in the proper shape for install. Keep the plastic tool in place until the crank pushes the tool out as you install the RMS plate to the block.
This is important as the teflon will start to lay out flat and lose its shape if the plastic tool is removed. If you let it expand out flat or lose some shape your install gets more difficult so keep the install tool in place, it also protects the teflon from damage. Teflon scratches easily. A scratch = a leak

Look very hard at the old seal, take pictures because it is very easy to install the new seal in the seal plate backwards. Teflon seals have very fine threads on the sealing surface. The threads in the seal actually push oil on the crankshaft back into the engine. Put the seal in backwards and it will pull oil out! This is why automotive teflon seals can't be used on reverse rotation engines. (marine use)

You will need a small bead of silicone at the two corners of the rear plate so put a small touch of silicone on the engine block right where the Oil Pan corners touch the rear of the block. You don't want a leak path at the intersection of the Pan, Plate and block. Just a small dab is all that is needed at the corners. Any excess is just a mess not a better seal.

As you put the plate up for the new install it takes a pretty solid push to get the teflon seal to expand as it slips over the crankshaft seal surface.

Once the plate is on the block start installing the plate bolts but not the lower 2 very long bolts yet. Do not use a power tool. Spin the upper bolts in till they make contact but don't tighten any bolts till all screws are in and touching the plate and you can see the plate is still square to the block.
I start with the bolts that surround the area of the RMS. Bring them in slowly maybe a turn each as you watch the plate start to draw down to the block. There is no rush at this point, slow will get it done quickly and right.

As you start to think the plate is nearly tight work your way around all the other upper bolts to get them to the same tension as the bolts surrounding the RMS itself. no more than finger tight at this point.

Now check and see if you can install the 2 lower long bolts in the rear of the oil pan. If they start to thread in the plate and RMS are nearly in place. If the the long bolts won't thread in, the plate is not yet up against the block you will need to tighten the upper small bolts more, evenly and just little on each bolt to keep pulling the plate in evenly without distorting your new seal. Do not tighten the lower 2 yet just make sure they are able to thread in. If they thread in do not even go finger tight yet leave them loose.

Lower bolts are now in but loose, this tells you the plate is properly up against the block. Go ahead and torque all the upper bolts now following torque spec and pattern. I think a three step torque will keep the plate square and avoid any damage while keeping the seal centered. Once all upper bolts are torqued to full spec you can now tighten the lower 2 long bolts to spec. That is it. Plate is torqued, Seal has centered itself. IF you tighten the lower 2 pan bolts first the seal will be pulled down, egg shape and cause a leak eventually.

The new teflon seal will break in to the crank on start up. Some teflon impregnates into the dry crank surface and creates a near zero drag zero leak seal that can last longer than any Viton or other type seal. Main advantage is Teflon never puts a groove in the crankshaft seal surface.

If you are super careful and use a good pattern of tightening the many short bolts you can suck the cover in to the engine without distorting the RMS or cracking the cover plate. Don't laugh. A boatload of these rear cover plates are sold every year many due to a bad mechanic or bad install technique.

Some of the Rear Main Seal cover plates installed by GM had a weak design and tend to crack and can be the source of your leak. GM has a new design cover plate that is thicker and no longer cracks. GM sells it with the new seal installed ready for you to install.
Study your old cover plate before re using it if you think it has damage or crack certainly get a new one. Dorman also sells a new rear main seal and new cover plate. I bought one before I knew GM had an improved version and have it but so far I have re used the GM cover plate on the LS engines I have done. If the OEM plate looks perfect after clean up it goes back in. I guess I trust the OEM part more than the Dorman.

Clean and Dry Teflon seals install is very hard to accept if you have not been exposed or trained on teflon. Teflon seals first came out to give Detroit Diesel, Cummins, International etc a far better rear main seal option 30 years ago. GM Ford and many other companies switched to Teflon rear main seals back in the late 90's. EVERY SINGLE one of these OEM Manufacturers, GAS or DIESEL list Clean and Dry as the proper install procedure for Teflon seals. Teflon has risen in popularity and many other applications are now sealed with Teflon seals. Front cover seals, in HD Trucks Differential Pinion seals, HD trucks rear wheel bearing seals. They work and are proven, just unique in install procedures.

I took the time to write this because pulling a tranny and transfer case, exhaust, drivelines and all the support structures to do a Rear Main Seal is so much labor I would hate to EVER do one twice. Once is hard enough. Hope it helps.

I did my 2008 GMC Yukon Denali 6.2L with the 6L80 last week. It is good now with no leaks but what a ton of work to fix a silver dollar sized oil drip.

Edit done to correct spelling mistakes.
 
Last edited:

justirv

Full Access Member
Joined
Dec 28, 2011
Posts
281
Reaction score
352
I have the installation tool but it is only necessary to use to center the plate with no main seal installed in the plate. The plate gasket is many times the actual RMS leak so it is ALWAYS best to remove the plate. Clean it, install the new Rear Main seal and reinstall the seal and plate as one unit with the brand new plate gasket. I use Fel Pro for the RMS and the Plate Gasket. Have yet to see one leak.

The crankshaft should be cleaned perfectly before install. A light sand with some 600 grip wet and dry sand paper to remove the old teflon on the shaft and to make damn sure there is no possible sharp nick or lip on the crank that could scratch the new teflon rear main seal when you install it.

Clean all the gasket surfaces equally well. Block, Oil Pan bottom, RMS Plate so they are ready for a good install.

All the rear main LS style seals I have installed I put the new seal in the rear main plate and then install the RMS plate with the seal in place. Let the seal center the plate perfectly.
The teflon seal will do its best to center itself if you just let it and then carefully tighten the cover into place.
A little tricky to do as you slip the plate and seal on. No Oil or grease of any kind is used to lubricate a Teflon Seal or the crankshaft seal surface for install.

Most teflon seals are sold with a plastic installation tool that holds the teflon seal in the proper shape for install. Keep the plastic tool in place until the crank pushes the tool out as you install the RMS plate to the block.
This is important as the teflon will start to lay out flat and loose its shape if the plastic tool is removed. If you let it expand out flat or lose some shape your install gets more difficult so keep the install tool in place, it also protects the teflon from damage. Teflon scratches easily. A scratch = a leak

Look very hard at the old seal, take pictures because it is very easy to install the new seal in the seal plate backwards. Teflon seals have very fine threads on the sealing surface. The threads in the seal actually push oil on the crankshaft back into the engine. Put the seal in backwards and it will pull oil out! This is why automotive teflon seals can't be used on reverse rotation engines. (marine use)

You will need a small bead of silicone at the two corners of the rear plate so put a small touch of silicone on the engine block right where the Oil Pan corners touch the rear of the block. You don't want a leak path at the intersection of the Pan, Plate and block. Just a small dab is all that is needed at the corners. Any excess is just a mess not a better seal.

As you put the plate up for the new install it takes a pretty solid push to get the teflon seal to expand as it slips over the crankshaft seal surface.

Once the plate is on the block start installing the plate bolts but not the lower 2 very long bolts yet. Do not use a power tool. Spin the upper bolts in till they make contact but don't tighten any bolts till all screws are in and touching the plate and you can see the plate is still square to the block.
I start with the bolts that surround the area of the RMS. Bring them in slowly maybe a turn each as you watch the plate start to draw down to the block. There is no rush at this point, slow will get it done quickly and right.

As you start to think the plate is nearly tight work your way around all the other upper bolts to get them to the same tension as the bolts surrounding the RMS itself. no more than finger tight at this point.

Now check and see if you can install the 2 lower long bolts in the rear of the oil pan. If they start to thread in you are close. If they don't thread in the plate is not yet up against the block. Do not tighten the lower 2 yet just make sure they are able to thread in. If they thread in do not even go finger tight yet.

Lower bolts are now in but loose, this tells you the plate is properly up against the block. Go ahead and torque all the upper bolts now following torque spec and pattern. I think a three step torque will keep the plate square and avoid any damage while keeping the seal centered. Once all upper bolts are torqued to full spec you can now tighten the lower 2 long bolts to spec. That is it. Plate is torqued, Seal has centered itself. IF you tighten the lower 2 pan bolts first the seal will be pulled down, egg shape and cause a leak eventually.

The new teflon seal will break in to the crank on start up. Some teflon impregnates into the dry crank surface and creates a near zero drag zero leak seal that can last longer than any Viton or other type seal. Main advantage is Teflon never puts a groove in the crankshaft seal surface.

If you are super careful and use a good pattern of tightening the many short bolts you can suck the cover in to the engine without distorting the RMS or cracking the cover plate. Don't laugh. A boatload of these rear cover plates are sold every year many due to a bad mechanic or bad install technique.

Some of the Rear Main Seal cover plates installed by GM had a weak design and tend to crack and can be the source of your leak. GM has a new design cover plate that is thicker and no longer cracks. GM sells it with the new seal installed ready for you to install.
Study your old cover plate before re using it if you think it has damage or crack certainly get a new one.

Clean and Dry Teflon seals install is very hard to accept if you have not been exposed or trained on teflon. Teflon seals first came out to give Detroit Diesel, Cummins, International etc a far better rear main seal option 30 years ago. GM Ford and many other companies switched to Teflon rear main seals back in the late 90's. EVERY SINGLE one of these OEM Manufacturers, GAS or DIESEL list Clean and Dry as the proper install procedure for Teflon seals. Teflon has risen in popularity and many other applications are now sealed with Teflon seals. Front cover seals, in HD Trucks Differential Pinion seals, HD trucks rear wheel bearing seals. They work and are proven, just unique in install procedures.

I took the time to write this because pulling a tranny and transfer case, exhaust, drivelines and all the support structures to do a Rear Main Seal is so much labor I would hate to EVER do one twice. Once is hard enough. Hope it helps.

I did my 2008 GMC Yukon Denali 6.2L with the 6L80 last week. It is good now with no leaks but what a ton of work to fix a silver dollar sized oil drip.
Great write up @West 1
 

Joseph Garcia

Elite Member
Supporting Member
Joined
Aug 2, 2018
Posts
10,521
Reaction score
15,268
Fantastic write-up, @West 1 !!

@Peeledpeas , when you have completed the work discussed in this thread, I recommend that you edit the thread's title to something like "How To Change a Rear Main Seal Correctly", so that we capture the fantastic write-up that @West 1 assembled for you. This will be extremely helpful to other members on this Forum, who are faced with a rear main seal changeout job.

Just another example why this Forum ROCKS!
 

West 1

Full Access Member
Joined
Jan 20, 2023
Posts
699
Reaction score
1,503
Tried to help, maybe someone can jump in and explain how to easily get to the upper two Tranny Mount bolts. They each have a bolt with a stud that holds some of the support brackets for tranny vent etc. Near impossible to get to them. It has taken me at least a half hour for each of these bolts each time. I do come in from the rear with a 3' extension with the tranny lowered as much as possible but they are still hard and take way too much time? I am hoping there is a shortcut someone can share? I think some pull off the intake manifold to reach those bolts?
 

justirv

Full Access Member
Joined
Dec 28, 2011
Posts
281
Reaction score
352
Tried to help, maybe someone can jump in and explain how to easily get to the upper two Tranny Mount bolts. They each have a bolt with a stud that holds some of the support brackets for tranny vent etc. Near impossible to get to them. It has taken me at least a half hour for each of these bolts each time. I do come in from the rear with a 3' extension with the tranny lowered as much as possible but they are still hard and take way too much time? I am hoping there is a shortcut someone can share? I think some pull off the intake manifold to reach those bolts?
@West 1 I do the same with perhaps a 4' 3/8" extension and stiff swivel. I drop the tailshaft as much as possible too. I've added electrical tape to the swivel in the past to stiffen it up. I have no shortcut to offer, but add lots of light to the area.
 

West 1

Full Access Member
Joined
Jan 20, 2023
Posts
699
Reaction score
1,503
I agree, have used the 3/8 extensions and tried both a swivel socket, tended to be a little large to fit and the 3/8 swivel with some tape to reduce movement. It has worked just very slow and working on your back gets old fast. Maybe on a lift it would not be so much trouble?

To the original question, can the main seal be done without dropping the tranny? If you remove the Transfer Case. (Edit) you would have room to slide it back enough to gain space. That is how I did this last one. I like to be able to clearly see the sealing surfaces to avoid leaks by getting them all clean. Removing the transfer case allows about an extra foot or more of space. To save time I bet some guys do slip the tranny and transfer case back enough to do the seal change but it would be very tight. I wanted to also change the torque converter so I needed more room.
 
Last edited:

RET423

Full Access Member
Joined
Dec 4, 2017
Posts
233
Reaction score
322
For the upper Bellhousing bolts I use a cartoonishly long extension so I am working from behind the transmission

When you did the RMS last time did you uses thread sealer on the flex plate bolts? They all are wet holes to the crankcase so they will leak oil if they don't have sealer on the threads
 

West 1

Full Access Member
Joined
Jan 20, 2023
Posts
699
Reaction score
1,503
I used blue locktite. Funny, I have been inside many of the LS engines and never once thought those bolts might be wet. They all come out bone dry, at least for me so far. I will think about thread sealer for future use.

EDIT: Went back and did some homework. The bolt holes on the LS crankshaft at the flywheel end are DRY. No need for a sealer. It is recommended to use lubricant under the flywheel bolt head and Thread Locker, Red or Blue on the threads so they do not come loose. No oil will leak out the flywheel end from these bolt holes. I do believe the Front Snout bolt that holds the harmonic balancer does go into oil and you can see those bolts new come with a seal under the bolt head and sealer on the threads.
 
Last edited:

B-train

Full Access Member
Joined
Sep 12, 2022
Posts
2,710
Reaction score
4,920
You also may want to consider just getting a new rear cover with the seal installed. The gasket on the cover gets hard with age and then weeps. I did it on my 2008 and wouldn't do it any other way
 

West 1

Full Access Member
Joined
Jan 20, 2023
Posts
699
Reaction score
1,503
You can buy the gasket for the rear cover. With a new seal and gasket you are good if the cover is good but you are correct. A new cover with the RMS installed saves some time and it is not much more money.
 
OP
OP
P

Peeledpeas

Member
Joined
Oct 22, 2023
Posts
44
Reaction score
43
For the upper Bellhousing bolts I use a cartoonishly long extension so I am working from behind the transmission

When you did the RMS last time did you uses thread sealer on the flex plate bolts? They all are wet holes to the crankcase so they will leak oil if they don't have sealer on the threads

This I wasn't aware of. I know I didn't use sealer on them but I may have use blue thread locker, but I'm not sure if I even did that. You're talking about the the bolts that attach the flexplate to the crank, correct?
 
OP
OP
P

Peeledpeas

Member
Joined
Oct 22, 2023
Posts
44
Reaction score
43
To answer a few questions: I did remove the cover and replace the gasket. I figured removing the cover and not using an alignment tool to reinstall was my problem.

I REALLY don't want to have to completely drop the transmission again. I have a few minor health issues that make getting under a car difficult for me now. Reinstalling the T-case was one of the biggest PITA things I had to do because I can't just bench press it into place like I used to be able to do.

I did the swap in my garage with limited space and it was not fun for me. Took me weeks to get up the motivation to get it all done.

I think I might get under there, hose it all down with brake clean, add some UC dye and see if I can see exactly where the leak is coming from.
 

justirv

Full Access Member
Joined
Dec 28, 2011
Posts
281
Reaction score
352
To answer a few questions: I did remove the cover and replace the gasket. I figured removing the cover and not using an alignment tool to reinstall was my problem.

I REALLY don't want to have to completely drop the transmission again. I have a few minor health issues that make getting under a car difficult for me now. Reinstalling the T-case was one of the biggest PITA things I had to do because I can't just bench press it into place like I used to be able to do.

I did the swap in my garage with limited space and it was not fun for me. Took me weeks to get up the motivation to get it all done.

I think I might get under there, hose it all down with brake clean, add some UC dye and see if I can see exactly where the leak is coming from.
I went and got a HB trans jack, it saved my physical being from days of muscle ache.
 

RET423

Full Access Member
Joined
Dec 4, 2017
Posts
233
Reaction score
322
I used blue locktite. Funny, I have been inside many of the LS engines and never once thought those bolts might be wet. They all come out bone dry, at least for me so far. I will think about thread sealer for future use.

EDIT: Went back and did some homework. The bolt holes on the LS crankshaft at the flywheel end are DRY. No need for a sealer. It is recommended to use lubricant under the flywheel bolt head and Thread Locker, Red or Blue on the threads so they do not come loose. No oil will leak out the flywheel end from these bolt holes. I do believe the Front Snout bolt that holds the harmonic balancer does go into oil and you can see those bolts new come with a seal under the bolt head and sealer on the threads.
The flex plate bolt holes pass directly through into the crankcase, blow by creates pressure in the crankcase that seeks an outlet which can cause oil leaks through the flex plate bolts

They aren't "wet" regarding coolant but they are most definitely a direct passage to the crankcase

Blue loctite will work as a thread sealant as well for flex plate/flywheel bolts but they should not be installed dry if you want an oil tight engine
 

6speedblazer

Full Access Member
Joined
Mar 17, 2017
Posts
214
Reaction score
390
Flex plate bolts need PTFE thread sealer.
Convertor bolts need MINIMUM blue loctite
use a new GM rear cover, its the updated design, includes the seals and bolts.

I made a custom socket/swivel for gmt800 bellhousing bolts. Cut down a deep socket and swivel and tig welded them together to make as compact of a mid depth swivel socket as possible to fix over those studs. its mostly the top one that i fought a lot as you need something deep to fit over the stud, but most deep sockets put the swivel into the pinch weld and make it difficult to get a good angle
 
OP
OP
P

Peeledpeas

Member
Joined
Oct 22, 2023
Posts
44
Reaction score
43
After much pondering I'm considering just pulling the engine instead. Getting the trans down and back up there for me is a major hassle. I swapped the engine in a weekend, took me three weeks to swap the trans.
 

West 1

Full Access Member
Joined
Jan 20, 2023
Posts
699
Reaction score
1,503
The Trans bolts and exhaust bolts still need to come out to pull the engine? That was the most time wasting part of pulling the tranny out. My tranny jack is the low priced harbor freight unit but I have added a larger platform made out of 5/8" plywood that allows me to support the GM trans and transfer case much better. With some creative blocks and the trans or transfer case strapped tight into place at the correct angles they pretty much slip right in and out if you are lucky. The angles have to be very close for it to slip in with no battle and time waste.
 
Last edited:

SundyO

TYF Newbie
Joined
Oct 28, 2020
Posts
3
Reaction score
4
Yes I have
I recently swapped my transmission and while I had it out I decided to do the rear main seal. I was unaware that an alignment tool was required to reinstall the cover properly and it leaks, so I need to do it again. I'm wondering if there is enough room to pull the transmission back without having to drop it to the floor. I really don't want to have to fully remove the trans again. 2005 Yukon AWD 5.

I recently swapped my transmission and while I had it out I decided to do the rear main seal. I was unaware that an alignment tool was required to reinstall the cover properly and it leaks, so I need to do it again. I'm wondering if there is enough room to pull the transmission back without having to drop it to the floor. I really don't want to have to fully remove the trans again. 2005 Yukon AWD 5.3
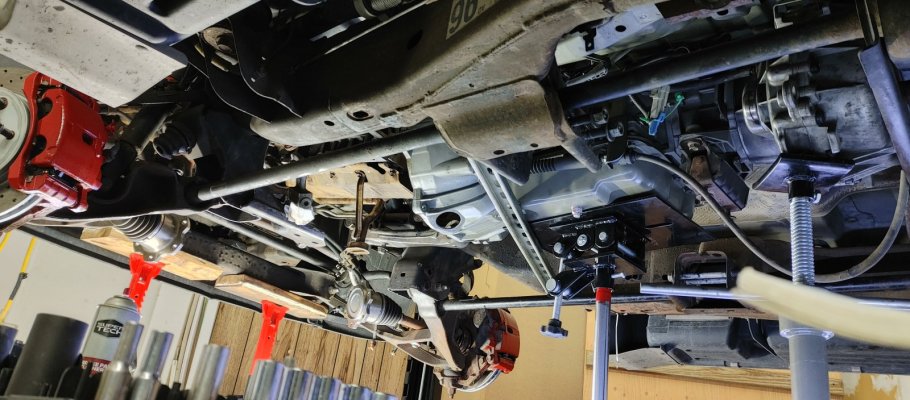
Yes, it is possible. I have swapped out the rear main seal by pulling the transmission back, it will give you about 5 or 6 inches of clearance. Mind you I had a 4 post lift, transmission jack and tall Jackstands to hold the trans and transfer case. Also a piece of strut or wood underneath the very front of transmission (for safety) and the strut or wood riding on the torque arms for the front tires. Zip tied the strut to keep it from moving. Got to be careful doing this but it is very doable. Don't forget to undo transmission lines, and cables, fuel line brackets, running to trans and dipstick tube. I think I've performed this about 3 times. Also while you have the rear main cover off, replace the oil barbell with an aluminum one. Might as well do the oil pan gasket while you're there to. Use a centering tool and take your time. Also don't forget to put the right stuff gasket maker in the lower corners. One last thing. I ran the engine without the trans hooked up to make sure no leaks for at least 20 minutes ( with transmission cables hooked up, the computer needs this to let it start). This has saved me a lot of rework since I discovered leaks several times before I got it water tight like a frogs butt.
 

Attachments

  • 0314262233_HDR.jpg
    0314262233_HDR.jpg
    186.6 KB · Views: 17
  • 0314262232_HDR.jpg
    0314262232_HDR.jpg
    264.9 KB · Views: 18

Forum statistics

Threads
138,040
Posts
1,997,669
Members
102,976
Latest member
Capybarbro
Back
Top