What did you do to your 2015-2020 K2XX Tahoe/Yukon Today?

Disclaimer: Links on this page pointing to Amazon, eBay and other sites may include affiliate code. If you click them and make a purchase, we may earn a small commission.

NYBRD

Full Access Member
Joined
Jul 29, 2024
Posts
188
Reaction score
288
I had to make the holes to feed the lines thru a little bigger because of the 6an fitting, but all went as planned, it makes it all leak
go back a page to post 4343, I did end up having to order a longer 6an line for one side the 36" was not long enough I bought a 54" which was more than enough but a 48" would have worked fine

Looks great hell yea !
 

Doubeleive

Wes
Supporting Member
Joined
Nov 7, 2017
Posts
30,565
Reaction score
48,043
Location
Stockton, Ca.
I am not happy with that ICT billet male 3/8 to 6an adapter, it's sweating at the quick connect, ordered another one from a different place to see if maybe it's just not 100% to spec,
also going to see if the quick connect fitting unscrews from the factory transmission cooler I gave it a couple ugga ugga's to see if it would come off but it didn't budge. I am going to check with the dealer tomorrow to see if it is a separate piece or not, if it is a separate piece then I can just remove it and go 3/8" to 6an and bypass the quick connect.
the ict billet one appears to be the only one on the market, all the rest are made for fuel lines which is a different design
or brain fart kicking in I can order a line like the one that I cut off and just adapt it like I did the male end on the return line
pipe2.JPG
 

eurodre

TYF Newbie
Joined
Jan 10, 2024
Posts
17
Reaction score
34
What did you put in place? I hate my rails as they’re looking pretty crappy lately.

only problem is that I do pick up a Christmas tree once a year with the Yukon so that would be the only reason for keeping it
Well trying to source the ppv flat roof rails was a mess so I used a combinatino of outdoor flex seal tape, outdoor weather proof silicone and these right on top:


Overall it filled the channel pretty well and decent enough.
 

Tonyv__

Full Access Member
Joined
Apr 18, 2018
Posts
4,568
Reaction score
10,662
Location
Bucks county PA
Well trying to source the ppv flat roof rails was a mess so I used a combinatino of outdoor flex seal tape, outdoor weather proof silicone and these right on top:


Overall it filled the channel pretty well and decent enough.
Gotcha, that was my next question, what’s under the rails lol

Might be something to consider. I have to take my rails off to wrap or do something with the roof anyway
 

eurodre

TYF Newbie
Joined
Jan 10, 2024
Posts
17
Reaction score
34
Gotcha, that was my next question, what’s under the rails lol

Might be something to consider. I have to take my rails off to wrap or do something with the roof anyway
It's not a bad job, you'll need to drop the rear half of the headliner and just take your time so you don't break things. If you have those auto trim removal tools you'll have an easier time. Also while you're there, I read the suggestion that once you remove the rails/rack to keep the 10mm bolts and throw on some nuts at the top because it helps plug the holes faster. I would recommend not doing all of this in the sun..don't ask..
 

Doubeleive

Wes
Supporting Member
Joined
Nov 7, 2017
Posts
30,565
Reaction score
48,043
Location
Stockton, Ca.
checked with the dealer and they said the quick connects on the upper part of the ac condenser (which is the factory transmission cooler) ARE replaceable so
I should be able to just remove the quick connect and put in a 3/8" to 6an adapter, presuming 3/8" is the oem thread size
**ordered a couple 3/8" npt to 6an fittings hopefully one of them works
 
Last edited:

MrTris

Member
Joined
Jul 14, 2025
Posts
44
Reaction score
25
Couple weeks ago, discovered an unopened box of Morimoto 2 Stroke 9005 LEDs (I've built a few setups in my day, really caked up in 2018, so, I bought a ton of lights) in my box of Retrofit parts. Finally got to inspecting the high beams on the Denali, and, lo and behold - they're 9005s!

I put the driver's side in, just to see. Well, would ya just look at it?! Now it matches the low beams! Pretty pleased. Plus, it doesn't look terrible when off.

I'll do the other one once the intake arrives, no sense taking it all apart, just to have to put it back, again. It's not like I use the highs, anyway.

Seems silly, but, I'm actually afraid of this thing because I don't fully understand how everything works together. Like, yeah, I know what each of the parts is and what it does, but I don't feel like I fully understand this thing because it's orders of magnitude more complex than the Subarus I'm used to. I'll get there, once I get my hands dirty with the intake and AOS/CC, I'll probably feel a little more confident.

Oh, and I'm a week late, but, I added like . . 3 more layers. We're dripping, now.

And, here's a shot of my homemade straciatella Gelato, which I just demolished in attempt to quell my feels because the market sucked complete and total аss today.

GymBro Protip : There's five egg yolks in this batch, so, technically it's, "carnivore" ice cream. (There's more protein in a frozen chicken patty; it just doesn't taste as good.)

CryptoBro Protip : Channel your inner Tate - Be the shark, not the bait!
 

Attachments

  • 20250808_134929~3.JPG
    20250808_134929~3.JPG
    291.6 KB · Views: 33
  • 20250808_105648.JPG
    20250808_105648.JPG
    295.4 KB · Views: 33
  • bd98b26b-2472-4c48-8724-bf1aa10a18c0.jpg
    bd98b26b-2472-4c48-8724-bf1aa10a18c0.jpg
    193 KB · Views: 35

Doubeleive

Wes
Supporting Member
Joined
Nov 7, 2017
Posts
30,565
Reaction score
48,043
Location
Stockton, Ca.
checked with the dealer and they said the quick connects on the upper part of the ac condenser (which is the factory transmission cooler) ARE replaceable so
I should be able to just remove the quick connect and put in a 3/8" to 6an adapter, presuming 3/8" is the oem thread size
**ordered a couple 3/8" npt to 6an fittings hopefully one of them works
well it's def not npt, I pulled one out at the junkyard that "should" be the right size and that one turns out to be 14x1.5 (metric) so I ordered a couple 6an to 14X1.5 should be here next week sometime...
 

MrTris

Member
Joined
Jul 14, 2025
Posts
44
Reaction score
25
Finally got my car sold, yesterday, so, I immediately bought everything I'd had my Amazon cart. Summit was gonna take too long for the same stuff..
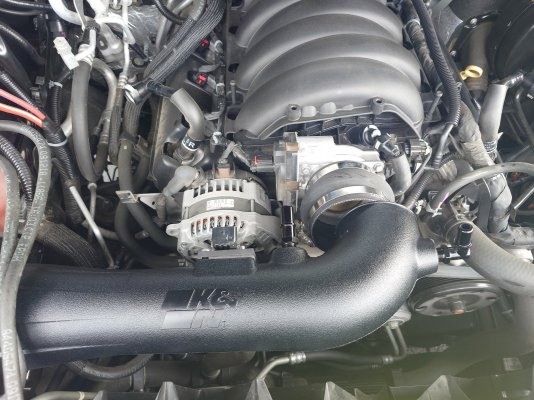
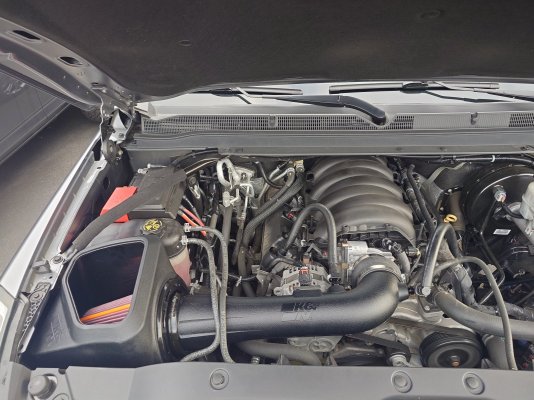
KN NextGen intake
J&L AOS (Corsa was actually $20 cheaper at Summit, and in stock!)
Phillips HIDs (stock box of light is cool, but, I NEED flicker, again!)
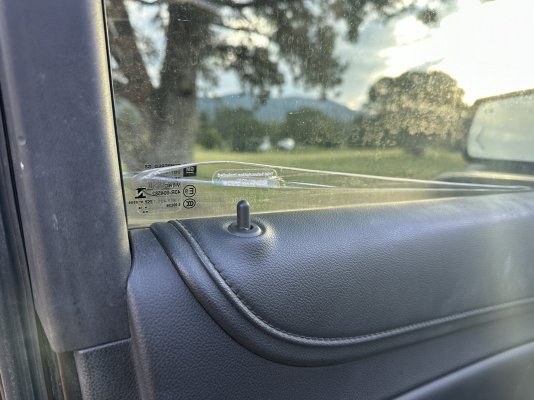
AVS window.. Things
GDIOMGWTFBBQ cleaner (which I still need to figure out how to do correctly)

I'm a lot of things - a Dog Dad, a Gym Rat, White Collar CryptoBro, Iron Chef.. One thing I'm not, though, is patient. I'm very hashtag Blessed, but, I'll pray in Thanks before I ever ask for Patience . . I know better.


Today, I installed that intake, since it arrived about an hour before I was off work.
Ugh. Supposed to be straightforward, right?

Wrong.

What should have been an hour job turned into three.

How, you ask?

Lemme tell ya, the cone sits in the box, right? It's supposed to sit flush. It wasn't until the second time I pulled it back out, that I inspected the sealing area - it was unevenly . . Cast, I guess? Take pocketknife, start, "clearancing" the hole, to get the filter to sit flush with the box. Test fit, it works. Pull it out, put box back in the chassis. Slide filter in. No Go. Apply hella pressure. Newp. Pull it back out . . Repeat. Was finally able to get the cone in, but, only if I have it in BEFORE it goes in the engine bay. This means there's only the two anterior bolts holding it down because the large end of the filter is blocking the one bolt hole on the opposite side. It'll have to do, for now.

The core support brace comes out, but, the other, larger chassis brace does need to come off the fender, just temporarily, as it impinges on the corner of the airbox. Once I got the box in, obviously, it didn't feel very seated, but, once I applied pressure to it with the chassis brace to bolt that back in, it stiffened up a bit. With everything in place, it doesn't move a whole heck of a lot.


All this and the PCV lines were actually the easiest part. I finally got it to sit correctly, clocked the tube into the filter, tightened down the clamp, got everything all squared away.. Now it sits solid.

Got everything back together, no job is complete without, "Where the fсk did my ten go?!" trying to put the negative terminal back on..

We sat and idled while I cleaned up, no codes (Thank God; the time I had, I was actually expecting that!)

Drove around the block - Meh. Didn't feel faster. Just louder, and I think I lost some low-end grunt.

Went back home, fed the dogs (their dinner was late because of all this) and washed up, decided I'd take the stock parts to storage. Threw 'em in the back, let the Fiancé know I might get stranded (She's away on a work trip, lol) and off I went.

Given a little bit more time, less traffic, I got to playing around with it - I don't recall the speedo skipping numbers, before, but it does, now. While it doesn't FEEL like it's accelerating faster, by the numbers, it appears to be. We'll see. It's certainly loud on acceleration. Sounds alot like the exhaust. If I'm just taking 'er easy, no change in sound, from stock. Shifting does feel a little.. Different. Jerkier? It probably needs more time and milage to learn.

Gas mileage is noticeably improved. I know what I used to burn on this trip, and as I drove, tank estimate went up and the gas gauge didn't move, so, that was actually a plus.

Remember what I said about patience and ordering new bulbs? Three guesses what I'm doing, tomorrow..

If you made it this far, you now realize I'm also verbose.

'night, fellas.
 

Attachments

  • 20250819_160811.JPG
    20250819_160811.JPG
    424.5 KB · Views: 33
  • 20250819_173903.JPG
    20250819_173903.JPG
    401.7 KB · Views: 34

Doubeleive

Wes
Supporting Member
Joined
Nov 7, 2017
Posts
30,565
Reaction score
48,043
Location
Stockton, Ca.
the m14X1.5 fitting worked, I had to cut the (m14) oem cooler side thread about 3/8" shorter so it would fully seat with the o-ring
no more sweating on that connection, the ICT billet quick connect just wasn't sealing up right
m14.jpg
m14a.jpg
m14b.jpg
 
Last edited:

Tonyv__

Full Access Member
Joined
Apr 18, 2018
Posts
4,568
Reaction score
10,662
Location
Bucks county PA

Doubeleive

Wes
Supporting Member
Joined
Nov 7, 2017
Posts
30,565
Reaction score
48,043
Location
Stockton, Ca.
if your oem cooler is like mine it's a tight fit in there a small tilting head ratchet adapter and a large socket worked I think 3/4" and a breaker bar to get it loose, then a 18mm box end worked for tightening up the 6an fitting a 1/4 turn at a time lol.
keep in mind the oem cooler is also the ac condenser so I used a big wrench wedged in the gap to keep from flexing the cooler while loosening/tightening.
 

Tonyv__

Full Access Member
Joined
Apr 18, 2018
Posts
4,568
Reaction score
10,662
Location
Bucks county PA
if your oem cooler is like mine it's a tight fit in there a small tilting head ratchet adapter and a large socket worked I think 3/4" and a breaker bar to get it loose, then a 18mm box end worked for tightening up the 6an fitting a 1/4 turn at a time lol.
keep in mind the oem cooler is also the ac condenser so I used a big wrench wedged in the gap to keep from flexing the cooler while loosening/tightening.
Well it’s going in my van so I’m sure it’s tight lol.

And good catch. Looks like mine are 5/8s based off rock auto


IMG_7133.png
 

Forum statistics

Threads
137,784
Posts
1,992,223
Members
102,778
Latest member
NjA4207

Latest posts

Back
Top