DIY Alignment 07 Tahoe 4WD

Disclaimer: Links on this page pointing to Amazon, eBay and other sites may include affiliate code. If you click them and make a purchase, we may earn a small commission.

OP
OP
89Suburban

89Suburban

Bull in the china shop
Space X Supporting Member
Joined
Jan 10, 2013
Posts
18,031
Reaction score
51,351
Location
SE PA
BTW if you do any suspension work on these be carful not to knock out one of the pins. That happened to me so I have one missing. They are just steel dowels pressed into a hole in the frame ear. I am using a center punch in the empty hole for getting these adjustments done. Once you torque everything down it will hold.
 
Joined
Apr 11, 2018
Posts
7,124
Reaction score
14,376
Location
St. Louis
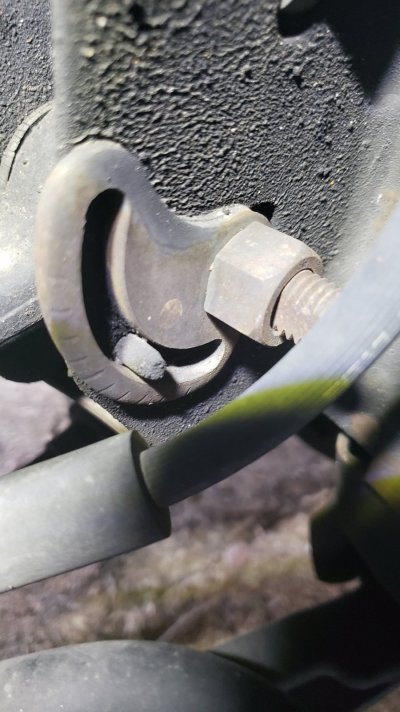
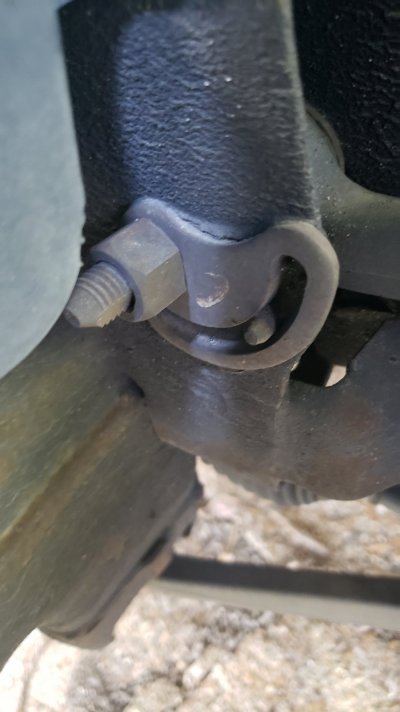
The 2 mounting bolts are straight, the bolt holes in the frame are slotted. There are small pins that stick out of the frame that the slot of the 4 washer keys slide on. Depending which way you turn the bolt head pulls the a-arm in or out. You adjust front to back for the castor and in or out for camber.
I see now that the bolts are flat on the sides and the cams move with the bolt.

So when I replace my upper control arms can I just mark where the pins are on the cams and put them back as close as I can when tightening down the new ones and it'd be close until I can get in for an alignment?

20220819_175537.jpg

20220819_175511.jpg
 

iamdub

Full Access Member
Joined
Apr 23, 2016
Posts
20,821
Reaction score
45,013
Location
Li'l Weezyana
I see now that the bolts are flat on the sides and the cams move with the bolt.

So when I replace my upper control arms can I just mark where the pins are on the cams and put them back as close as I can when tightening down the new ones and it'd be close until I can get in for an alignment?

View attachment 378400

View attachment 378401


That's pretty much all there is to it.
 
OP
OP
89Suburban

89Suburban

Bull in the china shop
Space X Supporting Member
Joined
Jan 10, 2013
Posts
18,031
Reaction score
51,351
Location
SE PA
I see now that the bolts are flat on the sides and the cams move with the bolt.

So when I replace my upper control arms can I just mark where the pins are on the cams and put them back as close as I can when tightening down the new ones and it'd be close until I can get in for an alignment?

View attachment 378400

View attachment 378401
You can use a magic marker or scribe on the washers to relocate them in reference to the pins too. I like the factory washers as they have degree marks and if you are lucky factory alignment plastic locators. You are on the right track.
 
Joined
Apr 11, 2018
Posts
7,124
Reaction score
14,376
Location
St. Louis
You can use a magic marker or scribe on the washers to relocate them in reference to the pins too. I like the factory washers as they have degree marks and if you are lucky factory alignment plastic locators. You are on the right track.
Mine doesn't have any of the factory plastic locators. Should I try to find/buy some or just not worry about them?
 
OP
OP
89Suburban

89Suburban

Bull in the china shop
Space X Supporting Member
Joined
Jan 10, 2013
Posts
18,031
Reaction score
51,351
Location
SE PA
Mine doesn't have any of the factory plastic locators. Should I try to find/buy some or just not worry about them?
I wouldn't worry about them since yours are not there. Just take pics to reference everything before and after assembly. Try to get things close as possible. I notice you have a bit of build up around the washers to leave a nice relocating imprint of where to put everything back too.
 
OP
OP
89Suburban

89Suburban

Bull in the china shop
Space X Supporting Member
Joined
Jan 10, 2013
Posts
18,031
Reaction score
51,351
Location
SE PA
I see now that the bolts are flat on the sides and the cams move with the bolt.

So when I replace my upper control arms can I just mark where the pins are on the cams and put them back as close as I can when tightening down the new ones and it'd be close until I can get in for an alignment?

View attachment 378400

View attachment 378401


Look, you already have plenty of existing reference clues to guide you.


372738-81073799f39d87cc242d5a0dbeb31ffd.jpg
372737-ee831e0338680a4ae4ea158a74506c83.jpg
 
OP
OP
89Suburban

89Suburban

Bull in the china shop
Space X Supporting Member
Joined
Jan 10, 2013
Posts
18,031
Reaction score
51,351
Location
SE PA
Also look at the difference from the gap in the top of the washer slots from front to the rear (brake line is rear). The lower the washer is on the pin, it pushes the arm out. So the front is pushed out father than the rear. That is the positive castor angle. :)


372738-81073799f39d87cc242d5a0dbeb31ffd (1).jpg
372737-ee831e0338680a4ae4ea158a74506c83 (1).jpg
 
OP
OP
89Suburban

89Suburban

Bull in the china shop
Space X Supporting Member
Joined
Jan 10, 2013
Posts
18,031
Reaction score
51,351
Location
SE PA
Also look at the difference from the gap in the top of the washer slots from front to the rear (brake line is rear). The lower the washer is on the pin, it pushes the arm out. So the front is pushed out father than the rear. That is the positive castor angle. :)


View attachment 378419View attachment 378420


I am backwards here, the lower the washer is on the pin, it pushers the arm IN.
 
OP
OP
89Suburban

89Suburban

Bull in the china shop
Space X Supporting Member
Joined
Jan 10, 2013
Posts
18,031
Reaction score
51,351
Location
SE PA
I spent ALOT of time on this this weekend. I am VERY close. I got the camber close as I can, caster close as I can. I used a dial caliper to match the pin settings for the castor in reference to the factory plastic locators. Then did the toe adjustment. Took a test drive Sat night. Wheel is a off center a little but it drove pretty good.

I fiddled with that offset steering wheel position today with some minor toe adjustments like @iamdub explained, equal adjustments on both sides and got the wheel straight. Seems damn close. Tonight I am going to go to the warehouse flat floor and do another camber check all around and see where I am at.

I did find myself running out of positive camber adjustment on the r/f FRONT keys. So I had to push the rear of the arm out slightly and lose a fraction of castor in the process. I am also having issues with the r/f rear arm camber setting. As I torque the bolt down, the degree reading wanders in the process. None of the other 3 bolts are doing that so I am scratching my head on that one.

Very close!
 
Joined
Apr 11, 2018
Posts
7,124
Reaction score
14,376
Location
St. Louis
Would Those factory inserts help hold the plate/washer and keep it from moving while tightening?

Maybe use a C-clamp or vise grip on it?
 
OP
OP
89Suburban

89Suburban

Bull in the china shop
Space X Supporting Member
Joined
Jan 10, 2013
Posts
18,031
Reaction score
51,351
Location
SE PA
Would Those factory inserts help hold the plate/washer and keep it from moving while tightening?

Maybe use a C-clamp or vise grip on it?

They won't fit unless I put it back to the original ride height. Which is still an option but I am trying to avoid.
 
OP
OP
89Suburban

89Suburban

Bull in the china shop
Space X Supporting Member
Joined
Jan 10, 2013
Posts
18,031
Reaction score
51,351
Location
SE PA
If you still have the original 17” Goodyears (QAS):
Caster: 3.2* Left and 3.6* Right
Camber: -0.1*
Total Toe: 0.1*

Your airbag recall is still open as well.


So damn close. Read about an old school trick of zeroing out the scale wheels straight then turning the wheels 15-20* to get rough caster measurement.


Pass/F Camber:

IMG_5020.JPG


Pass/F Castor:


IMG_5021.JPG


Driv/F Camber:


IMG_5022.JPG


Driv/F Castor:


IMG_5023.JPG
 
OP
OP
89Suburban

89Suburban

Bull in the china shop
Space X Supporting Member
Joined
Jan 10, 2013
Posts
18,031
Reaction score
51,351
Location
SE PA
Thank you @gooffeyguy . For future reference. 2012 Yukon Denali XL 1500


20221123_134528.jpg
 

07Burb

GM fan for life
Staff member
Moderator Supporting Member Administrator
Joined
Jan 3, 2011
Posts
50,966
Reaction score
19,474
Nice write up, Biff :) I've stickied this for future use as it's got a lot of great info for the at home DIYer :)
 

Maximus05Escalade

TYF Newbie
Joined
Sep 26, 2022
Posts
24
Reaction score
37
Your doing good. It's a long road to get where you are at when figuring it all out on your on. I am still on this road just a little way ahead of you. I graduated from your 16$ tool to 0ne that measures caster and king pin as well. By the way you can actually measure your caster with the gauge that you have. I made a holder for that very tool out of a piece of angle iron cut to the length of my rim lip to lip. cut 2 more pieces of the same angle iron about 7 " long and slid them behind the rim with a long bolt through the longer piece at the top and bottom so when you tighten the bolt it holds the longer piece snug to your rim and is rigid to give you a true reading. Center your gauge as if to do a camber reading and 0 the gauge. turn the wheel out and read the gauge. turn the wheel in and read the gauge. Subtract. The # that is left is what your caster is. You will find that when you get your caster set even within a degree your camber will follow a lot easier. The string set up is still to date the best way I have found for setting toe. I hope this makes sense and helps. Your on the right track. This alignment course is not an easy or fast class. The good news is that after you get toe, camber and caster figured out it's like an infill commercial "BUT WAIT!!!! THERES MORE!" Just worry about those 3 and you'll be fine. You're close.
 

Forum statistics

Threads
138,035
Posts
1,997,532
Members
102,973
Latest member
CRN_25
Back
Top