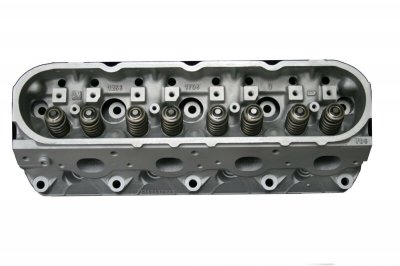
Which head bolts... 1st or 2nd design?

Disclaimer: Links on this page pointing to Amazon, eBay and other sites may include affiliate code. If you click them and make a purchase, we may earn a small commission.

OP
OP
N

nosole

Member
Joined
Jun 14, 2016
Posts
50
Reaction score
13
Well, as luck would have it, I am firmly in a very narrow gray area. I did some research and also called the dealer, but the dealer had no answers either. When they searched my VIN, it came back with both bolt sets. It looks like 1st design applies to the LM7 before mid 2004, while second design applies late 2004 and on. My production date was June ‘04 :wtf2: So I’m just gonna buy both and return what I don’t use.

More importantly, does anyone have torque specs? I’ve seen them for 2nd design (all same length M11 bolts), but not for 1st design (which has the two longer M11 per side). I’m guessing they’re the same, but don’t wanna mess around with a guess.
 

FreshLikeOprah

Full Access Member
Joined
Mar 29, 2013
Posts
112
Reaction score
3
you need the set with only two different sizes

Here is the tightening specs.

They are TTY so you torque them down then you go by angles. be sure to clean the bolt holes up really well
https://www.jegs.com/tech-articles/ls-engine-specs.html

in all honesty, I would just use ARP bolts, the angle torque thing sucks mounted in a vehicle. With the ARP you just use tq specs for each pass. Less time consuming and hassle.
 

SnowDrifter

Full Access Member
Joined
Sep 5, 2016
Posts
2,405
Reaction score
2,591
Location
Washington. The desert side not the Starbucks side
you need the set with only two different sizes

Here is the tightening specs.

They are TTY so you torque them down then you go by angles. be sure to clean the bolt holes up really well
https://www.jegs.com/tech-articles/ls-engine-specs.html

in all honesty, I would just use ARP bolts, the angle torque thing sucks mounted in a vehicle. With the ARP you just use tq specs for each pass. Less time consuming and hassle.
I've always wondered about ARP Bolts to be honest. They stand up long term to a DD? go 200k? I ask because the whole idea behind tty is to very tightly control clamping force largely independent of thread condition - like a rough tap vs a smooth tap or something. Clamping force is determined by the strength of the bolt vs the torque applied and the resultant interactions between the thread ramp and friction associated
 

Rocket Man

Mark
Supporting Member
Joined
Dec 25, 2014
Posts
25,966
Reaction score
50,662
Location
Oregon
I've always wondered about ARP Bolts to be honest. They stand up long term to a DD? go 200k? I ask because the whole idea behind tty is to very tightly control clamping force largely independent of thread condition - like a rough tap vs a smooth tap or something. Clamping force is determined by the strength of the bolt vs the torque applied and the resultant interactions between the thread ramp and friction associated
I’ve never heard a single thing bad about ARP bolts. I used their harmonic balancer bolt, which also replaces a TTY, on my DD without hesitation.
 

wjburken

Supporting Member
Joined
Dec 26, 2017
Posts
9,808
Reaction score
26,723
Location
Eastern Iowa
I've always wondered about ARP Bolts to be honest. They stand up long term to a DD? go 200k? I ask because the whole idea behind tty is to very tightly control clamping force largely independent of thread condition - like a rough tap vs a smooth tap or something. Clamping force is determined by the strength of the bolt vs the torque applied and the resultant interactions between the thread ramp and friction associated

I’ve never heard a single thing bad about ARP bolts. I used their harmonic balancer bolt, which also replaces a TTY, on my DD without hesitation.

Bolted joint design is an interesting study.

Both ARP and TTY/TTA bolts are fine, if one understands what is going on. They just use different methods to achieve the necessary clamping force.

TTY/TTA bolt specs are calculated to take into account how many degrees of turn of the bolt, after an initial torque is achieved, are required to induce the proper amount of strain/stretch in the bolt to achieve the necessary clamping force. This takes the amount of friction in the threads and under the bolt head out of play as they can vary widely.

For ARP, they take the path of having a consistent level of friction and therefore can prescribe the proper torque needed to achieve the needed clamping force. That is why they have ARP Ultra-Torque lubricant and some pretty specific installation instructions.
 

Rocket Man

Mark
Supporting Member
Joined
Dec 25, 2014
Posts
25,966
Reaction score
50,662
Location
Oregon
Bolted joint design is an interesting study.

Both ARP and TTY/TTA bolts are fine, if one understands what is going on. They just use different methods to achieve the necessary clamping force.

TTY/TTA bolt specs are calculated to take into account how many degrees of turn of the bolt, after an initial torque is achieved, are required to induce the proper amount of strain/stretch in the bolt to achieve the necessary clamping force. This takes the amount of friction in the threads and under the bolt head out of play as they can vary widely.

For ARP, they take the path of having a consistent level of friction and therefore can prescribe the proper torque needed to achieve the needed clamping force. That is why they have ARP Ultra-Torque lubricant and some pretty specific installation instructions.
Exactly. ARP has done a boatload of testing, design and research in order to achieve consistent preload however you need to use their assembly lubricant and follow their instructions.

https://arp-bolts.com/p/technical.php
 

lowpost99

Lowpost99
Joined
Apr 10, 2016
Posts
168
Reaction score
102
Location
Atlanta, GA
Quick question, how do I find out if I need the 1st or 2nd design head bolts for my Suburban? Is there a vehicle or engine code I can reference to find which I need? I'm going to tackle head gasket replacement next weekend and need to order parts so they are here in time to put it back together, but when I search for parts for my 2004 Suburban 1500, the vendors' search results always return both the 1st design and 2nd design as options.

Thanks!
I need to do a head gasket replacement as well and I could use all the process from A-Z. I've never done one, and so I could use all the advice and dos and don'ts from someone that's done it a few times. Did you complete the job this past weekend? Was this the first one that you've done? What did you use as your reference guide or instructions?
 

Stewey956

TYF Newbie
Joined
Apr 24, 2019
Posts
17
Reaction score
5
View attachment 240384 Not to revive this thread, but wanted to clarify some info.

1st Design, cast # 762 (Prone to cracking)
  • GM, 1256, 1706, Battery shape (Under valve cover)
  • 706 (Corner of head)
  • 3 different length head bolts
2nd Design, cast # 862 (The one you want)
  • Confirming numbers, but was told it has a square shape
  • 2 different length head bolts

s-l1600.jpg
 
Last edited:
OP
OP
N

nosole

Member
Joined
Jun 14, 2016
Posts
50
Reaction score
13
I need to do a head gasket replacement as well and I could use all the process from A-Z. I've never done one, and so I could use all the advice and dos and don'ts from someone that's done it a few times. Did you complete the job this past weekend? Was this the first one that you've done? What did you use as your reference guide or instructions?

Well, it’s a hell of a process, to say the least. Give yourself 3x as much time as you think you’ll need and get every possible specialty tool from Autozone. If this is your daily driver, definitely make sure you have a backup. There’s is no one-size-fits-all process for this as there a wide number of very small variations between these motors, even though they are technically the “same”. i had to reference multiple repair guides, forum threads, and videos to get through it. It’s incredibly complicated so move very slowly and label and video tape everything. I marked every stinkin thing I touched with tape so I wouldn’t forget something during reassembly. I also shot the entire process on a GoPro for reference. Before you ask, no, I won’t be posting it anywhere because it’s super long and will be of little benefit to anyone other than me as the angles I chose were crappy. I only did it to have a visual reference when reassembling. This was extremely helpful at a couple crucial moments as, despite my meticulous efforts, I misplaced a couple pieces of hardware, and also needed to jog my memory about how/when something goes back together. There were some incredibly testing periods that got me tossing every curse word I could think of into the midnight air, not the least of which was torquing the head bolts. The clearances for a few bolts were tight, which made hitting the proper degrees VERY difficult! Not to mention they require such a great deal of torque, you HAVE to use a very long wrench, which got very interesting in the tight spaces and with U-joints.

Yes, you absolutely can do it in a weekend, but plan on it taking longer and be EXTREMELY methodical and detail oriented. I can’t stress that enough. No amount of preparation and self support for something like this is too much. If you think you’re ready, prepare more because I promise you’re not, haha!
 

Forum statistics

Threads
129,258
Posts
1,812,957
Members
92,360
Latest member
csan2879
Top