You are using an out of date browser. It may not display this or other websites correctly.
You should upgrade or use an alternative browser.
You should upgrade or use an alternative browser.
What did you do to your NNBS GMT900 Tahoe/Yukon Today?
- Thread starter phattyford
- Start date
Disclaimer: Links on this page pointing to Amazon, eBay and other sites may include affiliate code. If you click them and make a purchase, we may earn a small commission.
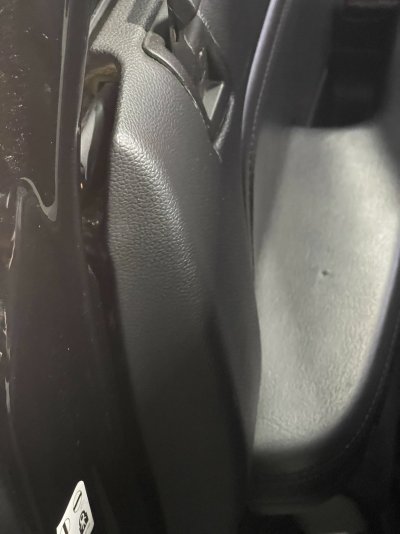
It’s not hooked at the top properly. It’s not going to go flush unless you remove it and get it to sit tight at the top. That area by the lock needs to be tight to the metal of the door. There’s 2 grooves in the weatherstrip and it’s hooked in the wrong one.View attachment 354657
Not flush at all.
George B
¯\_(ツ)_/¯
You beat me to it.It’s not hooked at the top properly. It’s not going to go flush unless you remove it and get it to sit tight at the top. That area by the lock needs to be tight to the metal of the door. There’s 2 grooves in the weatherstrip and it’s hooked in the wrong one.
pwtr02ss
Full Access Member
ThisIt’s not hooked at the top properly. It’s not going to go flush unless you remove it and get it to sit tight at the top. That area by the lock needs to be tight to the metal of the door. There’s 2 grooves in the weatherstrip and it’s hooked in the wrong one.
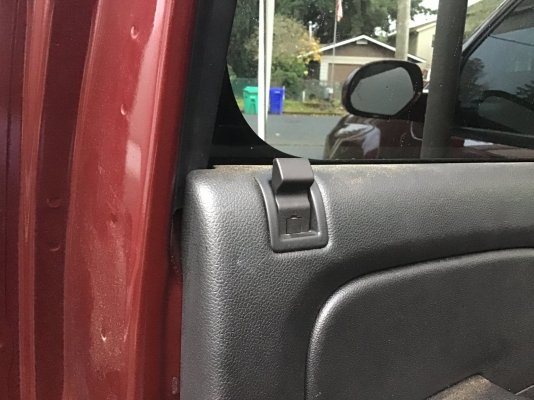
The other thing I have observed is the plastic retaining pins that are sold aftermarket -at least the ones I have tried- are inferior to OEM. And if you buy the genuine GM pins, the price is nut$.View attachment 354657
Not flush at all.
George B
¯\_(ツ)_/¯
I agree.The other thing I have observed is the plastic retaining pins that are sold aftermarket -at least the ones I have tried- are inferior to OEM. And if you buy the genuine GM pins, the price is nut$.
Sparksalot
Elite Member
I drilled some holes in the pushbar to mount additional emergency equipment.


Tonyrodz
Resident Resident
There was a member here--from Texas too, who had one mounted on his rear bumper. You Texans love your cold ones lol.I drilled some holes in the pushbar to mount additional emergency equipment.
View attachment 354672View attachment 354673
Love it!I drilled some holes in the pushbar to mount additional emergency equipment.
View attachment 354672View attachment 354673
George B
¯\_(ツ)_/¯
But Wisconsin holds the top drinking state rank.There was a member here--from Texas too, who had one mounted on his rear bumper. You Texans love your cold ones lol.
Sparksalot
Elite Member
I would have done a bumper, except they’re wonder plastic.There was a member here--from Texas too, who had one mounted on his rear bumper. You Texans love your cold ones lol.
Tonyrodz
Resident Resident
It was on an nbs.I would have done a bumper, except they’re wonder plastic.
Kee Fuller
Full Access Member
I just did that and it still doesn’t sit flush. I think the weatherstrip might be bad cause it’s bowing out a bit.It’s not hooked at the top properly. It’s not going to go flush unless you remove it and get it to sit tight at the top. That area by the lock needs to be tight to the metal of the door. There’s 2 grooves in the weatherstrip and it’s hooked in the wrong one.
On another note.
I replaced both the driver side position sensor and the seat belt. Airbag light still on. Tech 2 is still reading the same code.
Blah
Just Fishing
Can't fix stupid
I drilled some holes in the pushbar to mount additional emergency equipment.
View attachment 354672View attachment 354673
Love it!
I have a generic mounted on the bulkhead on my boat, and my home depot toolbox came with one.
I tried telling the check out counter girl "this was the big selling feature *pointing at the bottle opener*
She was not amused with me.

Mount one of those gun mount magnets from amazon below it, and then it will catch the bottle caps.

From my amazon review
")
Go find my review for the other image...

Last edited:
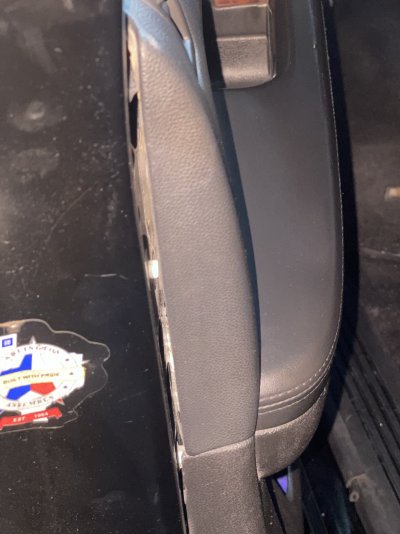
Maybe the weatherstrip isn’t installed right. IIRC it can be installed backwards. The panel should fit like this.I just did that and it still doesn’t sit flush. I think the weatherstrip might be bad cause it’s bowing out a bit.
On another note.
I replaced both the driver side position sensor and the seat belt. Airbag light still on. Tech 2 is still reading the same code.
Blah
Attachments
iamdub
Full Access Member
Maybe the weatherstrip isn’t installed right. IIRC it can be installed backwards. The panel should fit like this.
I've always had to push in on the door panel before I lower it down to hook the top of the door. By "push", I mean putting some body weight into it. Gripping the top and trying to roll the curved top of the door panel open helps, too.
Take the door panel off, then fix the weatherstrip on the panel then re-install, these panels are super easy, the 15+ are a pita.I just did that and it still doesn’t sit flush. I think the weatherstrip might be bad cause it’s bowing out a bit.
On another note.
I replaced both the driver side position sensor and the seat belt. Airbag light still on. Tech 2 is still reading the same code.
Blah
The NBS are the super easy ones. They don’t even use clips, just hooks and 2 screws. Pull the screws, lift it straight up. They have been getting harder to remove with every new generation.Take the door panel off, then fix the weatherstrip on the panel then re-install, these panels are super easy, the 15+ are a pita.
George B
¯\_(ツ)_/¯
gooffeyguy
Tom
Glad it's on the outside and not the insideI drilled some holes in the pushbar to mount additional emergency equipment.
View attachment 354672View attachment 354673
Similar threads
- Replies
- 6
- Views
- 1K
- Replies
- 3
- Views
- 4K
- Replies
- 56
- Views
- 12K