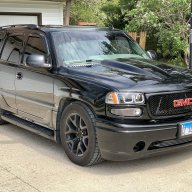
Best backup camera install

Disclaimer: Links on this page pointing to Amazon, eBay and other sites may include affiliate code. If you click them and make a purchase, we may earn a small commission.

Crippin87

Full Access Member
Joined
Mar 2, 2017
Posts
198
Reaction score
150
So I wanted to brag a little and show everyone that it could be done. I had my camera mounted below the lift gate on the back side of the plastic on top of the bumper. Though the camera was pretty well hidden I hated it, made it look like a widescreen movie when I put it in reverse. So, over the weekend I went to my local junkyard and picked up an extra window release button and was able to mount the camera inside of that button and still retain the functionality of it. It took a lot of patience and dremeling but I couldn't be more happy with it. Here are the pics of it completed. I wish I would have done a build on it but I can try to explain it the best that I can if anyone else is interested in tackling it themselves.

IMG_0827.JPG


IMG_0822.JPG


IMG_0823.JPG
 
OP
OP
Crippin87

Crippin87

Full Access Member
Joined
Mar 2, 2017
Posts
198
Reaction score
150
I went with the Esky EC170-06. It had really good reviews and a wide viewing range. I have been pretty happy with it and would recommend it to anyone. It even has the green, yellow and red lines for a distance indicator when backing.
 

shreksbrother

Full Access Member
Joined
May 9, 2017
Posts
324
Reaction score
290
Location
Auburn Hills, MI
Thanks for the info. I went ahead and ordered the no guideline model. The PO put dark tint on my Yukon and it is difficult to see out the back. I know that I could remove the tint, but I like the look, so I think I'll wire this to be always on (I have the rear view mirror with the monitor behind the glass, anyhow).

I'll make a junkyard run in the next day or two.

I assume that the camera needs to be removed from its casing? I'm looking forward to testing out my Dremel skills :) I usually use this bit: https://www.dremel.com/en_US/products/-/show-product/accessories/561-multipurpose-cutting-bit

I'll try to take some photos along the way and maybe we can co-author a little write-up on it.
 
OP
OP
Crippin87

Crippin87

Full Access Member
Joined
Mar 2, 2017
Posts
198
Reaction score
150
Thanks for the info. I went ahead and ordered the no guideline model. The PO put dark tint on my Yukon and it is difficult to see out the back. I know that I could remove the tint, but I like the look, so I think I'll wire this to be always on (I have the rear view mirror with the monitor behind the glass, anyhow).

I'll make a junkyard run in the next day or two.

I assume that the camera needs to be removed from its casing? I'm looking forward to testing out my Dremel skills :) I usually use this bit: https://www.dremel.com/en_US/products/-/show-product/accessories/561-multipurpose-cutting-bit

I'll try to take some photos along the way and maybe we can co-author a little write-up on it.
Sounds good to me. I just ordered another camera and some more cut off wheels for my Dremel. Hopefully they will be here by this weekend and I can do a write up on it. I found another camera on eBay for like $12 so I figured I could just have a back up lol.
 
OP
OP
Crippin87

Crippin87

Full Access Member
Joined
Mar 2, 2017
Posts
198
Reaction score
150
And no that's the nice thing about it is if you dremel the housing enough it will fit right in there without removing the housing of the camera or anything
 

HiHoeSilver

Away!
Joined
Feb 28, 2017
Posts
10,918
Reaction score
14,578
Location
Chicago
I've never had one, and thought I'd just hold out till I had a trick that came with one. Now you got me shopping..... *******.

Very nice work.
 

YukonXL04

The Riverboat
Joined
Sep 3, 2013
Posts
2,489
Reaction score
178
Location
Arlington, TX
I have that same camera in my barn doors. Removed the lock cylinder and put the camera in. Great camera, on my 2nd one though. Had the first wired to acc power so I could switch to it anytime, it burned up in about 6 months. 2nd one on reverse only and it's been good for a year or so. Also put the same camera on my Acura, reverse only and been good for a year too.

Might want to try to angle the camera down a little, straight out I couldn't see my tow hitch, angled just a smidge and I can.
 

iTahoe

Member
Joined
Nov 30, 2016
Posts
62
Reaction score
138
That's interesting. Do I lose the pop functionality of the button putting the camera in there? I might just run a 12V lead to the toggles in my center console so I can activate it at will in that case.
 
OP
OP
Crippin87

Crippin87

Full Access Member
Joined
Mar 2, 2017
Posts
198
Reaction score
150
Sure no problem, I will try to get a pic up tomorrow of what it looks like on the screen. I also have mine wired so that I can turn it on whenever I want, I tapped into the cig lighter spot on the back passenger side. If I have any trouble with it I may switch it to another source that only comes on when I back up. But no with the way I have it set up I did not lose any functionality of the button, it still pops the back glass just like it was factory that's why I love it lol. I have seen quite a few people put the cameras where I have mine but they always just pull the button completely out so it isn't functional anymore and put their backup camera in that spot. The OCD in me wouldn't allow me to do that lol so that's what drove me to come up with this set up.
 
OP
OP
Crippin87

Crippin87

Full Access Member
Joined
Mar 2, 2017
Posts
198
Reaction score
150
After running it like this for a week the only thing I would do differently is like shreksbrother did and bought the model with no reverse guidelines. The guidelines don't do much good because you can't see your hitch, other than that...it's still amazing lol. I just got the 2nd camera I ordered and cut off wheels for my dremel so I can do a build on it for everyone to see how it was done step by step. Hopefully I will have that done this weekend or early in the week for you guys.
 

HiHoeSilver

Away!
Joined
Feb 28, 2017
Posts
10,918
Reaction score
14,578
Location
Chicago
After running it like this for a week the only thing I would do differently is like shreksbrother did and bought the model with no reverse guidelines. The guidelines don't do much good because you can't see your hitch, other than that...it's still amazing lol. I just got the 2nd camera I ordered and cut off wheels for my dremel so I can do a build on it for everyone to see how it was done step by step. Hopefully I will have that done this weekend or early in the week for you guys.

Do the lines at least help with judging distance?
 
OP
OP
Crippin87

Crippin87

Full Access Member
Joined
Mar 2, 2017
Posts
198
Reaction score
150
In case anyone is interested in the model with no reverse guidelines the model number on that Esky EC170-11
 
OP
OP
Crippin87

Crippin87

Full Access Member
Joined
Mar 2, 2017
Posts
198
Reaction score
150
Do the lines at least help with judging distance?
Lol sorry I accidentally posted that before I wrote anything. Yes the lines do help with distance they are just angled up a little I took a pic for you guys it's not the greatest it's dark but I will get a better one for you tomorrow.

IMG_0833.JPG
 

ivin74

05 NBS Nali
Joined
Aug 3, 2014
Posts
2,420
Reaction score
2,557
Location
Htown, Texas
Crippin87
I have an extra hatch mechanisim and I don't see how you did it, everything is so tight up in there. I'm going to give it a shot, I Just ordered the Esky EC170-11 camera once it comes in I will try do a write up.
 
Last edited:

shreksbrother

Full Access Member
Joined
May 9, 2017
Posts
324
Reaction score
290
Location
Auburn Hills, MI
Well, I got mine installed, but was not able to figure out how to retain function of the button due to the way it all reassembles (as ivin74 pointed out, it's quite tightly fit together).

One other thing to remember as you're installing it is the need to temporarily power it on and mark the camera top and bottom. Otherwise it will be crooked since it is cylindrical with no discernable top/bottom.

Now that it's done, I'm happy with the results, but if I had to do it over again, I would not have since it was such a frustrating process (and my license plate camera worked fine).

One other thing to note, the diameter of the camera is less than that of the inside of the button. I used electrical tape to wrap several times around the camera to give it a larger diameter.

I've attached a photo of what it looks like (my monitor is in my rear view mirror).

If I can get good enough on CAD, I will 3D print something that will ot only mount the camera, but make the button work. I'm also considering just putting an actuator on the glass release and putting a button in the dash.

rearview.jpg
 

Forum statistics

Threads
138,049
Posts
1,997,873
Members
102,989
Latest member
justinakay79
Back
Top