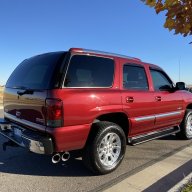
I got my tahoe back in 2010 at about 70k miles, second owner, first owners my parents they bought it new in 03. It is 2/20/23 and I have 197k and my oil pressure is solid, hangs just below 40psi at idle. Only check engine lights I have had over the years were for knock sensors, and bad o2 sensor.
I have always maintained it, oil changes and a few important corrective maintenance issues done by a shop, but the last four years I have really dove deep on her, taking care of every square inch and 80% of it with my own hands.
I have learned a ton along the way, as I didn't know much about cars before. Special thanks to these forums, and my good friend Anthony. If it wasn't for him, I wouldn't have such an awesome vehicle and also the skill set I have built up. He let me use his tools, use the back area of his shop, and let me tap into his knowledge, he has also put some time in under the vehicle with me, even late into the night for a challenging brake job shortly after someone rear ended him in his suburban causing a life changing injury. I owe him a lot.
Work done by shops years back while I was in the navy: Viper alarm/remote start, fuel pump, ac compressor, front wheel bearings, blower resistor, two brake lines blew out, alternator, knock sensors/harness
Major projects since 2019:
All new speakers, pioneer android auto dvd head unit, 5 channel amp under rear captain seat, capacitor under other seat, all new wiring. Most challenging on this project I gutted the center console and built my own sub box to fit an 8" kicker. Also a little hidden storage under the cup holders. Removed the factory bose sub and amp. I almost quit on the box it was so difficult but glad I didn't.
Replaced front upper/lower control arms (had to cut out pass. upper control arm, bolt seized), rear control arms, track bar, sway bar links and bushings, cv axles, bearings, inner/outter tie rods, idler arm, pitman arm, tightened gear box up a bit, new intermediate shaft and bearing, leveled on bilstein 5100, bump stops, gmt900 brakes all new calipers/pads/rotors, stainless lines replaced rubber, e brake, a few more brake lines replaced (stupid, I got the whole kit should have done all the lines at once)
S&B silicone body mounts (if anyone is wondering need 2 of kit part# 81-2000 for a total of 12 mounts, plus two bolts part# AI2365-00)
Replaced flat spare with full size snowflake, grinded off the safety latch so it doesn't catch when lowering
S&B intake, magnaflow catbacks, spark plugs and wires, o2 sensors.
Replaced ac compressor, most of the system. Cut a hole and installed a bracket for a cabin filter. New tensioner, pulleys, belts.
 www.tahoeyukonforum.com
Driver side valve cover (oem fix pcv), knock sensors, intake gasket, throttle body, water pump/thermostat, power steering cooler
Evap and purge system valves, sensors, canister, fuel pressure regulator & vacuum hose
New rear main seal, cam shaft sensor, oil # sensor, rebuilt trans at the same time: replaced planetary, upgrade sunshell, hd band, hardened pump rings, oversize boost valve, shift kit, sonnax 1-2 servo, all new solenoids/bushings/molded pistons, replaced converter
Rebuilt t-case: new chain, bearings, shift fork, case saver, seals, and new adapter plate mount. ( i never use auto 4wd left the original clutches)
Rebuilt rear end (found broken teeth), auburn, 3.73, new bearings
Drive shaft balanced, new u-joints and slip yoke
Driver side rocker major repair, cut a rocker out of a donor suburban had my dad and brother help me patch it up. Have to patch up some very small holes with rocker cover on passenger side.
Still original paint, first time after 10 years touching the paint I did my own paint correction: clay bar, compound, polish, wax.
cerakote trim wipes on all the plastics, chemical guys barebones back to black spray wheel well plastic
Removed running boards, and z71 grey cladding/plastic
Rattle canned front and rear bumper, but they are rusting out, going to replace
New door seals, Cadillac appliques, front seat covers, Headlights/tail lights
Removed roof rack and cleaned up underneath/teflon tape bolts/silicone around bolts and reinstalled.
Antenna unscrewed from vertical position and tucked horizontal inside engine bay.
Ceramic tints, repaired rear hatch glass hinges (they broke shortly after replacing the struts, did not know this common issue was basically guaranteed to happen)
Basically replaced any sensor within reach that only takes a few moments to replace, ignition switch, cabin temp aspirator
Dash cluster rebuilt (shipped out to an ebay seller), new motors and blue LED lights (I should have had a trans temp gauge added at the same time)
Updates:
Custom tune recently, stretched out the shift points and changed when the converter locks up
New windshield, was leaking, top edge rusty
New rear hatch glass
New rear bumper
E-fans from an 05 tahoe, new radiator, t-fittings and hoses, reservoir and sensors, steam pipe o-rings
New wheels, 18" silverado take-offs and michelin defenders
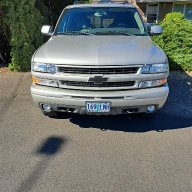
2500hd grill conversion with new front bumper, painted front lower valence black, new headlight housings and fog lights
New GM exhaust manifolds, gaskets, ARP bolts and GM motor mounts
new heater core, evaporator, all the actuators in the dash
Next:
Oil pan gasket, pickup tube oring, oil level sensor, crankshaft sensor, new starter
Nylon fuel lines, new fuel pump
sway bars
Random things that have been annoying me for a while:
A drain on my INFO circuit, pulled the fuse, it is for my rear dvd player, someday i'll have to fix it for my kids or put a switch on the circuit maybe
My driver door lock button doesn't work, and my seat memory for driver 1 or 2 doesn't function properly.
My rear cig outlet in the back doesn't work, probably just needs to be replaced
Thanks everyone for reading and thanks for all the knowledge over the years!!
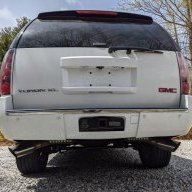
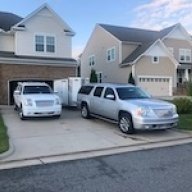
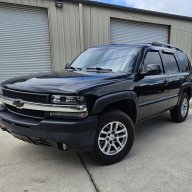
Some pics.. one a few years back, and some recently. See next posts for more random pics of projects.


I have always maintained it, oil changes and a few important corrective maintenance issues done by a shop, but the last four years I have really dove deep on her, taking care of every square inch and 80% of it with my own hands.
I have learned a ton along the way, as I didn't know much about cars before. Special thanks to these forums, and my good friend Anthony. If it wasn't for him, I wouldn't have such an awesome vehicle and also the skill set I have built up. He let me use his tools, use the back area of his shop, and let me tap into his knowledge, he has also put some time in under the vehicle with me, even late into the night for a challenging brake job shortly after someone rear ended him in his suburban causing a life changing injury. I owe him a lot.
Work done by shops years back while I was in the navy: Viper alarm/remote start, fuel pump, ac compressor, front wheel bearings, blower resistor, two brake lines blew out, alternator, knock sensors/harness
Major projects since 2019:
All new speakers, pioneer android auto dvd head unit, 5 channel amp under rear captain seat, capacitor under other seat, all new wiring. Most challenging on this project I gutted the center console and built my own sub box to fit an 8" kicker. Also a little hidden storage under the cup holders. Removed the factory bose sub and amp. I almost quit on the box it was so difficult but glad I didn't.
Replaced front upper/lower control arms (had to cut out pass. upper control arm, bolt seized), rear control arms, track bar, sway bar links and bushings, cv axles, bearings, inner/outter tie rods, idler arm, pitman arm, tightened gear box up a bit, new intermediate shaft and bearing, leveled on bilstein 5100, bump stops, gmt900 brakes all new calipers/pads/rotors, stainless lines replaced rubber, e brake, a few more brake lines replaced (stupid, I got the whole kit should have done all the lines at once)
S&B silicone body mounts (if anyone is wondering need 2 of kit part# 81-2000 for a total of 12 mounts, plus two bolts part# AI2365-00)
Replaced flat spare with full size snowflake, grinded off the safety latch so it doesn't catch when lowering
S&B intake, magnaflow catbacks, spark plugs and wires, o2 sensors.
Replaced ac compressor, most of the system. Cut a hole and installed a bracket for a cabin filter. New tensioner, pulleys, belts.
03 Tahoe Cabin Air Filter Retrofit + Clean Evap
Last september I replaced my ac compressor, all easily accessible hoses and lines, the orifice, dryer, sensors, pulley, belt and clutch fan. System was working well through the mild florida winter. Spring comes around and continues to get hot and humid and I easily can tell my system is not...
www.tahoeyukonforum.com
Driver side valve cover (oem fix pcv), knock sensors, intake gasket, throttle body, water pump/thermostat, power steering cooler
Evap and purge system valves, sensors, canister, fuel pressure regulator & vacuum hose
New rear main seal, cam shaft sensor, oil # sensor, rebuilt trans at the same time: replaced planetary, upgrade sunshell, hd band, hardened pump rings, oversize boost valve, shift kit, sonnax 1-2 servo, all new solenoids/bushings/molded pistons, replaced converter
Rebuilt t-case: new chain, bearings, shift fork, case saver, seals, and new adapter plate mount. ( i never use auto 4wd left the original clutches)
Rebuilt rear end (found broken teeth), auburn, 3.73, new bearings
Drive shaft balanced, new u-joints and slip yoke
Driver side rocker major repair, cut a rocker out of a donor suburban had my dad and brother help me patch it up. Have to patch up some very small holes with rocker cover on passenger side.
Still original paint, first time after 10 years touching the paint I did my own paint correction: clay bar, compound, polish, wax.
cerakote trim wipes on all the plastics, chemical guys barebones back to black spray wheel well plastic
Removed running boards, and z71 grey cladding/plastic
Rattle canned front and rear bumper, but they are rusting out, going to replace
New door seals, Cadillac appliques, front seat covers, Headlights/tail lights
Removed roof rack and cleaned up underneath/teflon tape bolts/silicone around bolts and reinstalled.
Antenna unscrewed from vertical position and tucked horizontal inside engine bay.
Ceramic tints, repaired rear hatch glass hinges (they broke shortly after replacing the struts, did not know this common issue was basically guaranteed to happen)
Basically replaced any sensor within reach that only takes a few moments to replace, ignition switch, cabin temp aspirator
Dash cluster rebuilt (shipped out to an ebay seller), new motors and blue LED lights (I should have had a trans temp gauge added at the same time)
Updates:
Custom tune recently, stretched out the shift points and changed when the converter locks up
New windshield, was leaking, top edge rusty
New rear hatch glass
New rear bumper
E-fans from an 05 tahoe, new radiator, t-fittings and hoses, reservoir and sensors, steam pipe o-rings
New wheels, 18" silverado take-offs and michelin defenders
2500hd grill conversion with new front bumper, painted front lower valence black, new headlight housings and fog lights
New GM exhaust manifolds, gaskets, ARP bolts and GM motor mounts
new heater core, evaporator, all the actuators in the dash
Next:
Oil pan gasket, pickup tube oring, oil level sensor, crankshaft sensor, new starter
Nylon fuel lines, new fuel pump
sway bars
Random things that have been annoying me for a while:
A drain on my INFO circuit, pulled the fuse, it is for my rear dvd player, someday i'll have to fix it for my kids or put a switch on the circuit maybe
My driver door lock button doesn't work, and my seat memory for driver 1 or 2 doesn't function properly.
My rear cig outlet in the back doesn't work, probably just needs to be replaced
Thanks everyone for reading and thanks for all the knowledge over the years!!
Some pics.. one a few years back, and some recently. See next posts for more random pics of projects.
Last edited: