No idea why the pics didn’t post..Washed, and finally waxed her today. Getting ready for the winter that appears to be missing this year. Detailed and good to go. Oh, and since I had my trans filter / drain / fill done, I now have a fxcking leak.
You are using an out of date browser. It may not display this or other websites correctly.
You should upgrade or use an alternative browser.
You should upgrade or use an alternative browser.
What did you do to your NBS GMT800 Tahoe/Yukon Today?
- Thread starter vwbeaner
- Start date
Disclaimer: Links on this page pointing to Amazon, eBay and other sites may include affiliate code. If you click them and make a purchase, we may earn a small commission.
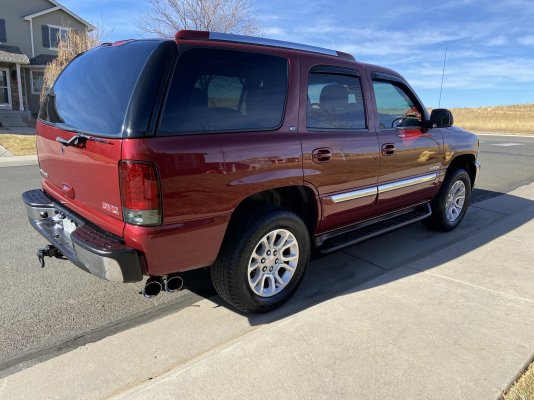
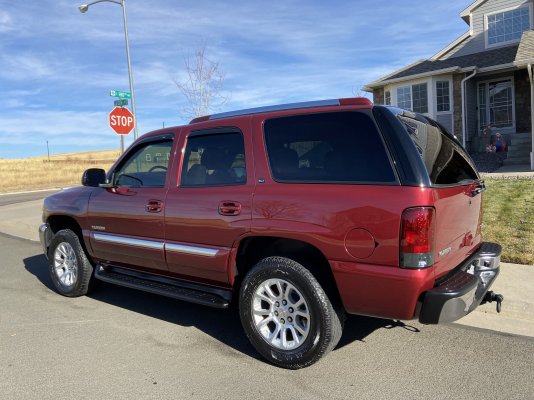
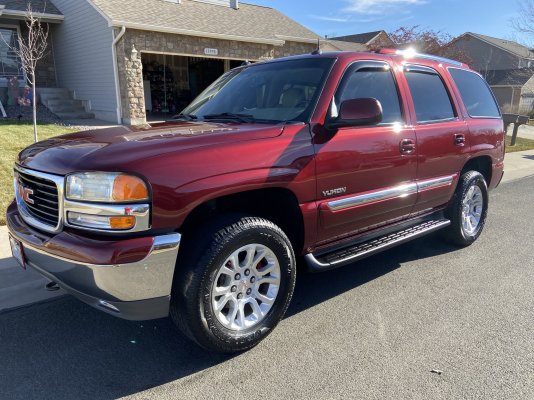
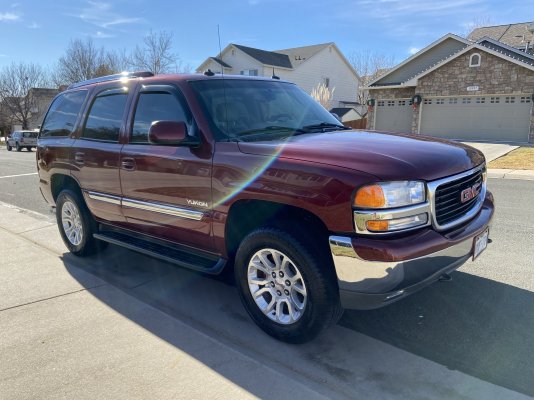
No idea why the pics didn’t post..
Sharp! (as expected....)
Walchit
Full Access Member
- Joined
- Aug 29, 2021
- Posts
- 447
- Reaction score
- 911
Pretty sure you have to take the keys off first, get under there with some pb blaster and a little sledgehammer. I just watched a ton of YouTube videos on leveling kits and control arm installation. If you don't have an air hammer, you will probably need some good sawzall blades to get the upper control arms out, and then the alignment pins might fall out too. I took one to the hardware store and got stainless nuts and bolts to replace them. GM could order the correct pins, but the parts store ones didnt work, they had too much of the "grip" area on them.So question, I bought a bunch of front end parts to rebuild the 05, got all the parts needed a shop quoted me $1300 labor (11 hours) which seems excessive to me
so I want to try and tackle at least a portion of it
I have
upper & lower control arms w/ball joints-new
steering gear box with arm already attached it's refurb-used vgc
control arm/pitman arm-new
inner & outer tie rods-new
so I want to try and tackle the lower control arms first, given there is the torsion bar, how hard is it to do?
can I just jack it up and drop the lower control arms and swap them out with out difficulty? or is the torsion bar a b*itch? any tricks?
I'm not a mechanic by any means, and I got mine done. It took me closer to 11 weeks than 11 hours though, lol
With the lube locker gasket? Probably just need to re-torque the pan bolts. Hopefully they didn’t over torque them the first time. They’re probably loose, the torque value is pretty low.Washed, and finally waxed her today. Getting ready for the winter that appears to be missing this year. Detailed and good to go. Oh, and since I had my trans filter / drain / fill done, I now have a fxcking leak.
Walchit
Full Access Member
- Joined
- Aug 29, 2021
- Posts
- 447
- Reaction score
- 911
My abs light came on again Friday, but shut back off by the time I got home, been working on the Ford Five Hundred now, so I haven't hooked the scanner up, but I imagine it was the EBCM motor/relay code again. I'm really not looking forward to pulling that out. Especially if soldering it doesn't work, because it looks like they are a few hundred bucks, and I need ABS.
thanks for the info, shouldn't need a sawzall or anything like that no rust here, all we get is spider webs, you might see some very light surface rust on unpainted surfaces after 15 years but that's about itPretty sure you have to take the keys off first, get under there with some pb blaster and a little sledgehammer. I just watched a ton of YouTube videos on leveling kits and control arm installation. If you don't have an air hammer, you will probably need some good sawzall blades to get the upper control arms out, and then the alignment pins might fall out too. I took one to the hardware store and got stainless nuts and bolts to replace them. GM could order the correct pins, but the parts store ones didnt work, they had too much of the "grip" area on them.
I'm not a mechanic by any means, and I got mine done. It took me closer to 11 weeks than 11 hours though, lol
you can swap in a already repaired one or used one as long as the part number matches, doesn't require any programming as long as the part number is a exact match.My abs light came on again Friday, but shut back off by the time I got home, been working on the Ford Five Hundred now, so I haven't hooked the scanner up, but I imagine it was the EBCM motor/relay code again. I'm really not looking forward to pulling that out. Especially if soldering it doesn't work, because it looks like they are a few hundred bucks, and I need ABS.
clandr1
Full Access Member
Looks great! What do you use for tire shine? I have some Armor All Gel that's a pain to work with, and I'm looking for something easier to manage.No idea why the pics didn’t post..
Walchit
Full Access Member
- Joined
- Aug 29, 2021
- Posts
- 447
- Reaction score
- 911
Removing the old one is gonna be the worst part, We get surface rust in Kansas in about 15 minutes, lol. It seems like soldering them works, and I'm decent with the soldering iron. I made this for growing peppers, but it didn't turn out as bright as I would have liked, so it's over my workbench now. I used RGBW LEDs and there were tiny contact points to solder, it was a lot of work, but I put knobs to control each color of led. Red, blue, green, cool white, and warm white.you can swap in a already repaired one or used one as long as the part number matches, doesn't require any programming as long as the part number is a exact match.
Attachments
Ya those little hex head bolts can get stripped pretty easy, then you have no choice but to cut it out, I tried a few at the junkyard and about 30% of the time they would get strippedRemoving the old one is gonna be the worst part, We get surface rust in Kansas in about 15 minutes, lol. It seems like soldering them works, and I'm decent with the soldering iron. I made this for growing peppers, but it didn't turn out as bright as I would have liked, so it's over my workbench now. I used RGBW LEDs and there were tiny contact points to solder, it was a lot of work, but I put knobs to control each color of led. Red, blue, green, cool white, and warm white.
Yeah.. have to see what the deal is. Argh. Need to replace the PS pressure line, so I ordered the AC Delco replacement from Summit.. won’t be here until end of the month.With the lube locker gasket? Probably just need to re-torque the pan bolts. Hopefully they didn’t over torque them the first time. They’re probably loose, the torque value is pretty low.
That part seems to be a bit hard to find for some reason as well. Not sure what the deal is, lots of places say it’s discontinued (15095939)Thanks man!!Looks great! What do you use for tire shine? I have some Armor All Gel that's a pain to work with, and I'm looking for something easier to manage.
Well, initially I thought they were too shiny, but after detailing everything else, It’s grown on me.. I buy the “Hot Shine” from Meguiars:
MEGUIAR'S G-13815 Hot Shine High Gloss Tire Coating - 15 oz. https://smile.amazon.com/dp/B000AMXQDG/ref=cm_sw_r_cp_api_glt_fabc_JYBSGXPJER75PHEWT4KB
I spray it on, let it sit for a few, and then use a foam block to wipe excess off. So definitely not a quick / simple process. I’ve been trying to decide what to change over to myself. Lol.
Still really liking the “Bare bones” for the undercarriage / wheelwells though. Once they’re cleaned up, that stuff kicks a s s and it’s easy to keep them looking clean & black, like they’re supposed to.
Though, I’m sure my neighbors laugh at me, watching me wiping down the wheelwells..

Logan5
Full Access Member
Sawzall? Oof. I would say I am in a mid-rust zone and I was able to get my upper and lower control arms out with just a prybar.Pretty sure you have to take the keys off first, get under there with some pb blaster and a little sledgehammer. I just watched a ton of YouTube videos on leveling kits and control arm installation. If you don't have an air hammer, you will probably need some good sawzall blades to get the upper control arms out, and then the alignment pins might fall out too. I took one to the hardware store and got stainless nuts and bolts to replace them. GM could order the correct pins, but the parts store ones didnt work, they had too much of the "grip" area on them.
I'm not a mechanic by any means, and I got mine done. It took me closer to 11 weeks than 11 hours though, lol
I do remember it being a little tricky with the upper control arm bolts because they are slotted for the camber alignment pins.
I also marked where those pins were so I could put it all back together and not screw my alignment. Which it did and my alignment was within proper range when I was finished.
FYI this is what I used for measuring my camber:
Amazon.com: eoocvt Universal Magnetic Gauge Tool For Car/Truck Camber Castor Strut Wheel Alignment : Automotive
Buy eoocvt Universal Magnetic Gauge Tool For Car/Truck Camber Castor Strut Wheel Alignment: Tire Repair Tools - Amazon.com ✓ FREE DELIVERY possible on eligible purchases
www.amazon.com
Alex_M
Full Access Member
- Joined
- Sep 27, 2021
- Posts
- 380
- Reaction score
- 686
Welcome to the home of doing the right thing the wrong way.
I had some new shocks laying around for an '88 Dodge D150, and my Tahoe still had the original shocks at 295k miles. I looked up the specs and they were pretty close, so I decided to make em work.
Rear was easy peasy. Bolt in, just swapped to a 1/2" bolt on the top.
Front took a little more figuring. I ended up cutting the bottom mount off the original shock. I cut a piece of 1/4” plate and welded across the mount. Tapped two 3/8 thread bolt holes. Cut some 1/2" aluminum tube into spacers for the correct height. Bolted the shocks to the adapters, painted it black, threw it all back in the truck. This actually worked out great because the front shocks were about 1" shorter than stock plus I have cranked keys. This extended the shock roughly 2" making the length about perfect.
By the way, if you all haven't seen em... Check out the Diablo Steel Demon circular saw blades. I use these a ton for metal fab any more. Saves a ton on angle grinder wheels, and it's way quicker and cleaner.
Not the prettiest job, but it works just fine for the Ugly **.
Last edited:
iamdub
Full Access Member
Welcome to the home of doing the right thing the wrong way.
I had some new shocks laying around for an '88 Dodge D150, and my Tahoe still had the original shocks at 295k miles. I looked up the specs and they were pretty close, so I decided to make em work.
Rear was easy peasy. Bolt in, just swapped to a 1/2" bolt on the top.
Front took a little more figuring. I ended up cutting the bottom mount off the original shock. I cut a piece of 1/4” plate and welded across the mount. Tapped two 3/8 thread bolt holes. Cut some 1/2" aluminum tube into spacers for the correct height. Bolted the shocks to the adapters, painted it black, threw it all back in the truck. This actually worked out great because the front shocks were about 1" shorter than stock plus I have cranked keys. This extended the shock roughly 2" making the length about perfect.
By the way, if you all haven't seen em... Check out the Diablo Steel Demon circular saw blades. I use these a ton for metal fab any more. Saves a ton on angle grinder wheels, and it's way quicker and cleaner.
Not the prettiest job, but it works just fine for the Ugly **.
View attachment 357237
View attachment 357238
View attachment 357239
View attachment 357240
View attachment 357241
I'm diggin' the custom fabrication! This especially hits home for me as I'm rockin' Jeep TJ coils and Jeep XJ shocks in the rear for my drop.
I do have a concern about the side loads on those bolts in 1/4" plate. I see them working loose and wallowing out.
Logan5
Full Access Member
I agree. I love this kind of custom fab work and I am missing my welder and plasma right now. I was also concerned the softer aluminum spacers might deform over time.I'm diggin' the custom fabrication! This especially hits home for me as I'm rockin' Jeep TJ coils and Jeep XJ shocks in the rear for my drop.
I do have a concern about the side loads on those bolts in 1/4" plate. I see them working loose and wallowing out.
iamdub
Full Access Member
I agree. I love this kind of custom fab work and I am missing my welder and plasma right now. I was also concerned the softer aluminum spacers might deform over time.
Yup. The Grade 5 bolts themselves aren't so much the problem. It's that they're in single shear and doing double duty with keeping that fabricated lower half straight while clamping it all together. Most of the loads are linear with the shocks compressing and extending, but it's not a perfectly straight action. They're basically relying on 1/4" of thread and the aluminum to hold straight. A few sharp bumps could fold it.
A quick and easy fix would be to replace the spacers with thicker sleeves welded to those 1/4" plates and use nuts instead of the plate. I'd make the sleeves out of 1" solid round stock with a 3/8" hole through the center to maximize load plane and support for the bolt. I'd also top it off with Grade 8 hardware. Quite a similar repair/upgrade as what @Rocket Man did for his tie rod end spacers.
Alex_M
Full Access Member
- Joined
- Sep 27, 2021
- Posts
- 380
- Reaction score
- 686
That's awesome, and thanks! Theoretically they won't see much side load, but this is a [relatively] short term solution anyway. I plan to swap a Dana 44 under the front of the ** and do a 4 link setup in the front eventually.
Alex_M
Full Access Member
- Joined
- Sep 27, 2021
- Posts
- 380
- Reaction score
- 686
I'm diggin' the custom fabrication! This especially hits home for me as I'm rockin' Jeep TJ coils and Jeep XJ shocks in the rear for my drop.
I do have a concern about the side loads on those bolts in 1/4" plate. I see them working loose and wallowing out.
That's awesome, and thanks! Theoretically they won't see much side load, but this is a [relatively] short term solution anyway. I plan to swap a Dana 44 under the front of the ** and do a 4 link setup in the front eventually.
Alex_M
Full Access Member
- Joined
- Sep 27, 2021
- Posts
- 380
- Reaction score
- 686
I agree. I love this kind of custom fab work and I am missing my welder and plasma right now. I was also concerned the softer aluminum spacers might deform over time.
I just got a plasma for the first time a few months ago. Talk about a game changer.
The aluminum I think will be fine since there's only the load of the shock on it. I've used aluminum spacers in harsher conditions.
Similar threads
- Replies
- 5
- Views
- 365
- Replies
- 25
- Views
- 1K
- Replies
- 40
- Views
- 3K