YukonBrian
TYF Newbie
- Joined
- Jun 21, 2022
- Posts
- 16
- Reaction score
- 52
Yesterday, I finally sat down and took care of the wiring to install my junkyard Sierra seats. I picked them up on a whim last year when I found a wrecked truck with a decent looking interior.

The connection to the body harness is apparently in the front for Sierras, and the seat harness is designed to connect there. In addition, the new seats are lacking air bags, so I had to also wire in some resistors to get rid of the airbag light.

I started at the connector I cut off of the seat harness. I’ve never spliced wires before. I tried to solder the connections but apparently I need a lot of practice. So, I ended up using Solder Stick connectors that I always see on Lawrence Tolman’s videos. They worked like a dream with a big lighter and I was able to effortlessly get solid, soldered connections.

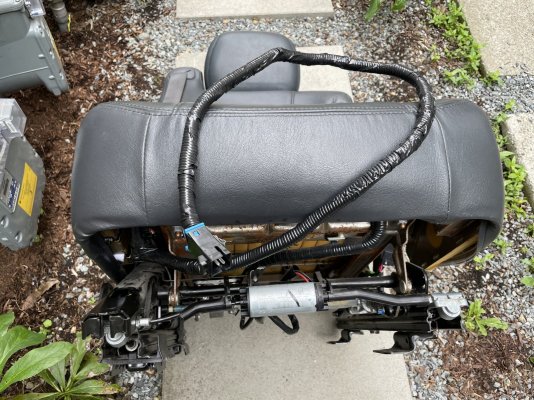
This is the drivers side seat with new wiring splice into the harness. The wires themselves were interesting to chase down. As I said, I’ve not spliced wires before, so finding 3 ft of extension was not easy for me, until it was.
I got the wire from the same shop that put in my stereo. I just brought in the connector I cut off and they let me have whatever I wanted from their scrap wire bin.
For the smaller wires, I was able to cut apart and use individually shielded wires from a ~3.5 run of Speedwire from Stinger audio. It had about 9 strands of wire running through it, which was the same gauge as the smaller seat harness wires. https://stingerelectronics.com/products/9-conductor-speedwire-20ft
For the larger wires, I just got a handful of 3.5ft long 12 gauge.

I made the connector extra long so I could test the seats outside of the truck. I regret that a little bit now, but it was a trade off for a smaller headache, due to my very limited working space in a shared driveway. The seats checked out fine.
For loom, I just for a 7ft run of 0.5in split, flexible hose and some electrical tape. I also wrapped each connection in electrical tape just to be extra sure there was no interference.
Once the seats were installed, I of course had to deal with the SRS light on the dash. For that, I wired in a 2.2ohm resistor that I got off eBay.
I clipped off the connector from the old seat with airbags and stuck the resistor on the end. I was happy to avoid doing any modifications to the body SRS wires, and everything turned out clean.
My only remaining challenges are to install the trim for the seats. For the rear, I don’t really care that the seat legs are exposed but it looks ugly in the front. I have the pieces, I just need to wiggle them in and I didn’t feel like figuring it out yesterday.
The lengthy harness is also something I need to take care of. There’s a good bit of wire under the seat so I need to use some zip ties to clean up the rear passenger floorboard.
The seats themselves were a huge improvement over my very tired Yukon seats. Mine are very cracked and tired, plus they are the ugly stock pewter color that shows everything.
Really happy with the results of this swap!
The connection to the body harness is apparently in the front for Sierras, and the seat harness is designed to connect there. In addition, the new seats are lacking air bags, so I had to also wire in some resistors to get rid of the airbag light.
I started at the connector I cut off of the seat harness. I’ve never spliced wires before. I tried to solder the connections but apparently I need a lot of practice. So, I ended up using Solder Stick connectors that I always see on Lawrence Tolman’s videos. They worked like a dream with a big lighter and I was able to effortlessly get solid, soldered connections.
This is the drivers side seat with new wiring splice into the harness. The wires themselves were interesting to chase down. As I said, I’ve not spliced wires before, so finding 3 ft of extension was not easy for me, until it was.
I got the wire from the same shop that put in my stereo. I just brought in the connector I cut off and they let me have whatever I wanted from their scrap wire bin.
For the smaller wires, I was able to cut apart and use individually shielded wires from a ~3.5 run of Speedwire from Stinger audio. It had about 9 strands of wire running through it, which was the same gauge as the smaller seat harness wires. https://stingerelectronics.com/products/9-conductor-speedwire-20ft
For the larger wires, I just got a handful of 3.5ft long 12 gauge.
I made the connector extra long so I could test the seats outside of the truck. I regret that a little bit now, but it was a trade off for a smaller headache, due to my very limited working space in a shared driveway. The seats checked out fine.
For loom, I just for a 7ft run of 0.5in split, flexible hose and some electrical tape. I also wrapped each connection in electrical tape just to be extra sure there was no interference.
Once the seats were installed, I of course had to deal with the SRS light on the dash. For that, I wired in a 2.2ohm resistor that I got off eBay.
I clipped off the connector from the old seat with airbags and stuck the resistor on the end. I was happy to avoid doing any modifications to the body SRS wires, and everything turned out clean.
My only remaining challenges are to install the trim for the seats. For the rear, I don’t really care that the seat legs are exposed but it looks ugly in the front. I have the pieces, I just need to wiggle them in and I didn’t feel like figuring it out yesterday.
The lengthy harness is also something I need to take care of. There’s a good bit of wire under the seat so I need to use some zip ties to clean up the rear passenger floorboard.
The seats themselves were a huge improvement over my very tired Yukon seats. Mine are very cracked and tired, plus they are the ugly stock pewter color that shows everything.
Really happy with the results of this swap!