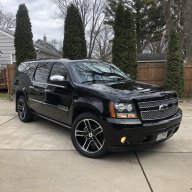
Rocket Man's 02 Denali Build Thread AKA "THE BEAST"

Disclaimer: Links on this page pointing to Amazon, eBay and other sites may include affiliate code. If you click them and make a purchase, we may earn a small commission.

OP
OP
Rocket Man

Rocket Man

Mark
Supporting Member
Joined
Dec 25, 2014
Posts
26,679
Reaction score
52,954
Location
Oregon
You really need a tool to set the brake shoe? When I did my rear brakes(parking brake shoe) it didn't seem like a special tool was needed.
I'm not sure but i thought that was the best way so they work and don't drag. I have never adjusted them. With this you measure the ID of the drum and then adjust the OD of the shoes to .026 less than that. That's the method shown in the SM. You do this with the pedal adjustment slack and then afterwards you adjust the pedal. I just don't want to reinstall everything and then either have them making noise or not working. They've never worked. Have you ever adjusted yours?
 

Fless

Staff member
Moderator
Joined
Apr 2, 2017
Posts
16,620
Reaction score
34,400
Location
People's Republic of Colorado
I'm a bit curious about this. The shop that did my rear brakes said that my cables are too stretched for the parking brake to work and that they should be replaced. But I see that the replacement cables don't have the adjustment screw/nut, so how does one make the cable adjustment? Is there some kind of adjustment on the pedal? Or is it just what it is?
 
OP
OP
Rocket Man

Rocket Man

Mark
Supporting Member
Joined
Dec 25, 2014
Posts
26,679
Reaction score
52,954
Location
Oregon
I'm a bit curious about this. The shop that did my rear brakes said that my cables are too stretched for the parking brake to work and that they should be replaced. But I see that the replacement cables don't have the adjustment screw/nut, so how does one make the cable adjustment? Is there some kind of adjustment on the pedal? Or is it just what it is?
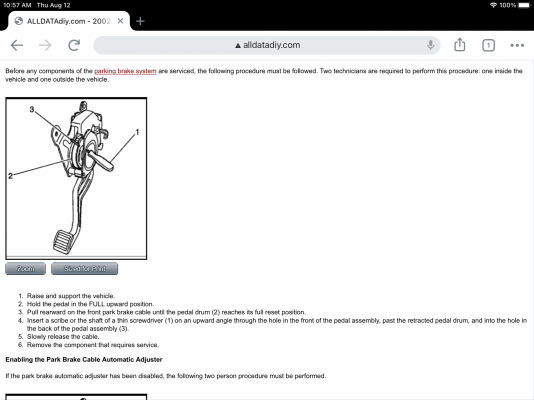
The SM says to make sure the self-adjuster lockout pin has been removed which is discussed in the part about "disabling the parking brake automatic adjuster" pic enclosed. Then push the pedal to the floor 3x and release each time.
 

Attachments

  • 9DCD4208-9815-4C28-8D56-21B81677C359.png
    9DCD4208-9815-4C28-8D56-21B81677C359.png
    433.7 KB · Views: 24
  • 4B397B81-D17B-4B05-99F6-FE855C29C036.png
    4B397B81-D17B-4B05-99F6-FE855C29C036.png
    411.7 KB · Views: 35

Tonyrodz

Resident Resident
Joined
Feb 16, 2012
Posts
33,326
Reaction score
51,789
Location
Central Jersey
I'm not sure but i thought that was the best way so they work and don't drag. I have never adjusted them. With this you measure the ID of the drum and then adjust the OD of the shoes to .026 less than that. That's the method shown in the SM. You do this with the pedal adjustment slack and then afterwards you adjust the pedal. I just don't want to reinstall everything and then either have them making noise or not working. They've never worked. Have you ever adjusted yours?
Nope, mine doesn't even work. I did my rear brakes about 5 yrs ago, along with the rear parking shoe. I broke a bolt that holds the shoe in--because this is NJ--and I said Eff it! I don't need no stinkin' parking brake!
 

George B

¯\_(ツ)_/¯
Joined
Feb 5, 2020
Posts
7,882
Reaction score
18,994
Location
Oconomowoc, Wisconsin 53066
@Rocket Man
I would have responded but didn’t have time. Both times I did parking brake service on one of these. I set the rear shoes to be just static rubbing as I rotated the rotor. Both worked well and the ones on my current burb hold it on an incline by themselves in gear. They don’t drag or rub.
 
OP
OP
Rocket Man

Rocket Man

Mark
Supporting Member
Joined
Dec 25, 2014
Posts
26,679
Reaction score
52,954
Location
Oregon
@Rocket Man
I would have responded but didn’t have time. Both times I did parking brake service on one of these. I set the rear shoes to be just static rubbing as I rotated the rotor. Both worked well and the ones on my current burb hold it on an incline by themselves in gear. They don’t drag or rub.
Did you release the cable like they show before adjusting them?
 

George B

¯\_(ツ)_/¯
Joined
Feb 5, 2020
Posts
7,882
Reaction score
18,994
Location
Oconomowoc, Wisconsin 53066
Did you release the cable like they show before adjusting them?
Honestly I don't recall but I don't think I did. Can you post the rest of the procedure outlining what to do when your done?
I had no issues with mine and was sure the actuator levers were resting on the stops when I had the shoes out. my cables are taught and my self adjuster works good. Maybe they do that for safety since the cables are under spring tension.

All I know is my parking brakes work well.
 
OP
OP
Rocket Man

Rocket Man

Mark
Supporting Member
Joined
Dec 25, 2014
Posts
26,679
Reaction score
52,954
Location
Oregon
Honestly I don't recall but I don't think I did. Can you post the rest of the procedure outlining what to do when your done?
I had no issues with mine and was sure the actuator levers were resting on the stops when I had the shoes out. my cables are taught and my self adjuster works good. Maybe they do that for safety since the cables are under spring tension.

All I know is my parking brakes work well.
All it says is to release the lockout on the cable and then step on and release the pedal 3 times.
 

George B

¯\_(ツ)_/¯
Joined
Feb 5, 2020
Posts
7,882
Reaction score
18,994
Location
Oconomowoc, Wisconsin 53066
All it says is to release the lockout on the cable and then step on and release the pedal 3 times.
I assume that process is to help ensure the cables and levers all get set back to zero so the levers are at rest when the shoes are adjusted and then the cables slack is removed. I believe I did that on mu 03 because I replaced the backing plates too so I had everything apart. on the 13 I just did shoes and cleaned/lubed the adjusters.
 
OP
OP
Rocket Man

Rocket Man

Mark
Supporting Member
Joined
Dec 25, 2014
Posts
26,679
Reaction score
52,954
Location
Oregon
I assume that process is to help ensure the cables and levers all get set back to zero so the levers are at rest when the shoes are adjusted and then the cables slack is removed. I believe I did that on mu 03 because I replaced the backing plates too so I had everything apart. on the 13 I just did shoes and cleaned/lubed the adjusters.
It says it has a parking brake pedal self-adjuster, that’s why you have to lock it out when serving the cable or shoes. That supposedly is how you get it to self-adjust.
 

George B

¯\_(ツ)_/¯
Joined
Feb 5, 2020
Posts
7,882
Reaction score
18,994
Location
Oconomowoc, Wisconsin 53066
It says it has a parking brake pedal self-adjuster, that’s why you have to lock it out when serving the cable or shoes. That supposedly is how you get it to self-adjust.
Right, it pulls the cable tight rather than having the rusted up threaded rod adjuster. That spring in the cable pully at the pedal is not strong enough to overcome the springs at the ends of the cables by the levers. There doesn't appear to be any self adjusting mechanism related to the shoe tension within the rotor/drum.

It can't hurt to do what those instructions call for. It ensures all is well and properly adjusted.

Maybe I got lucky...
 
OP
OP
Rocket Man

Rocket Man

Mark
Supporting Member
Joined
Dec 25, 2014
Posts
26,679
Reaction score
52,954
Location
Oregon
There needs to be a separate set of instructions for these trucks that's for the rust belt!:driver:
 
OP
OP
Rocket Man

Rocket Man

Mark
Supporting Member
Joined
Dec 25, 2014
Posts
26,679
Reaction score
52,954
Location
Oregon
I did some repair on the grill. It had a few cracks in the honeycomb part so I super glued them and touched up the gloss black that was chipping with some Testers paint. I’ll get a pic in a bit, all I have is The Beast with no grill. Looks mean. I have to say the body color paint isn’t looking too great. I think next I’ll order another aftermarket grill and paint it myself.
 

Attachments

  • 14A5978A-82A8-4B99-8F1A-DC99DF4A9CCF.jpeg
    14A5978A-82A8-4B99-8F1A-DC99DF4A9CCF.jpeg
    484.4 KB · Views: 37
OP
OP
Rocket Man

Rocket Man

Mark
Supporting Member
Joined
Dec 25, 2014
Posts
26,679
Reaction score
52,954
Location
Oregon
The cowl and wipers were looking bad. It’s been a few years since I painted them so I decided to Cerakote the plastic and paint the wiper arms like I just did on The Machine. Before pics.
 

Attachments

  • 00D08136-22DF-4DAE-A503-64DA335A29A4.jpeg
    00D08136-22DF-4DAE-A503-64DA335A29A4.jpeg
    254.5 KB · Views: 32
  • 55947F25-01B6-4003-901F-F45169A9C240.jpeg
    55947F25-01B6-4003-901F-F45169A9C240.jpeg
    246.6 KB · Views: 31
  • 7FCEAB50-0875-4D80-9C48-D35EB320E58C.jpeg
    7FCEAB50-0875-4D80-9C48-D35EB320E58C.jpeg
    444.7 KB · Views: 35
  • 10F108B2-17C8-4629-9F23-392483852FFE.jpeg
    10F108B2-17C8-4629-9F23-392483852FFE.jpeg
    277.7 KB · Views: 35
OP
OP
Rocket Man

Rocket Man

Mark
Supporting Member
Joined
Dec 25, 2014
Posts
26,679
Reaction score
52,954
Location
Oregon
After. I have to say so far I’m really liking the Cerakote.
 

Attachments

  • B1004979-CC53-47F4-B392-52E3FE048067.jpeg
    B1004979-CC53-47F4-B392-52E3FE048067.jpeg
    512.3 KB · Views: 27
  • D78400F8-B99D-4EBD-8BE8-169412EF7505.jpeg
    D78400F8-B99D-4EBD-8BE8-169412EF7505.jpeg
    449.3 KB · Views: 31
  • 8565E0F2-044B-43B8-A699-66DDACA2E6BA.jpeg
    8565E0F2-044B-43B8-A699-66DDACA2E6BA.jpeg
    418.9 KB · Views: 34
  • AB27B35B-536E-413E-B1E8-14EB25BC9FD3.jpeg
    AB27B35B-536E-413E-B1E8-14EB25BC9FD3.jpeg
    245.1 KB · Views: 26

Forum statistics

Threads
138,042
Posts
1,997,728
Members
102,981
Latest member
Towmaster

Latest posts

Back
Top