Cheap Catch Can Install

Disclaimer: Links on this page pointing to Amazon, eBay and other sites may include affiliate code. If you click them and make a purchase, we may earn a small commission.

iamdub

Full Access Member
Joined
Apr 23, 2016
Posts
20,777
Reaction score
44,669
Location
Li'l Weezyana
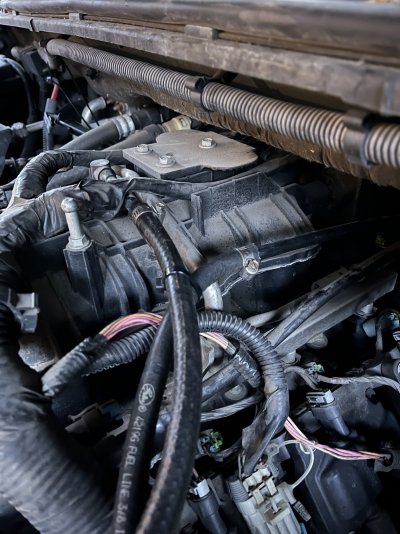
If you have a GM V-8, especially an LS+ series, chances are that you need a catch can. This is common knowledge but there are always newcomers to the platform or to the concept, so questions are still being asked. I recently had the task of installing one on my friend's '09 Tahoe and I took the opportunity to document it. This install applies to the Gen 3 and Gen 4 engines. There are countless options for catch cans. For the most part, they all operate the same, some performing better than others. This write-up is on what I believe to be the best bang-for-the-buck option, depending on your resources. It's a universal catch can found all over Amazon and ebay, sold under various brand names. It has all the necessary functions and only needs a bracket to mount it to your specific vehicle and choice of location and the hoses to connect it. Technically, even the bracket could be omitted if you chose to use what comes with it and mount it to sheet metal. Still, all in, the cost is very low compared to others costing 2-10 times as much, yet perform the same. For the most part, you're paying for the name brand, appearance and ease of installation: pieces machined from billet aluminum and/or stainless and application-specific mounting brackets and hoses. The key here is your level of fabrication skills and will to invest your time and labor, and that which is required here is quite minor.

I've installed a few of these cans but this is my first 750ml size (HERE). The others have been about half the size, but otherwise identical. I chose the large capacity since my friend's Tahoe seems to be consuming a considerable amount of oil. The price, $20 as of this writing, was about the same as any others.


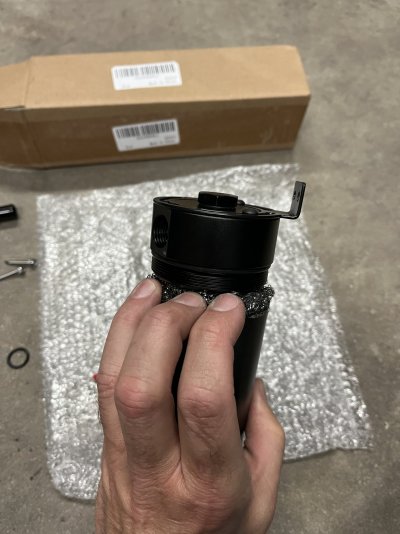
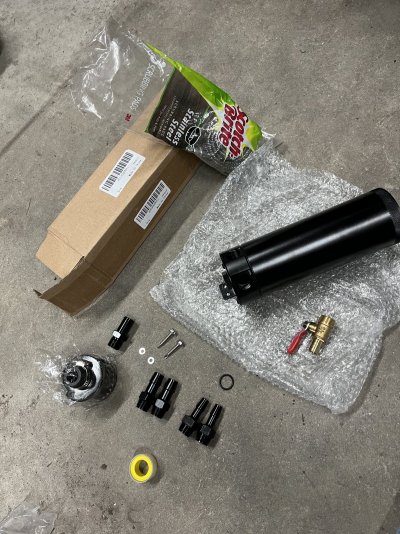
What's included plus the Scotch-Brite scrubbing pad that will be added to increase the can's performance. The breather filter can't be used in our application so you would use the plug. Mine came installed with its O-ring gasket but finger-tight so I just had to tighten it:
IMG_8577.JPG


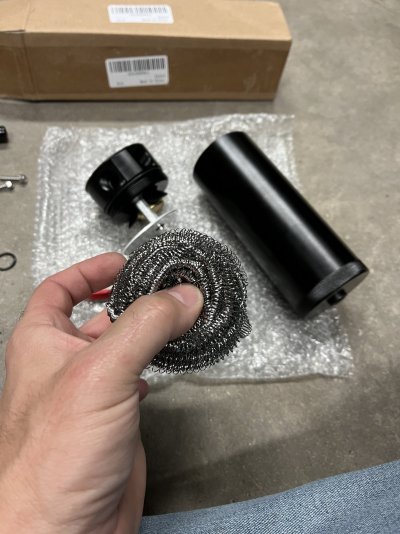
The scrubbing pad has a hole of sorts in the center, kinda like a doughnut. Note the way the coils are wrapped to find the proper orientation:
IMG_8578.JPG


The pad will sit on that aluminum baffle. Its mounting pin is offset of center, so you need to open a hole in the scrubbing pad off-center:
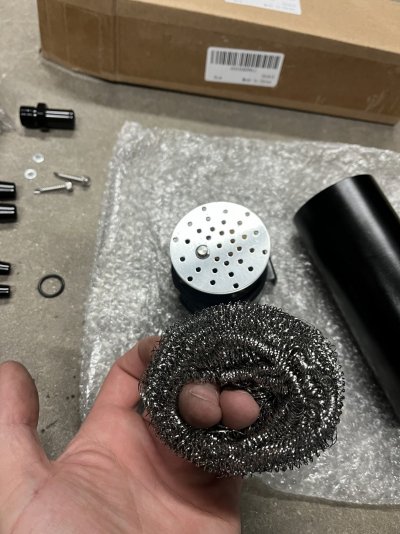
IMG_8579.JPG


Stretch the pad around the baffle and pack it into the space above it as much as you can to make it as easy as possible to slide back into the reservoir:
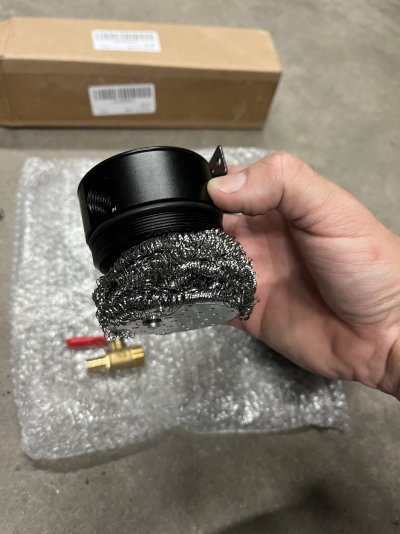
IMG_8580.JPG


Tucking the pad in as the reservoir is slid back into position:
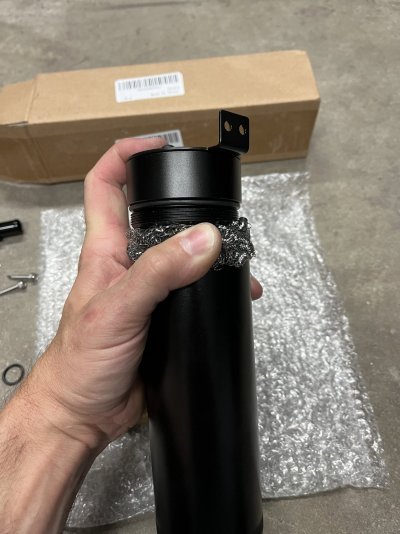
IMG_8581.JPG
 
Last edited:
OP
OP
iamdub

iamdub

Full Access Member
Joined
Apr 23, 2016
Posts
20,777
Reaction score
44,669
Location
Li'l Weezyana
Almost there:

IMG_8582.JPG


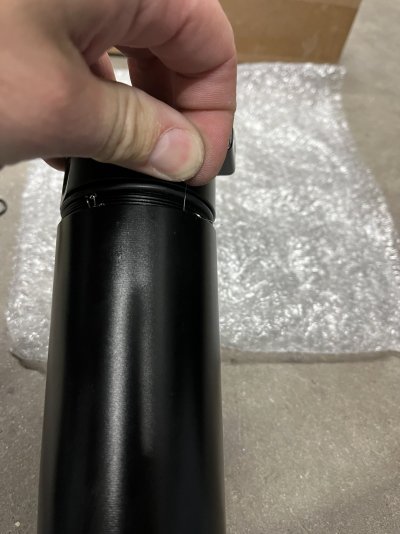
Once the reservoir was able to be screwed on with a couple of turns, I pulled the few stragglers of stainless strands out of the threads. I'm holding it here with my fingers to show, but I recommend you grab them with needle-nosed pliers as they can easily slice your fingertips. Just pull and rotate a few times and they'll break off. You might have to twist the reservoir on a little more to help pinch and cut the strands:

IMG_8583.JPG


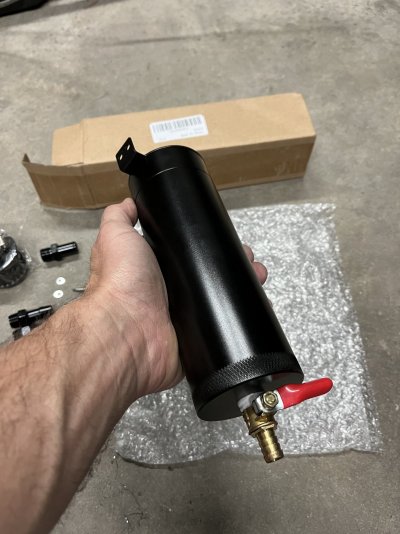
Just before I fully tightened the reservoir, I smeared a very light coat of clean engine oil on the O-ring gasket. The reservoir doesn't need to be torqued down. Just squash the gasket. You should never need to open it unless you just want to inspect the insides. I used the supplied thread tape to install the drain valve and two 3/8" (10mm) hose barbs:

IMG_8584.JPG


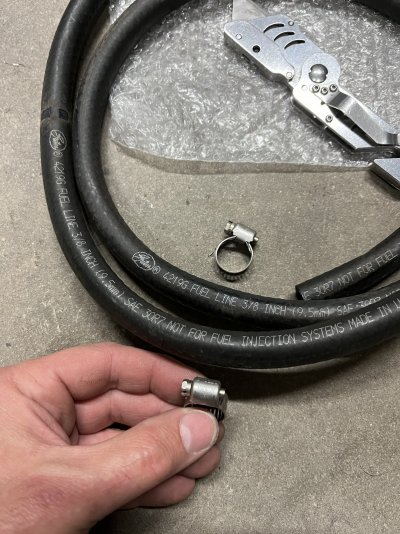
I had this hose in my stock already, but it can be bought by the foot from any auto parts store. It's basically for carburetor fuel feed. You don't need EFI (high pressure) or fuel submersion rated hose. Those are much more expensive and unnecessary. This hose looks to have been replaced by Gates #27325 and is currently $3.99/ft at O'Reilly. For the location I'm installing this can, I'll need 3' of the hose. The hose clamps were some I had on hand, as well. They're Breeze #3604, $1-$2 each at the hardware store:

IMG_8586.JPG


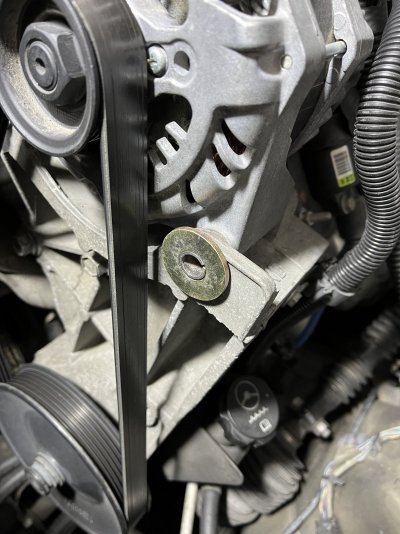
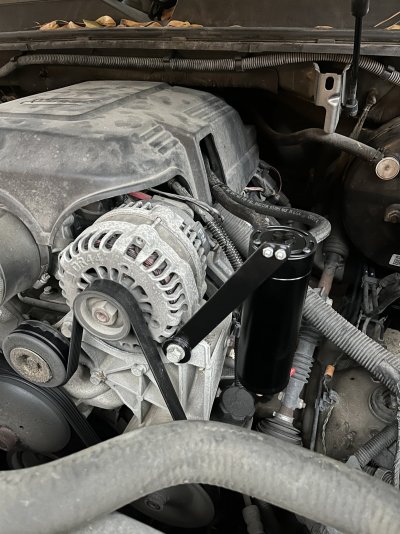
A popular spot to mount the can is next to the brake master cylinder. I like to put it next to the alternator since the space is open and provides easy access for draining the can. A thick washer with a 9/16" hole is needed. One of these are about $1 at the hardware store. I'm using my Tahoe for mock-up here:

IMG_8589.JPG
 
OP
OP
iamdub

iamdub

Full Access Member
Joined
Apr 23, 2016
Posts
20,777
Reaction score
44,669
Location
Li'l Weezyana
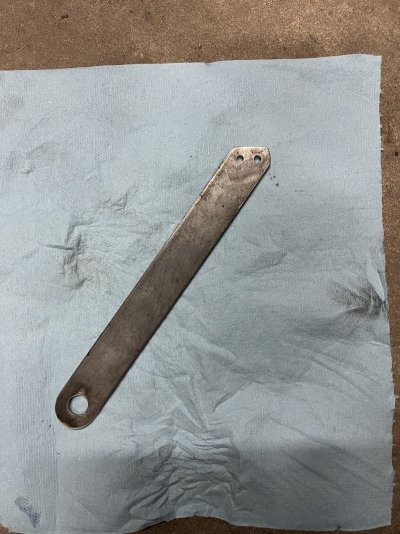
The mounting bracket is just a piece of 1" wide x 1/8" thick flat stock, about 8" long. Again, some left over from past projects. The current price at Home Depot is $15 for a 36" piece. If you really wanna pinch pennies, you might have or can find something cheaper like this shelf bracket to cut the ~8" you'll need from it. For the extra $8, I'd rather skip the hassle and get the flat bar. You might have another need for flat bar for future projects. I drilled a 9/16" hole in one end and used the catch can's hanger to locate the two mounting holes, positioned 45° from the long edge. Then I trimmed the edges to not have sharp corners and rounded off all edges with a flap disc:

IMG_8592.JPG


***The rest of the pics are of my friend's engine bay. I wanted to mention that before I caught static from you about the filth***


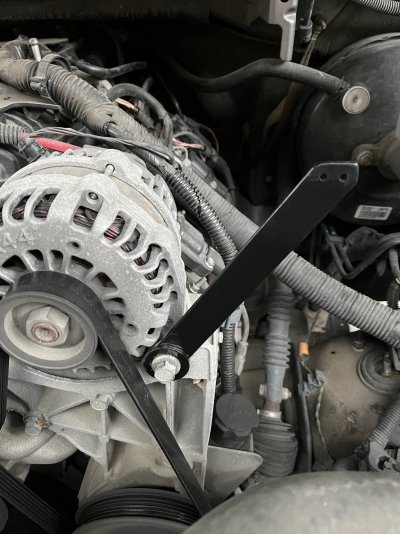
After painting the bracket and washer, I removed the alternator mounting bolt (15mm head), slid the bracket over the sleeve bushing, put the washer on the bolt and reinstalled it. When the washer started making contact with the bracket, I held the washer centered and tightened the bolt further. When tightened, the sleeve bushing will protrude just a hair beyond the flat bar, so the washer needs to be centered so the bushing can go into it as well. When all that was located, I eyeballed the flat bar to be at a 45° angle and cinched down the alternator bolt:

IMG_8611.JPG


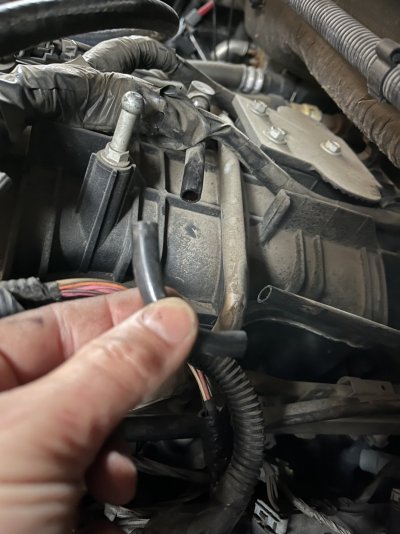
The only permanent mod to the engine is to cut the bend out of the PCV pipe. If you ever remove or just want to bypass the catch can, you can slip a short piece of 3/8" hose over the cut ends to splice it back together. Or, if a temporary bypass is needed, disconnect one of the hoses from the can, loop it and use it as a splice- no need to cut it and the extra length won't harm anything. I cut the pipe by pressing and rocking a utility razor knife. Be sure to minimize movement and stresses on the fitting going into the manifold. They're often brittle:

IMG_8612.JPG


I slid the hoses over the pipe about 1" and secured with hose clamps:

IMG_8615.JPG


I didn't use hose clamps on the ends on the hose barbs since they fit very snugly. I like the cleaner look. I used some spare hardware I already had to mount the can to the bracket. The hoses are 16" long for the one nearest the engine and 17" for the other. I wanted to mention this as these lengths will position them to naturally go through the notch in the engine cover. I used two zip ties to keep them cleanly oriented:

IMG_8616.JPG


In this spot, the can can easily be drained, doesn't hang far out in the way and doesn't interfere with access to the power steering reservoir. As I mentioned earlier, you can skip making a bracket and use the two included self-drilling sheet metal screws to hang the can elsewhere, like on the inner fender frame above the unused battery tray or core support. I'd reserve these locations for the shorter can, though. Also, you'd need to run a lot more hose, potentially costing more than the custom bracketry. If you wanted to mount it next to the master cylinder, the same bracket idea would apply.

Total cost in parts for all included here, assuming you didn't already have anything on hand, would be around $50. Having to purchase the $15 36" flat bar just for that ~8" piece is the biggest con, IMO. If your PCV system doesn't pass that much oil, or if you don't mind draining the can more often, this 300ml setup is only $35 and might be the better option if you don't have the supplies or tools to make a bracket from scratch. It includes hose and a bracket that, with minor modification, can be mounted to the side of the alternator bracket using the factory bolt or to the master cylinder. I also like the parallel ports. I haven't seen good pics of its baffle design. But, it comes with a scrubber pad and looks like it'd work just as effectively as the other designs.

Tools used were a drill with an assortment of bits, 4" grinder with cut-off disc and flap disc, utility knife and ratchet set.
 
Last edited:

Hobert

Full Access Member
Joined
Jan 6, 2019
Posts
216
Reaction score
431
Location
Downers Grove, IL
@iamdub This is awesome and will help many. I stumbled around 4 years ago adding a can to my 2019 Suburban. Going overboard added 2 cans clean and dirty side which I now know was totally unnecessary on a non boosted engine. I did get a large can as up north we catch a lot of water vapor in the winter. Clean side can catches nothing.
 

j91z28d1

Full Access Member
Joined
Feb 28, 2022
Posts
1,977
Reaction score
2,285
@iamdub This is awesome and will help many. I stumbled around 4 years ago adding a can to my 2019 Suburban. Going overboard added 2 cans clean and dirty side which I now know was totally unnecessary on a non boosted engine. I did get a large can as up north we catch a lot of water vapor in the winter. Clean side can catches nothing.


clean side is interesting. I was thinking unless you drive using wot a lot or have a worn engine with some extra blow by it wouldn't do much.. it's nice to hear you're not seeing anything. maybe some of the guys that tow big trailers in the mountains at wot for minutes at a time.


there is also clean side setup that replaces the oil cap with a bigger vent with the same Brillo pad type stuff in it so the oil drains back into the valve cover. I might try it on a high performance engine that gets. drivin hard, but my stock truck that will never really see more than half throttle it seems like a waste of 99$.
 

BlaineBug

Full Access Member
Joined
Dec 29, 2019
Posts
1,129
Reaction score
628
https://www.ebay.com/itm/235184152580

Check this seller out: $24.41. Also has factory quick-disconnect fittings. States that it is for 2019-2022 Silverado, which is correct - there is NOTHING out there this cheap for the pre-2019 Silverado motor variety. Although if you search, you'll see that the only difference is the shape of the mounting bracket for installing and hanging the catch can itself. Perhaps you can modify it or build a new bracket - mine was just ordered so I have yet to report on how I'll mount it exactly in my 2019 model year Yukon, which has the same underhood configuration as the 2018 Silverado.
 
Last edited:

BlaineBug

Full Access Member
Joined
Dec 29, 2019
Posts
1,129
Reaction score
628
If one has a can with a mesh screen, which side should this go on, in or out? I'm reading conflicting things about this orientation.
 

j91z28d1

Full Access Member
Joined
Feb 28, 2022
Posts
1,977
Reaction score
2,285
If one has a can with a mesh screen, which side should this go on, in or out? I'm reading conflicting things about this orientation.

did you find the answer? I'd have to double check but I'm like 90% sure the inlet from the valve cover, or oily source goes into the port that has the mesh, or whatever they are using to give the oil mist something to collect on. and the outlet to the intake is the other port
 

BlaineBug

Full Access Member
Joined
Dec 29, 2019
Posts
1,129
Reaction score
628
did you find the answer? I'd have to double check but I'm like 90% sure the inlet from the valve cover, or oily source goes into the port that has the mesh, or whatever they are using to give the oil mist something to collect on. and the outlet to the intake is the other port
I had mine plumbed backwards, thinking that the screen and honeycomb should go on the vacuum side, when in actuality, I read some installation instructions the other day, that stated that the screen and honeycomb should go on the PCV valve side, to help separate and precipitate the oil and moisture out of the air as it flows through the catch can. So, I corrected my mistake the other day. Not sure how much of a difference it makes. I also added about 80% of a stainless steel pot scrubber to the inside of my can at the same time.
 

Forum statistics

Threads
129,239
Posts
1,812,630
Members
92,339
Latest member
Thekenstar

Latest posts

Top