Mircophones in roof of Denali making a Humming noise

Disclaimer: Links on this page pointing to Amazon, eBay and other sites may include affiliate code. If you click them and make a purchase, we may earn a small commission.

TheAutumnWind

Full Access Member
Joined
Jan 8, 2015
Posts
3,254
Reaction score
1,993
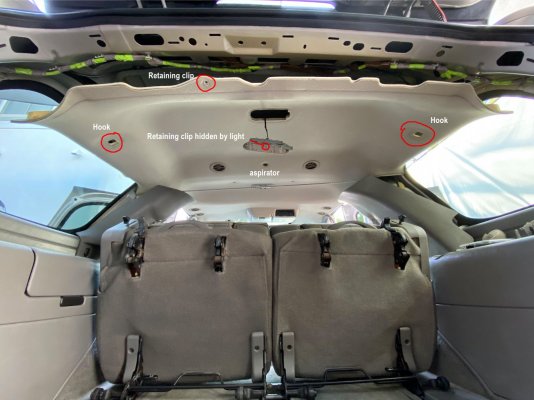
I just picked up my new to me 2005 Tahoe this morning and discovered the rear one on mine was buzzing. Merely blowing out the built up dust didnt fix mine. They ARE serviceable for anyone handy enough or inclined to give it 20 minutes of your time. The hardest part was coming to the eventual conclusion that the only way to get them out is through the hole itself. I thought wrongly that there would be a way in through either a some light or the vents.

For anyone interested here's what I did.
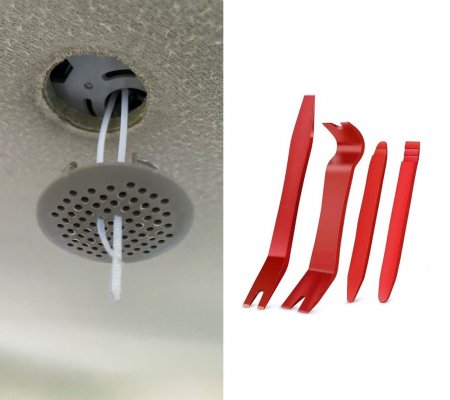
1. I took my ghetto fabbed trim tool (aka bent butter knife) and pried off the plastic cover.
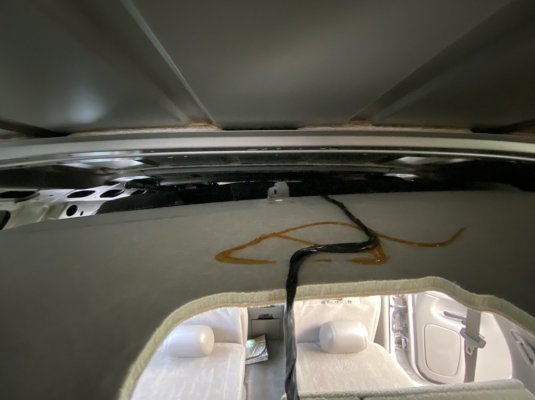
2. Widen the opening by carefully cut the headliner about a quarter inch in four places equally around the opening.
3. Pull the aspirator and wiring through the opening with some plyers...two pairs and some wiggling got mine out fairly easily.
4. Unsnapped the wiring connector.
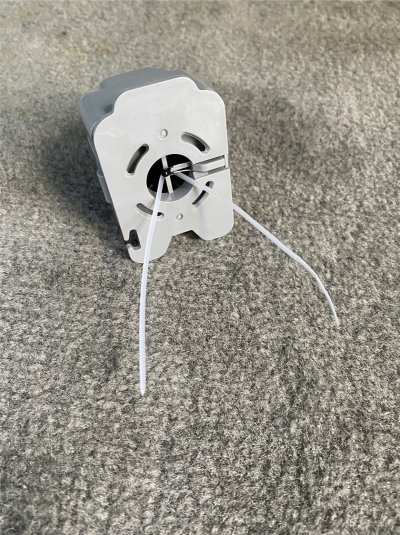
5. Carefully separate the top and bottom "housing" to the aspirator.
6. Separate the fan and electrical board from the bottom piece...there's a couple black pieces that just took a light push to release it.
7. Carefully bdnd back the thermometer to allow the fan to slide off.
8. Using some compressed air blow off all the dust, I washed all the pieces besides the electrical board, and inspect for any damage. The mating surface on mine between the fan and the lower "rubber seat" was a bit rough causing a clicking. It took some gentle scraping but after a couple tries the clicking went away. You can test it by just pitting fan back in and hitting it with the air. A little petroleum jelly on the shaft...hehe...and she was good to go.
9. Reassemble.
10. Connect wires and jam it back in.
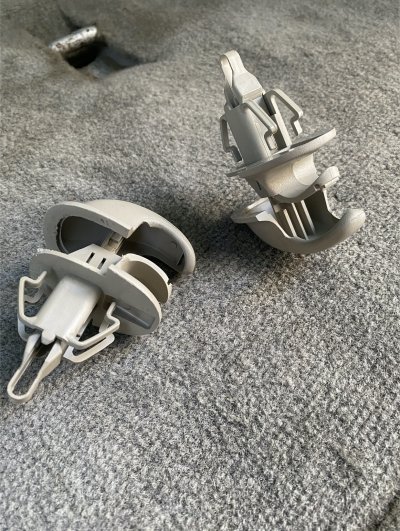
11. With a little wiggling around get the aspirator centered above the hole.
12. With even pressure snap the cover back on...the headliner should flex enough to allow counter pressure from the roof.

HTH

Darren

I am having this problem also. Will be looking into it soon

Had no idea that this is what it was. Thought it was a blown tweeter or something!
 
Last edited:

TheAutumnWind

Full Access Member
Joined
Jan 8, 2015
Posts
3,254
Reaction score
1,993
I am having this problem also. Will be looking into it soon

Had no idea that this is what it was. Thought it was a blown tweeter or something!


Hah, I have the same issue in the new esky periodically. Glad I know how to fix it!
 

apenney

TYF Newbie
Joined
May 23, 2017
Posts
1
Reaction score
3
Location
Wisconsin
Hi. I recently bought a 2003 Yukon and have this noise issue as well. I found this video that shows the fix. I haven't tried it out myself yet but it looks fairly straightforward.


Merc1973

Full Access Member
Joined
Sep 16, 2016
Posts
351
Reaction score
322
Location
Maryland
So does anybody have a tutorial for removing the REAR ceiling sensor??? That's a lot of headliner to come down unless there is an easier way? Im replacing my front one tonight since I only get heat with temp at max and the buzzing noise stopped, lol. I have no heat in the rear at all.
 

TheAutumnWind

Full Access Member
Joined
Jan 8, 2015
Posts
3,254
Reaction score
1,993
Replaced mine today. Hopefully no more hum. Old one was full of dust and junk.

New one looks slightly different.

Screwed up the a pillar cover though damnit... Hopefully plastic weld putty will hold it in there.

20180105_123050_HDR.jpg 20180105_122948.jpg 20180105_123352_HDR.jpg
 

TaboltB2015

Member
Joined
Sep 5, 2016
Posts
83
Reaction score
31
I have a 2003 and mine does the same thing. I did a little researching on it and found that service bulletin though so I wasn't that worried about it. How do those come out? Do they have little clips that pop out or does that side of the headliner have to be removed?


I work at a dealer and most of the time I can just take the headliner down a little and pull it out and just use the air blower and get all the gunk out of it and then if that don't fix it which it dose most of the time just unplug it


Sent from my iPhone using Tapatalk
 

RyanJW

TYF Newbie
Joined
Nov 13, 2014
Posts
17
Reaction score
14
Location
Palo Alto
I have the same question about the rear sensor? Will I have to remove all the headliner?

Also I'm guessing it is the same part number as the driver side one?
 

TheAutumnWind

Full Access Member
Joined
Jan 8, 2015
Posts
3,254
Reaction score
1,993
I have the same question about the rear sensor? Will I have to remove all the headliner?

Also I'm guessing it is the same part number as the driver side one?
I didnt replace mine in the rear, but I did remove it and clean it.

In the case of my escalade ESV there are some plastic push clips that hold the headliner in very close to the rear sensor. It was quite easy to remove a few and push the liner out of the way enough to deal with the rear sensor.
 

ARogg619

Member
Joined
Oct 10, 2019
Posts
85
Reaction score
53
does anyone know where to get one of the little round covers? I fixed mine by cleaning but the little cover has always been missing since I bought the truck
 

delmaracer

TYF Newbie
Joined
Jan 24, 2023
Posts
4
Reaction score
0
They're not microphones, they're small fans that have something to do with the climate control system.
My 2005 has a very similar noise from the round thingy over & to the left side of the drivers head. It kinda sounds like a small fan to me. But how do ya get access to that item? Is there some schematic for it?
 

MassHoe04

Full Access Member
Joined
Nov 4, 2021
Posts
1,588
Reaction score
2,841
Location
Western MA
My 2005 has a very similar noise from the round thingy over & to the left side of the drivers head. It kinda sounds like a small fan to me. But how do ya get access to that item? Is there some schematic for it?
I believe that pops out of the headliner if gently pried out. There are a couple of retention clips molded into the plastic holding in the headliner panel. The sensor should snap out of/into the the face plate.

I didn't watch, but here is a YouTube on it...

I have heard they can make that noise after sucking in dirt and dust over the years. I saw a post somewhere, where a can of compressed gas (a can of computer/electronics duster things) was used to blow some crud out to solve the issue.

Mine makes a slight buzz once in a while, but I have not found the urge to pay $50 for a new one. I live the the occasional noise.
 
Last edited:

Roilux

Senior Member
Supporting Member
Joined
May 15, 2022
Posts
133
Reaction score
329
Location
Burbank, CA
So does anybody have a tutorial for removing the REAR ceiling sensor?

Genuine GM Parts # 22834330 Cabin Air Temperature Sensor Aspirator

Here's how I accessed the rear aspirator. Use a panel clip removal tool to remove retainer clips in the headliner. (See last photo, 2nd tool from left is most useful) I don’t know if this method works on Suburban, ESV or XL’s rear aspirators. There’s a video earlier in this thread showing how to replace the front unit.

Let’s go!

Remove the upper plastic trim at the rear of the headliner by pulling straight down.

Remove both D pillar panels by pulling in and forward simultaneously.

Disconnect speaker wires. Set panels aside.

Remove the rear cargo light lens and then light housing by sliding it sideways and let it hang.

Remove both coat hooks by pulling and prying along the seam that joins each hook. Each hook is two pieces that when eventually pulled apart will release as an anchor and allow the headliner sides to drop. I used two small flat screwdrivers and gently worked around the seam perimeter. Refer to photos for expanded hooks.

Un-fasten the C pillar panels down to the seat belts by pulling in toward the center of the vehicle.

Use a bungee cord to keep them leaning toward each other as shown in photo.

Remove the grill from the aspirator with pry tool.

Remove the remaining two round retaining clips (circled in red) along at the rear and center of headliner with pry tool. The headliner should now drop easily at the rear.

Reach in through the rear being cautious not to bend the headliner too much thereby creasing it.

Unplug the old aspirator and plug in the new unit. Check for power.

Position the aspirator over the opening while another person attaches the grill from underneath. If going solo, you MIGHT be able to reattach the grill and hold the aspirator while accessing them from either side. If not, use a zip tie as shown in photo to hold the aspirator in place, secure grill and gently pull out zip tie. Take care to use center most grill holes to help orientate grill snapping into slots on aspirator. Remove zip tie, it’s the prudent thing to do!

Replace center clips in headliner and side hooks followed by the light assembly.

Push C panels back in place, reattach speaker wires, replace D panels and lastly upper plastic trim between the D panels.


Viola! Now celebrate this little victory with a frosty beverage.

Happy Trails!
 

Attachments

  • 2.jpg
    2.jpg
    243 KB · Views: 35
  • 3.jpg
    3.jpg
    866.9 KB · Views: 35
  • 4.jpg
    4.jpg
    176.3 KB · Views: 32
  • 5.jpg
    5.jpg
    890.8 KB · Views: 34
  • 6.jpg
    6.jpg
    209.9 KB · Views: 34

mattbta

Full Access Member
Joined
Jun 19, 2012
Posts
1,185
Reaction score
2,217
Location
Frisco, TX
Genuine GM Parts # 22834330 Cabin Air Temperature Sensor Aspirator

Here's how I accessed the rear aspirator. Use a panel clip removal tool to remove retainer clips in the headliner. (See last photo, 2nd tool from left is most useful) I don’t know if this method works on Suburban, ESV or XL’s rear aspirators. There’s a video earlier in this thread showing how to replace the front unit.

Let’s go!

Remove the upper plastic trim at the rear of the headliner by pulling straight down.

Remove both D pillar panels by pulling in and forward simultaneously.

Disconnect speaker wires. Set panels aside.

Remove the rear cargo light lens and then light housing by sliding it sideways and let it hang.

Remove both coat hooks by pulling and prying along the seam that joins each hook. Each hook is two pieces that when eventually pulled apart will release as an anchor and allow the headliner sides to drop. I used two small flat screwdrivers and gently worked around the seam perimeter. Refer to photos for expanded hooks.

Un-fasten the C pillar panels down to the seat belts by pulling in toward the center of the vehicle.

Use a bungee cord to keep them leaning toward each other as shown in photo.

Remove the grill from the aspirator with pry tool.

Remove the remaining two round retaining clips (circled in red) along at the rear and center of headliner with pry tool. The headliner should now drop easily at the rear.

Reach in through the rear being cautious not to bend the headliner too much thereby creasing it.

Unplug the old aspirator and plug in the new unit. Check for power.

Position the aspirator over the opening while another person attaches the grill from underneath. If going solo, you MIGHT be able to reattach the grill and hold the aspirator while accessing them from either side. If not, use a zip tie as shown in photo to hold the aspirator in place, secure grill and gently pull out zip tie. Take care to use center most grill holes to help orientate grill snapping into slots on aspirator. Remove zip tie, it’s the prudent thing to do!

Replace center clips in headliner and side hooks followed by the light assembly.

Push C panels back in place, reattach speaker wires, replace D panels and lastly upper plastic trim between the D panels.


Viola! Now celebrate this little victory with a frosty beverage.

Happy Trails!
Here we are doing the same jobs the same way. Good info for others.

There was no way to access that one the way the service manual indicates, so I loosened the headliner as well. Those coat hooks gave me challenges. Watched many vids and still managed to booger them up.
 

S33k3r

Elite Member
Supporting Member
Joined
Aug 14, 2017
Posts
2,848
Reaction score
4,091
Location
Dallas, Texas
Here we are doing the same jobs the same way. Good info for others.

There was no way to access that one the way the service manual indicates, so I loosened the headliner as well. Those coat hooks gave me challenges. Watched many vids and still managed to booger them up.
Those are pretty easy to get from part outs. I don't expect they are expensive, either.
 

Xing_Gateway

TYF Newbie
Joined
Sep 17, 2023
Posts
17
Reaction score
15
Question... is this supposed to be on all the time? I had an issue where my AC would only blow hot or cold. Saw on here that it could be the aspirator. I bought a new one and when I went to replace it the one I took out looked like the attached pic. Yeah, nothing there.


Anyway, I replaced it but AC now just blows only hot air. I haven't really checked to see if I can hear the new aspirator fan going... when is it supposed to be on?
PXL_20240309_203408936.jpg
 

Fless

Staff member
Moderator
Joined
Apr 2, 2017
Posts
16,255
Reaction score
33,590
Location
People's Republic of Colorado
Question... is this supposed to be on all the time? I had an issue where my AC would only blow hot or cold. Saw on here that it could be the aspirator. I bought a new one and when I went to replace it the one I took out looked like the attached pic. Yeah, nothing there.


Anyway, I replaced it but AC now just blows only hot air. I haven't really checked to see if I can hear the new aspirator fan going... when is it supposed to be on?View attachment 427582

I'm not sure what's supposed to happen, but mine seems to run all the time. If I'm in the truck with the key on "run", but the engine not running (like checking for codes), I can hear it softly running.
 

Forum statistics

Threads
137,671
Posts
1,989,103
Members
102,675
Latest member
j_jerry79

Latest posts

Back
Top