What did you do to your NBS GMT800 Tahoe/Yukon Today?

Disclaimer: Links on this page pointing to Amazon, eBay and other sites may include affiliate code. If you click them and make a purchase, we may earn a small commission.

S33k3r

Elite Member
Supporting Member
Joined
Aug 14, 2017
Posts
2,861
Reaction score
4,117
Location
Dallas, Texas
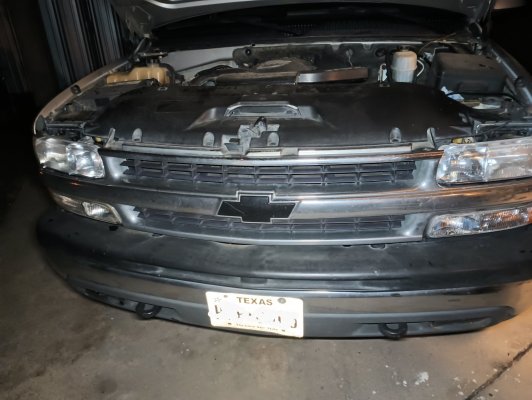
A few days ago, we played "musical batteries." My daughter's 2003 Sierra has both a parasitic drain AND what appears to be a bad cable between the alternator and the battery. Yay. Had to give her the battery from my 2004 Silverado; that's how we figured out the bad cable. It wouldn't start with a known good battery. When I went to remove it, I jiggled something and she suddenly had power.

Next, I stole one of the batteries from my 2007 and placed it in my 2004, so I could move it out of my daughter's way...

Spent 30-45 minutes trying to find my trickle charger, but finally found it. Through her battery on the trickle charger. After a day of that, reinstalled in my truck, except the battery that was in the truck was low, so I threw it on the trickle charger. Got it charged a day later, got it reinstalled, and threw the trickle charger on the second battery in the 2007. Realized I had 2, AGM batteries...

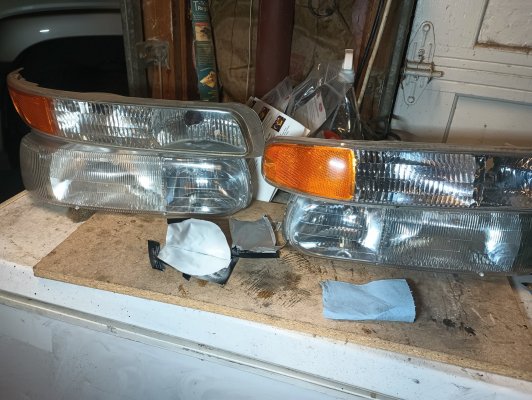
I had placed some items in our Amazon cart, and then my wife ordered them. So now the gaping holes are filled: there was a reflector missing from my Wife's 2500 Suburban, as well as one from my 2007 Silverado. Yay.
 

strutaeng

Full Access Member
Joined
Aug 10, 2023
Posts
1,949
Reaction score
4,227
Location
Dallas, Texas
I tried the 3M headlight restoration kit on my 06 Suburban. It worked pretty well. It was supposed to have some sort of "synthetic wax" but both kits I ordered the envelopes were empty! WTF

I think for my 99 Silverado and other vehicles I'm just going to try to find some different grits of sandpaper for my die grinder and polish them and use the regular rubbing compound for auto body.

...but they do look a lot better!
 

Attachments

  • IMG_20240220_204643424.jpg
    IMG_20240220_204643424.jpg
    455.7 KB · Views: 23
  • IMG_20240220_205633105~2.jpg
    IMG_20240220_205633105~2.jpg
    248.1 KB · Views: 23

S33k3r

Elite Member
Supporting Member
Joined
Aug 14, 2017
Posts
2,861
Reaction score
4,117
Location
Dallas, Texas
I tried the 3M headlight restoration kit on my 06 Suburban. It worked pretty well. It was supposed to have some sort of "synthetic wax" but both kits I ordered the envelopes were empty! WTF

I think for my 99 Silverado and other vehicles I'm just going to try to find some different grits of sandpaper for my die grinder and polish them and use the regular rubbing compound for auto body.

...but they do look a lot better!
Any chance you can come do mine? :cool:
 

strutaeng

Full Access Member
Joined
Aug 10, 2023
Posts
1,949
Reaction score
4,227
Location
Dallas, Texas
Any chance you can come do mine? :cool:
LoL. It's kinda of a tedious process actually. Holding the headlamp awkward shape and holding the drill with the other hand. It kinda wore out your arm.

So I think for the next job, I'm gonna gently hold them in my vice and use the die grinder. Probably spray them with a 2k clear also to keep them looking clear.

Project Farm recently did a video on these kits. The Sylvania kit is the one that actually came out on top...
 
Last edited:

Fless

Staff member
Moderator
Joined
Apr 2, 2017
Posts
16,390
Reaction score
33,895
Location
People's Republic of Colorado
LoL. It's kinda of a tedious process actually. Holding the headlamp awkward shape and holding the drill with the other hand. It kinda wore out your arm.

So I think for the next job, I'm gonna gently hold them in my vice and use the die grinder. Probably spray them with a 2k clear also to keep them looking clear.

Why not pull the grill off if it's in the way, and do them on the truck?
 

strutaeng

Full Access Member
Joined
Aug 10, 2023
Posts
1,949
Reaction score
4,227
Location
Dallas, Texas
Why not pull the grill off if it's in the way, and do them on the truck?
I think you have to remove the headlights to pull the grill, no? I was just thinking it would be easier to do this without me leaning down.

The removing of the headlights is an increasingly easy task on these trucks. If anyone knows the fella at GM that designed this system, give him a handshake on my behalf :cool:
 

Jimmyy

Full Access Member
Joined
Oct 27, 2020
Posts
1,930
Reaction score
9,948
Location
Minnesota
LoL. It's kinda of a tedious process actually. Holding the headlamp awkward shape and holding the drill with the other hand. It kinda wore out your arm.

So I think for the next job, I'm gonna gently hold them in my vice and use the die grinder. Probably spray them with a 2k clear also to keep them looking clear.

Project Farm recently did a video on these kits. The Sylvania kit is the one that actually came out on top...
I used the Sylvania kit on my DD. Easy to use. It lasted 2 years. I would have used it again but the lens had cracks in it so I replaced them. This is a good option.
 

dps01

Senior Member
Navy Supporting Member
Joined
Nov 25, 2017
Posts
213
Reaction score
538
Location
N. TEXAS
I hope to never have to do this again.
Ended up with one small wrinkle in the rear cargo area…
 

Attachments

  • IMG_9490.jpeg
    IMG_9490.jpeg
    199.8 KB · Views: 21
  • IMG_9433.jpeg
    IMG_9433.jpeg
    370.8 KB · Views: 23
  • IMG_9417.jpeg
    IMG_9417.jpeg
    317.9 KB · Views: 29
  • IMG_9406.jpeg
    IMG_9406.jpeg
    721.1 KB · Views: 28

mattbta

Full Access Member
Joined
Jun 19, 2012
Posts
1,185
Reaction score
2,218
Location
Frisco, TX
I hope to never have to do this again.
Ended up with one small wrinkle in the rear cargo area…
Was it a PITA with the rear HVAC? I didn’t pull mine all the way out but replacing that rear aspirator was not fun.

Good job.
 

dps01

Senior Member
Navy Supporting Member
Joined
Nov 25, 2017
Posts
213
Reaction score
538
Location
N. TEXAS
Was it a PITA
It was.
This was actually the 2nd time around for a redo of the headliner.

The entire piece has to pivot down on the driver side (for removal) to slide free of the air supply tube. (Right side of photo below)

IMG_9346.jpeg

Aside from all the “finessing”, the hardest part was not cracking the edges of the headliner that had to be repaired using fiberglass resin on the reinstall.

…oh, and definitely was difficult to keep it clean… nitrile gloves were a godsend…

BEFORE:
IMG_9338.jpeg
DURING:
IMG_9429.jpeg
FINAL:
IMG_9491.jpeg
 

strutaeng

Full Access Member
Joined
Aug 10, 2023
Posts
1,949
Reaction score
4,227
Location
Dallas, Texas
Oh, I was just talking to a buddy about headliners...

Can anyone recommend a source for materials?Fabric and adhesive? Maybe a YT video as well? How hard is it? I feel like if I can remove it myself, might as well try it.

My 04 project Suburban needs a new headliner. My 99 Silverado has "just" started to get the fabric unbonded at the edges, but I'm going to try to re-adhere it with Super 77 that one.
 

mountie

Elite Member
Supporting Member
Joined
May 9, 2018
Posts
7,148
Reaction score
13,936
Location
Wellington, Fl., (formally Kalifornia)
Oh, I was just talking to a buddy about headliners...

Can anyone recommend a source for materials?Fabric and adhesive? Maybe a YT video as well? How hard is it? I feel like if I can remove it myself, might as well try it.

My 04 project Suburban needs a new headliner. My 99 Silverado has "just" started to get the fabric unbonded at the edges, but I'm going to try to re-adhere it with Super 77 that one.
I tried Permatex Hedliner Adheisive spray along the top of door edge. It held for 2 weeks then failed.
 

Tonyrodz

Resident Resident
Joined
Feb 16, 2012
Posts
33,203
Reaction score
51,461
Location
Central Jersey
Oh, I was just talking to a buddy about headliners...

Can anyone recommend a source for materials?Fabric and adhesive? Maybe a YT video as well? How hard is it? I feel like if I can remove it myself, might as well try it.

My 04 project Suburban needs a new headliner. My 99 Silverado has "just" started to get the fabric unbonded at the edges, but I'm going to try to re-adhere it with Super 77 that one.
Auto parts stores near me sell headliner material as a kit. Might want to check your local parts stores. Super 77 is good stuff, but you'll only have 1 shot to get it right. I'd suggest watching a few YouTube videos to get a good idea on the process.
I tried Permatex Hedliner Adheisive spray along the top of door edge. It held for 2 weeks then failed.
Permatex spray adhesive is garbage.
 

mountie

Elite Member
Supporting Member
Joined
May 9, 2018
Posts
7,148
Reaction score
13,936
Location
Wellington, Fl., (formally Kalifornia)
Auto parts stores near me sell headliner material as a kit. Might want to check your local parts stores. Super 77 is good stuff, but you'll only have 1 shot to get it right. I'd suggest watching a few YouTube videos to get a good idea on the process.

Permatex spray adhesive is garbage.
And I have the proof..... :crazy:
 

RAMurphy

Bob
Military
Joined
Oct 5, 2011
Posts
1,450
Reaction score
4,649
Location
S. Maryland
After changing my fuel pump today I decided to finally remove my starboard and port (right and left) body side molding. Started on the driver side. Now to find the best way to remove the adhesive. I do like the cleaner look. Pictures to follow, when it gets lighter out.
 

Tonyrodz

Resident Resident
Joined
Feb 16, 2012
Posts
33,203
Reaction score
51,461
Location
Central Jersey
After changing my fuel pump today I decided to finally remove my starboard and port (right and left) body side molding. Started on the driver side. Now to find the best way to remove the adhesive. I do like the cleaner look. Pictures to follow, when it gets lighter out.
Easiest way--3M sells an adhesive/decal removal wheel. Definitely worth buying. Fits in your hand drill.
 

Forum statistics

Threads
137,804
Posts
1,992,561
Members
102,792
Latest member
Hodmjstone

Latest posts

Back
Top