Dave's 1995 Tahoe LS 4X4 2dr

Disclaimer: Links on this page pointing to Amazon, eBay and other sites may include affiliate code. If you click them and make a purchase, we may earn a small commission.

David Staines

Member
Joined
Jan 25, 2020
Posts
84
Reaction score
153
Location
Columbia City, OR
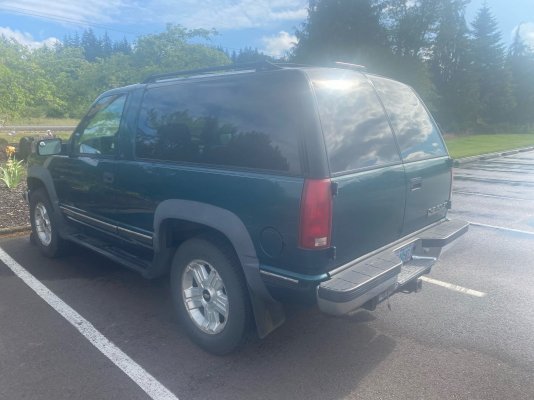
I just purchased a 1995 Tahoe LS 4x4 2dr. I've attached the pictures from the craigslist add. I'll take more as I upgrade/repair the vehicle.

I've always like Blazers. I've owned two 71's in the past, but didn't have the opportunity to keep them and restore them. Life just got in the way. Now... they're well out of my price range or require WAY too much work. I've decided to look at the Tahoe 2drs since I've owned a couple of gen 2 Tahoes (2005 and 2001). I still own the 2001 and love it. I ultimately decided to go with the OBD 2dr. Finding one in my price range meant some sacrifice on quality. The interior is in very good shape, but the body is door-ding laded with some damage on the passenger side. I've decided to hold off on getting that repaired until body shops return to their senses. That might never happen, however.

I have decided to get all of the little things fixed. I'm used to this routine as I did the same things with my heavily used Gen 2s. I must say that I'm a bit disappointed in regards to resources for these vehicles. Some of it is design, some of it is scarcity and the rest I can only attribute to "too old to supply parts for".

I'll keep a list of things I find wrong in the OP and post my fixes in replies below.

Engine:

- Idles at 1000 rpm - suspect vacuum leak
- Water pump
- Fan clutch

Body:

- Door detent pins
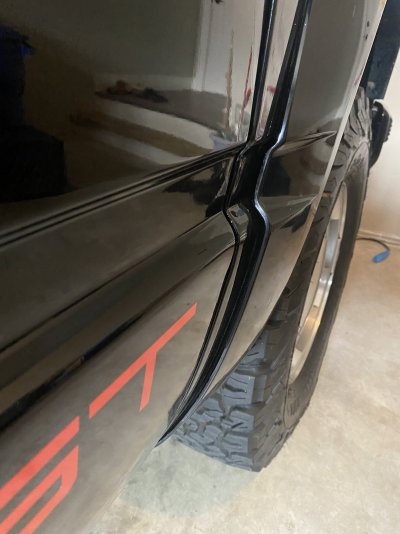
- Dent on passenger side
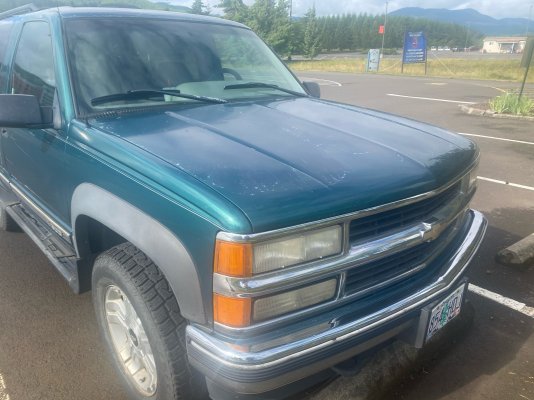
- Peeling clearcoat on hood and roof
- door dings galore
- remove trim
- remove pinstriping
- correct and replace 3rd brake light

Interior:

- Ashtray/power plugs won't stay up
- New radio
- Sirius XM
- Convert 12v outlets
- New speakers
- Broken passenger door handle (inside)
- Dirty
- Clean out blower duct

Other:

- Light housings are foggy
- Driveline u-joints
- AC needs replaced
- Brakes


image0.jpeg

image2.jpeg
 

Attachments

  • image1.jpeg
    image1.jpeg
    288 KB · Views: 17
  • image3.jpeg
    image3.jpeg
    309.1 KB · Views: 17
Last edited:
OP
OP
David Staines

David Staines

Member
Joined
Jan 25, 2020
Posts
84
Reaction score
153
Location
Columbia City, OR
- Ashtray / power plugs won't stay up

This is a pretty standard problem. It was a relatively easy fix, but required removing the lower dash panel (below steering wheel). That was easily removed with a 7mm socket driver. Unfortunately, the 26 year old clips did not fare well. 2 were completely missing and the rest were broken in some capacity. Fortunately, these are very standard clips for GM vehicles and I already had some after working on my Gen 2s. The spring on the right side of the ashtray / power plugs was dislogded. I was able to put it back into the correct location and all was well. I took the opportunity to clean the panel and replace the clips while I had it out. Everything went back together without issue.

Clips: https://www.auveco.com/door-int-trim-instrument-panel-fastener-21387
 
OP
OP
David Staines

David Staines

Member
Joined
Jan 25, 2020
Posts
84
Reaction score
153
Location
Columbia City, OR
- Door detent pins

I found a set of these on amazon and purchased them. The driver side detent pin's roller had completely broken off and the spring was missing. The passenger side's roller was bent and ready to go at any time.

I will say... these are a fricking pain in the ass for the first one and simply a pain for the 2nd. The originals are pressed in at the factory prior to putting the doors on. That would be the easy way to do it. The top of these detent pins are pressed/mushroomed into place. In order to remove them, you have to remove the mushroom from the top of the pin and then punch the pin down and out. I tried a couple of different things for removing the mushroom head: 1) an impact hammer with a cold chisel fitting. That didn't do much at all. 2) a grinder. I simply couldn't get the grinder in there to get at it. 3) A dremel tool. This actually worked, but takes about 10 minutes of noisy dremel grinding to get things ground flat. Once I got the mushroom head ground off, the rest punched out without issue. I had a very long punch that was perfectly sized for this. I've seen several videos where people used a 1/4" ratchet extension as a punch.

The real fun part is getting the new piece installed. There isn't really a good angle and it really seems as if the replacement part is just too big for anything other than hydraulic compression. I decided to repurpose the dremel and take a little off of the press-in area. This allowed me to hammer the piece into position and place a c-clip on the head (no more grinding).

The spring was easier than I thought it would be as I watched videos ahead of time and purchased a spring compression tool made for this. I had a 9/16" ratchet dogbone that worked well as you can't get a socket on the compression tool to release it once the spring is in position. The springs were surprisingly easy.

Spring Tool: https://www.amazon.com/dp/B0187IOXJA
Detents: https://www.amazon.com/dp/B000COB5KS
Spring: https://www.amazon.com/dp/B000C5I3ZW
 
OP
OP
David Staines

David Staines

Member
Joined
Jan 25, 2020
Posts
84
Reaction score
153
Location
Columbia City, OR
- Passenger inside door handle

I highly recommend doing this with the window down.

This wasn't nearly as bad as I thought it would be. Pulling the door panel was a bit tricky, but nothing serious. First, I pulled the two screws from the inside armrest. I then removed the trim piece above the door panel that backs the rearview mirror. That was just pulling out a little then pulling up. I then pulled off the trim around the door handle. This was also much easier than I thought it would be, but there were problems. To remove this, you need to gently pry out with a trim tool while you insert a screwdriver (or thin trim tool) between the handle enclosure and the trim piece. The tabs are notched to lock inside, so you have to insert a tool to pry them away from the handle. This was easy. Unfortunately, the piece had already been removed once before and had a broken tab. It also looked like the PO had dipped the damn thing in bleach. I've ordered two new ones. After this, I removed the window control / speaker panel by simply prying up with an interior clip tool.

After unplugging the speaker / window controller, you can start pulling off the door panel. You do this by prying it away from the door (don't start at the top... start at the bottom). I highly recommend having spare retainer pieces (I'll post below) on hand. These aren't really designed to be re-used, but can be if everything goes well and if POs haven't already lost/destroyed some. I found 3 completely missing and 2 that failed to release properly. I found direct replacements at NAPA. Before completely removing the panel, be sure to disconnect the door/foot light. Once that's done, you'll need to lift up on the door to unhook the folded over portion that wraps around the door frame by the window.

After the panel was removed, I drilled out the rivet holding in the old door handle. I slide the door handle forward and then pulled it out (disconnecting the door lock and release rods). This is all pretty straight forward.

I replaced the broken door handle with a new part and hooked up the door lock and release rods. I then inserted the handle into the door and slid it backwards to lock it in position. I tested the lock and release to make sure they worked. The next step was re-riveting the handle in place using a 3/16 rivet (1/2" long). It looks like a factory rivet when done.

Everything went back together in reverse order quite nicely. Once again, I recommend having replacement retainers on hand. I dropped the top of the panel over the upper lip of the window opening (you'll feel it drop in place) and then made sure all of the retainers were lined up properly before slapping the panel up against the door and locking it in position.

Door handles: https://www.amazon.com/dp/B0943FVHMR
Panel retainers: GM 15960325 (google search that)
Handle trim piece: https://www.amazon.com/gp/product/B009S3275G https://www.amazon.com/gp/product/B009S326KM
 
OP
OP
David Staines

David Staines

Member
Joined
Jan 25, 2020
Posts
84
Reaction score
153
Location
Columbia City, OR
- New radio

The correct mounting hardware finally came in from Crutchfield. Their system had initially assigned and sent the wrong one. After spending some time on the line with their tech support, they sent out the correct bracket free of charge and identified the problem in their database. I installed a Restrosound New York M4. The bracket kit came with the harness adapter and made installing the radio plug-and-play. I still need to figure out exactly how I want to route the microphone. I'm leaning towards putting it on the visor as opposed to the roof center console.
 

east302

Full Access Member
Joined
Dec 21, 2016
Posts
1,555
Reaction score
1,379
Location
Mississippi
- Light housings are foggy
Assuming that you have the stock (Sylvania) lenses, I’d try to wet sand those and see if you can get them cleaned up. Even when new, they were nothing compared to the subsequent (2000-06) generation in terms of light output.

Aftermarket headlights pretty much stink on these, though the Spyder brand gets somewhat better marks.

Nice choice, by the way!
 
OP
OP
David Staines

David Staines

Member
Joined
Jan 25, 2020
Posts
84
Reaction score
153
Location
Columbia City, OR
- Speakers

Round 1 is complete. I had a blown left rear speaker. I bought a set of 4x10s from retrosound. They fit nicely, but didn't come with an adapter so I cut and spliced in the appropriate connectors. I changed the bad speaker and tested both out. They sound almost identical.. so I decided not to replace the other side. I'll save the remaining speaker as a backup.

I still have tears in my front right speaker. It doesn't seem to impact sound too much at normal levels. I've ordered a new set from Crutchfield, but they went backorder. I can't say I'm in a rush to do this just yet.
 
OP
OP
David Staines

David Staines

Member
Joined
Jan 25, 2020
Posts
84
Reaction score
153
Location
Columbia City, OR
- Clean out blower duct

I actually removed the blower motor assembly a week ago and cleaned this out. Unfortunately, the motor cover crumbled at the touch. I had to order a new one. The dealer wanted $97 with 2 weeks delivery time. I found one on-line for $73 that arrived 2 days after ordering.

In order to remove the cover on my Tahoe, I had to remove the PCM that is attached to two posts coming off of the duct housing that the blower cover needs to go over. This means removing the PCM and the PCM tray. The PCM has two clips on the left bottom side that hold it in place. What you really need to do is slide the whole PCM left as it has 2 pins on the right side that hold it in place. Pry the clips from the bottom enough to clear the plastic lip they clipped around and the whole unit will slide left and lift out. Put the clips back in place (push them back up) before putting the PCM back in.

The PCM cover has 4 screws. 2 are easy. 1 is a bit tough to remove and requires a bit of a touch to restart on installation. The 4th requires a 7mm wrench to back out a few turns (doesn't need to be removed, only backed enough for the bracket to slide up).

With the tray removed, everything is easy to get to.

Be warned: There are multiple videos on the internet without the PCM in place (most trucks like this?). I had to use a 1992 Silverado/Tahoe video with a different glove box for my 95. This vid was the most helpful (except for glove box)


Once everything is out of the way, you can reach up into the heater box area and clean out the debris. Mine wasn't actually that bad.
 
OP
OP
David Staines

David Staines

Member
Joined
Jan 25, 2020
Posts
84
Reaction score
153
Location
Columbia City, OR
I also decided to have a local shop do a replacement of my AC compressor, dryer and expansion device. They also replaced the two quick disconnect ports as well as a leaky fitting they noticed on my water pump. It came to $740 including parts. The local dealer wanted $2400 in labor alone... without quoting the parts. My AC now blows cold and hard. Booya!
 

Forum statistics

Threads
128,785
Posts
1,805,347
Members
91,762
Latest member
DenaliRoyal
Top