04blackout
Full Access Member
- Joined
- Jan 6, 2013
- Posts
- 233
- Reaction score
- 1
ok guys, heres the scoop on how i ditched my torsion bars and installed qa1 coilovers up front...
first off... i've never been good at posting new threads about how i did suff, or making how to threads, so please take it easy on me. i didnt really take any pics other than what i sent to Mike (tahoewhat) to make sure i was doing shit right
NEXT...
a HUGE thank you to Richard (Atomic) for making these brackets, and bringing this conversion to our community. also a huge thank you to Mike (Tahoewhat) not only for being the first one to take the plunge and make this happen, but also for giving out his cell # and answering all kinds of ridiculous questions via text
THREADS I USED IN MY RESEARCH
any interest in 4wd front coilover conversion
coil over conversion installed
2000 silverado project charlie murphy
UCA and camber issues
MY SHOPPING LIST
Atomic conversion brackets (i only used lowers)
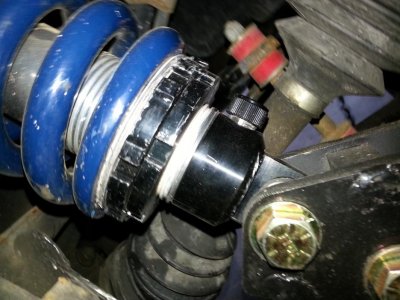
qa1 ds301 coilover shocks
Hyperco 7" 1200lb 2.5" ID coils ($160 ebay, free shipping)
spanner wrench and thrust bearings
upgraded steel shock bearings (2 of these)
top spacers
bottom spacers
bumpstops
pro comp shock mount conversion
belltech total alignment kit
i also picked up a set of qa1 rs702 adjustable rear shocks and 2 of the upper loop conversion kit to complete the rear shock swap
-----------------------------------------------------
i took my time and did this over the course of 2 days, but it could easily have been a 1 day project, as long as you know what ur doing and have it all planned out pretty good. for me, i had just installed my djm 3/5 a little over a year ago, so i knew all the ins and outs of tearing this beast down, so it was pretty simple. a 12lb sledge was my best friend for popping the lower ball joints loose and for breaking the rusty keys off the torsion bars
if you have read any of the above threads, they have pretty good pics of how to install all of the components, so i wont go into any of that unless someone has a specific question
THE MAIN THING I DID DIFFERENT THAN THE OTHERS, was i did not use any upper reinforcement, i bolted my coilover shock straight to the factory upper shock perch, using the pro comp adapter mentioned above
another important point is that if you use the factory LCA, you will need the belltech camber kit i listed up top. i ran my cams all the way out just to be able to drive it, and i still need more adjustment
MY REVIEW
so far, i have about 150 miles on my setup, and i am still adjusting it a little bit every day. at this point, i am pretty sure i like the front on 14/18 and the rear on 15/18, but i am still going to get new rear springs to replace my 5305 so that could change
of course i had to trim the universal bumpstop up front and spend a fair amount of time getting the ride height just right, but everything is so close to perfectly level that you could never tell just by looking at it. the responsiveness over bumps is stellar, and while it definitely still rides like a lowered truck, it is NIGHT AND DAY from what it was with the torsion bars!
after alot of reasearch, and finding out that ridetech uses the factory upper shock perch for their airbag shocks, i decided to take a chance and find out if it is a suitable coilover mount... so far, it is holding up just fine, and i have race car syndrome while taking the on/off ramps so its not like i just baby this thing along. it definitely gets a good workout
all in all, im very happy with the conversion, and i would definitely suggest it to anyone looking to go lower (or higher) than stock, to consider this as an alternative (though more expensive) to LCA's or psindles in the front. the fact that you can adjust the firmness by just hopping out and turning a knob is awesome, but they ride and handle way better than the stupid torsion bars... best of all, i kept my bars, keys, and crossmember, so IF i ever sell it, i can easily swap back to stock and sell these to someone
first off... i've never been good at posting new threads about how i did suff, or making how to threads, so please take it easy on me. i didnt really take any pics other than what i sent to Mike (tahoewhat) to make sure i was doing shit right
NEXT...
a HUGE thank you to Richard (Atomic) for making these brackets, and bringing this conversion to our community. also a huge thank you to Mike (Tahoewhat) not only for being the first one to take the plunge and make this happen, but also for giving out his cell # and answering all kinds of ridiculous questions via text
THREADS I USED IN MY RESEARCH
any interest in 4wd front coilover conversion
coil over conversion installed
2000 silverado project charlie murphy
UCA and camber issues
MY SHOPPING LIST
Atomic conversion brackets (i only used lowers)
qa1 ds301 coilover shocks
Hyperco 7" 1200lb 2.5" ID coils ($160 ebay, free shipping)
spanner wrench and thrust bearings
upgraded steel shock bearings (2 of these)
top spacers
bottom spacers
bumpstops
pro comp shock mount conversion
belltech total alignment kit
i also picked up a set of qa1 rs702 adjustable rear shocks and 2 of the upper loop conversion kit to complete the rear shock swap
-----------------------------------------------------
i took my time and did this over the course of 2 days, but it could easily have been a 1 day project, as long as you know what ur doing and have it all planned out pretty good. for me, i had just installed my djm 3/5 a little over a year ago, so i knew all the ins and outs of tearing this beast down, so it was pretty simple. a 12lb sledge was my best friend for popping the lower ball joints loose and for breaking the rusty keys off the torsion bars
if you have read any of the above threads, they have pretty good pics of how to install all of the components, so i wont go into any of that unless someone has a specific question
THE MAIN THING I DID DIFFERENT THAN THE OTHERS, was i did not use any upper reinforcement, i bolted my coilover shock straight to the factory upper shock perch, using the pro comp adapter mentioned above
another important point is that if you use the factory LCA, you will need the belltech camber kit i listed up top. i ran my cams all the way out just to be able to drive it, and i still need more adjustment
MY REVIEW
so far, i have about 150 miles on my setup, and i am still adjusting it a little bit every day. at this point, i am pretty sure i like the front on 14/18 and the rear on 15/18, but i am still going to get new rear springs to replace my 5305 so that could change
of course i had to trim the universal bumpstop up front and spend a fair amount of time getting the ride height just right, but everything is so close to perfectly level that you could never tell just by looking at it. the responsiveness over bumps is stellar, and while it definitely still rides like a lowered truck, it is NIGHT AND DAY from what it was with the torsion bars!
after alot of reasearch, and finding out that ridetech uses the factory upper shock perch for their airbag shocks, i decided to take a chance and find out if it is a suitable coilover mount... so far, it is holding up just fine, and i have race car syndrome while taking the on/off ramps so its not like i just baby this thing along. it definitely gets a good workout
all in all, im very happy with the conversion, and i would definitely suggest it to anyone looking to go lower (or higher) than stock, to consider this as an alternative (though more expensive) to LCA's or psindles in the front. the fact that you can adjust the firmness by just hopping out and turning a knob is awesome, but they ride and handle way better than the stupid torsion bars... best of all, i kept my bars, keys, and crossmember, so IF i ever sell it, i can easily swap back to stock and sell these to someone