2-Channel Dash Cam Install

Disclaimer: Links on this page pointing to Amazon, eBay and other sites may include affiliate code. If you click them and make a purchase, we may earn a small commission.

badreau

Member
Joined
Nov 4, 2021
Posts
38
Reaction score
38
Location
Alberta, Canada
Hey all,
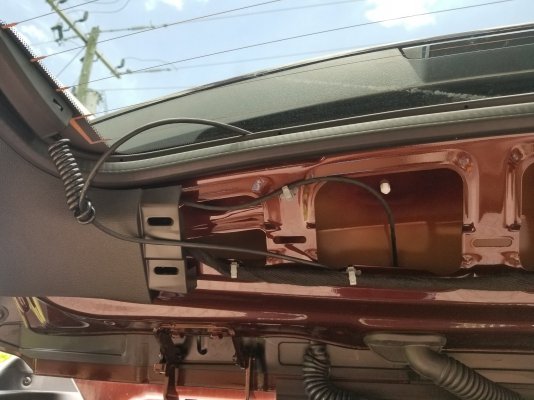
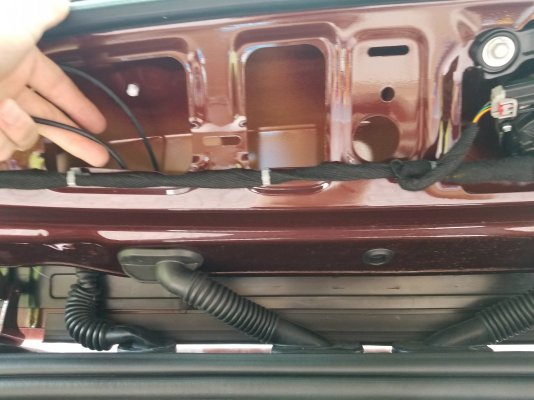
Didn’t see any information on installing a dash cam in a 2021+ Tahoe/Yukon so figured I would share some info from my install for others.

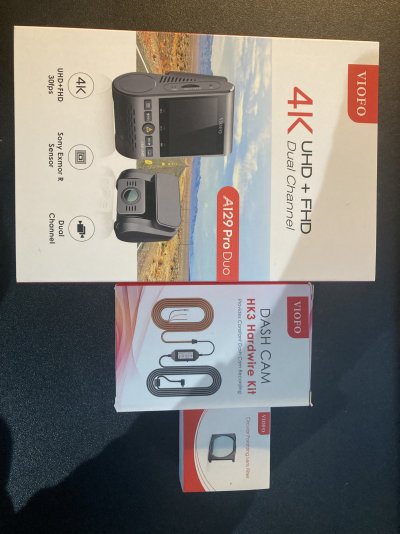
Dash Cam is a VIOFO A129 Pro Duo that I picked up on a Black Friday sale. I also got the CPL filter and 3-wire hardwire kit.
934F8874-8C79-40E5-8AA2-676FDE5B61C0.jpeg

Another thread stated F26 was a switched power fuse, this is on the passenger side dash . I checked all fuses and came to the same conclusion so I used F26 for accessory power and F44 for constant power.
A Micro2 fuse tap was used for F44 with a 5A fuse. I couldn’t fit a Micro3 fuse tap on F26 so just wrapped the wire around one of the fused legs of the existing 10A fuse (ie not the center leg).
B8D2E537-0102-4B76-8CBD-261F4E3DAC20.jpeg
0972FD2E-6FB8-4805-8D82-41720C074668.jpeg

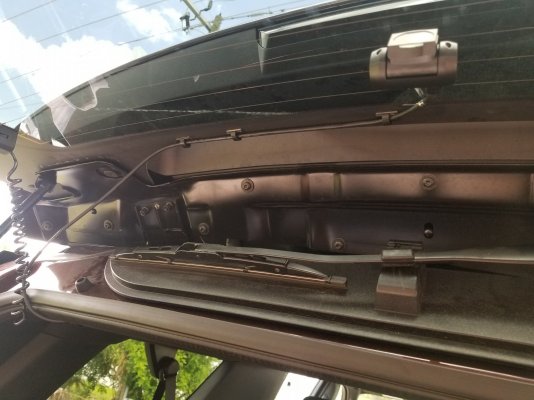
Next I disconnected the + battery terminal so I could remove the A-pillar cover and not risk the air bag going off. To disconnect the battery, pop off the cover, loosen the nut with a 10mm socket, and pull the plastic tabs on the side of the batter to allow the entire fuse block assembly off the battery.
6688F0FD-674A-4848-AE04-39123C5482A1.jpeg

(Continued in next post)
 

Attachments

  • D5DB77FE-C827-4005-AAE4-A5F424C5F11D.jpeg
    D5DB77FE-C827-4005-AAE4-A5F424C5F11D.jpeg
    298.3 KB · Views: 8
OP
OP
B

badreau

Member
Joined
Nov 4, 2021
Posts
38
Reaction score
38
Location
Alberta, Canada
The passenger A-pillar cover could then be removed by popping off the plastic covers with a trim removal tool and loosening the 2 bolts with a 10mm socket.
B0C4A22C-0130-485A-83D6-94DA305FF956.jpeg
DF0E6E32-640C-48C2-95F5-08518D0C6191.jpeg
Once removed, I could then route the hardwire kit up through the back of the fuse box and up the a-pillar, tucking it behind the factory wire bundle and up to the headliner. It’s very important not to run any wires IN FRONT of the airbag, which could affect how it operates.
The wire was then tucked up along the edge of the headliner over to the right side of the rear view mirror.
7A9F666A-7A40-40C8-995E-A241264A2A94.jpeg
If you’re only doing a front cam you can stop here.
I then back-routed the wire for the rear cam from the dash cam to the a-pillar along the headliner. I passed it behind the airbag on the pillar, and into the weatherstripping along the top of the passenger door.
187EBC1D-EB5F-4836-8EEF-F3315849E14F.jpeg
From there, it was pretty easy to tuck the wire along the top of the b-pillar trim, along the top of the rear passenger door weatherstripping, across the c-pillar trim, along the top of the rear window, and along the top of the d-pillar.
257F8523-6EAB-481B-9065-67BF4AAA4E1B.jpeg
(Continued on next post)
 
OP
OP
B

badreau

Member
Joined
Nov 4, 2021
Posts
38
Reaction score
38
Location
Alberta, Canada
To route the wire to the back hatch, I popped off the plastic cover on the top of the interior hatch of the Tahoe. I chose the large left hose to route the wire through as it was mostly empty. I fashion a crude fish tool with a chunk of tie wire with the end bent into a hook.
B7CD0DC6-FD7A-4A08-84C1-2CA0A7B56C85.jpeg
I fished this down the hose from the hatch to the rear headliner of the Tahoe. I was then able to hook it with another piece of wire and pull it out the headliner. I taped the rear camera wire to it and pulled the wire into the rear hatch.
2280B3F1-72FA-47BF-A295-CAE27ADAE304.jpeg
AB2DBD4F-F73F-40B9-9393-2A72EFDD12C1.jpeg
Once pulled, I replaced the one plastic trim on the rear hatch and left enough slack in the wire so that if we ever open the glass only portion of the hatch, it won’t yank the wire out of the dash cam and damage it.
019C5324-E8AD-49AE-B667-2DFCBFE456AC.jpeg

Rear dash cam was installed as high up as possible in the centre of the rear glass.
3542D280-BAD4-4464-9933-7F00F8643FB2.jpeg
I replaced any removed trim and reconnected the battery and tested everything out. Works great, and no wires are visible other than where they exit the headliner at the front and the trim at the rear.
I set the voltage cutoff on the hardwire kit to 12.4V (highest setting). My math tells me this should give me 4-6 hours of parking mode on the cams which is plenty for our needs.

If anyone has any questions fire away. Hopefully this is of use to someone tackling the same project. Took about 1.5 hrs flying blind so should go quicker for the next guy.

Chris
 

89Suburban

Bull in the china shop
Supporting Member
Joined
Jan 10, 2013
Posts
13,145
Reaction score
36,091
Location
SE PA
Nice write up, much appreciated! How to the cameras mount to the glass? I hate the suction cup mounts they always fall off at some point.
 
OP
OP
B

badreau

Member
Joined
Nov 4, 2021
Posts
38
Reaction score
38
Location
Alberta, Canada
Nice write up, much appreciated! How to the cameras mount to the glass? I hate the suction cup mounts they always fall off at some point.
Thanks! These came with a 3m adhesive pad on them. Seems very solid so far, with a couple of freeze thaw cycles on them already.
 

Falah

TYF Newbie
Joined
Jan 18, 2022
Posts
2
Reaction score
0
Thanks that's exactly what I am looking for the ACC FUSE
 

Apollo13

Member
Joined
Jun 14, 2021
Posts
39
Reaction score
35
This is awesome...thank you

I had my blackvue just sitting there for a few months.
 

PsyZek

Member
Joined
Aug 29, 2021
Posts
43
Reaction score
25
Why wouldn't the fuse tap fit on F26? Wrong size or something else?
Thanks, nice write-up.
 

PsyZek

Member
Joined
Aug 29, 2021
Posts
43
Reaction score
25
I found out for myself, there are ridges on the fuse tap where there should not be. I had to shave them off with a razorblade. If you look down at the blades of the add-a-circuit and compare it with an actual fuse you'll see exactly what to shave off.
 
OP
OP
B

badreau

Member
Joined
Nov 4, 2021
Posts
38
Reaction score
38
Location
Alberta, Canada
I found out for myself, there are ridges on the fuse tap where there should not be. I had to shave them off with a razorblade. If you look down at the blades of the add-a-circuit and compare it with an actual fuse you'll see exactly what to shave off.
Missed your previous message. Ya, the fuse tap was a bit too wide. I did snip off the wire lead from one side, but it still wouldn't seat properly. Nice work on getting it to fit by trimming the plastic.
 

Forum statistics

Threads
129,234
Posts
1,812,537
Members
92,334
Latest member
BWASTEEZE
Top