digitalfiend
Expert Overthinker
didnt do anything, but got to drive a ZL1 Camaro that had 3k miles.
I hope you drove it like you stole it.
Disclaimer: Links on this page pointing to Amazon, eBay and other sites may include affiliate code. If you click them and make a purchase, we may earn a small commission.
didnt do anything, but got to drive a ZL1 Camaro that had 3k miles.
Got pics of yer work?
sent from my Crifftastic $3
You suck.... Lol...
I want the new Z/28 and an exact replica of the Nurburgring so I can drive it all day long!!
Mike
 Hell Yes!
You suck.... Lol...
I want the new Z/28 and an exact replica of the Nurburgring so I can drive it all day long!!
Mike
I hope you drove it like you stole it.
Got it into the shop today, nothing to serious. The truck sat up for many years it seems, and that had me worried. It has 33k miles on it, but 30k of that was driven from 04-07. Then the truck looks like it sat for a number of years until the stealership acquired it, and they put 1700 on it in must a few weeks. So, the truck got driven only just over 1000 miles between 2007 - 2014. No idea the story there, but sure would love to know.It definitely looks good from the pictures but I am sure you can see a lot of the little things when you look closer. Hopefully the mechanically everything checks out and you have a good base to start from.

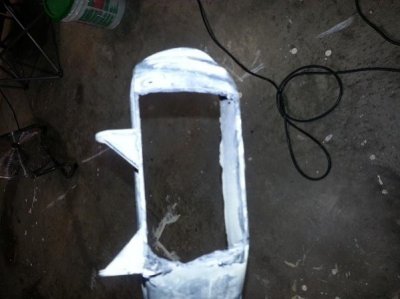
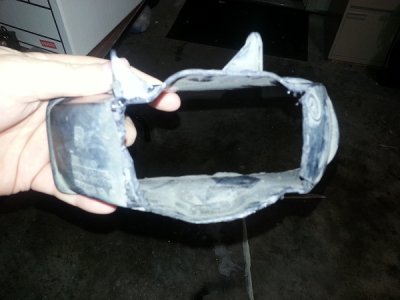
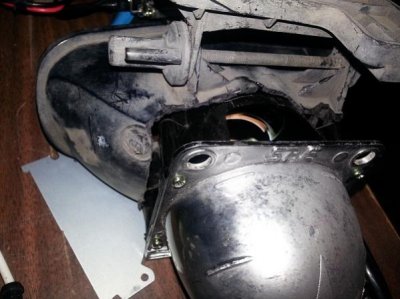
Yea, Here is some. Keep in mind this is pretty much just a mockup stage.
Basically what I did was cutout the back of the fog housing to fit the projector as close to the lens as I could get. Then I heated up the plastic housing only on the backside careful not to deform the front lens side. once the plastic is heated you can stretch it open some more to fit the projector into it. I have eyeballed the both assemblies and they are close to where I think I want them aiming wise. Then I will mount the both onto the truck and get my aiming where I want it. Epoxy the projector to the housing, then start to build out the housing to meet the backside of the projector to seal it up. Once that is done the whole inside and out will get painted high heat black except the chrome ring on the face of the lens holder.
The first pic is the trimming on the housing. The next is the curved cutoff shield. There is 1 of the heated expanded plastic. the last 2 are of the whole assembly just pressure held together.

That looks really good. I need the details please lol. I want to do that to mine !
Hell Yea, sounds like your gonna have a good Friday haha
Oh awesome. Next on my list! See a light tint would be perfect for my white truck. Awesome!
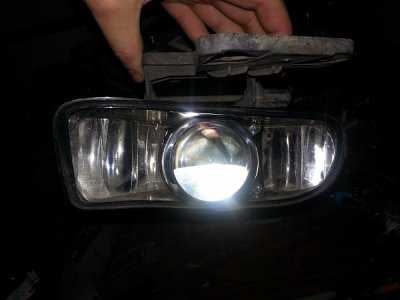
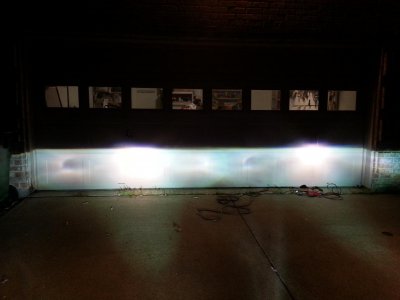
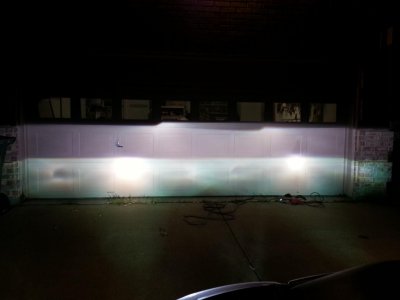
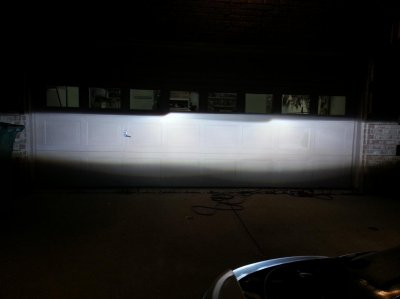
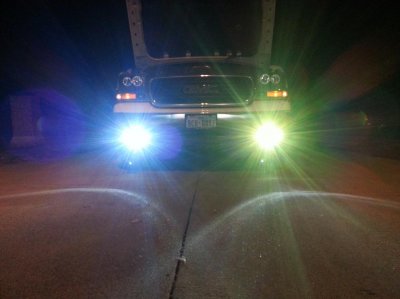
Projector fogs anyone? Just temp installation for rotational alignment. Best of all this was free lol. Sure you could do better with a real hid projector, but it definitely beats the stock fog lights lol.
Lows step cutoff only, fogs straight cutoff only, lows and fogs, lows and fogs looking at the front, and color flicker anyone? Lol no one will ever see the color flicker but it's there haha.
Also 5k lows 6k fogs temp, unsure if I want to match the fogs 5k or go yellow 3k
Yea, Here is some. Keep in mind this is pretty much just a mockup stage.
Basically what I did was cutout the back of the fog housing to fit the projector as close to the lens as I could get. Then I heated up the plastic housing only on the backside careful not to deform the front lens side. once the plastic is heated you can stretch it open some more to fit the projector into it. I have eyeballed the both assemblies and they are close to where I think I want them aiming wise. Then I will mount the both onto the truck and get my aiming where I want it. Epoxy the projector to the housing, then start to build out the housing to meet the backside of the projector to seal it up. Once that is done the whole inside and out will get painted high heat black except the chrome ring on the face of the lens holder.
The first pic is the trimming on the housing. The next is the curved cutoff shield. There is 1 of the heated expanded plastic. the last 2 are of the whole assembly just pressure held together.
Oh awesome. Next on my list! See a light tint would be perfect for my white truck. Awesome!
Projector fogs anyone? Just temp installation for rotational alignment. Best of all this was free lol. Sure you could do better with a real hid projector, but it definitely beats the stock fog lights lol.
Lows step cutoff only, fogs straight cutoff only, lows and fogs, lows and fogs looking at the front, and color flicker anyone? Lol no one will ever see the color flicker but it's there haha.
Also 5k lows 6k fogs temp, unsure if I want to match the fogs 5k or go yellow 3k
Nice man looks great, still need to get to doing my retrofit sometime! Lol. Good job using the projector out of your headlight, you say modifying the cut off shield helped? Ill prob do the same thing install new ones in head lights and install old ones in my fogs! Good work. Hey any of those pics just fogs on shooting at garage?
Billy
Thinking about trading it.
Thanks man, yeah I figured it was a way to reuse those projectors. I cut new cutoff shields from aluminum flashing with a straight cutoff instead of a stepped on that's on headlights. Then I curved the edges of it to produce a sharper across the beam pattern. It sharpens up further away, the garage pic is only about 10-15ft away. At 30+ it's nice and sharp. The first picture is fogs only. This one. Also it's flatter in person. The camera is picking up the center hotspot and distorting it.