Interior Seats and Dash restoration

Disclaimer: Links on this page pointing to Amazon, eBay and other sites may include affiliate code. If you click them and make a purchase, we may earn a small commission.

Yukongk

Full Access Member
Joined
Apr 14, 2013
Posts
776
Reaction score
12
Location
NY
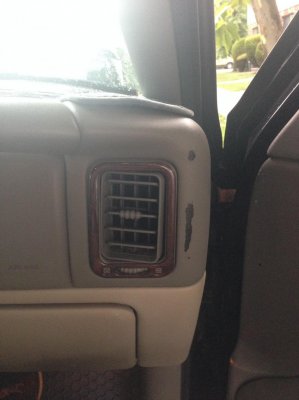
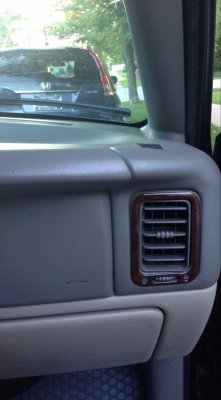
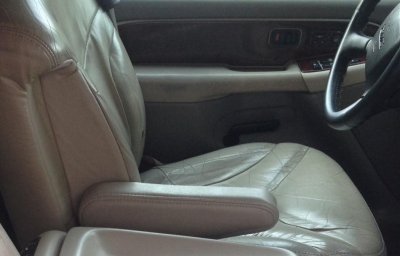
Well, like many of you, I had paint peeling on my dash (upper pewter color, and lower shale color). I have searched high and low for a solution to no avail, and was about to remove the dash pad and power wash all the paint off and leave it black/unpainted. Then I stumbled onto a leather restoration site because I wanted to also repair a hole in the driver seat cover. Turns out the dye's they sell for leather restoration are compatible with hard vinyls and plastic as long as you use a plastic primer. I ordered from leatherworldtech.com but there are a handful of sites that sell water based dyes and are dedicated to leather restoration. The main items you will need is:
-color matched dye
-plastic primer
-topcoat
-prep cleaner
-leather protectant/conditioner
-foam brushes
-thick paint sponge
-acrylic brush (if you need to paint in tight areas)
-green vinyl scuff pad
-grey leather scuff pad
-leather adhesive
-leather filler
-600 and 1000 grit sandpaper
-hair dyer (if you want to speed up drying times)
-a lot of paper towel to keep your space clean

I will use this thread to post my progress and will upload pics. I'm happy to answer questions.

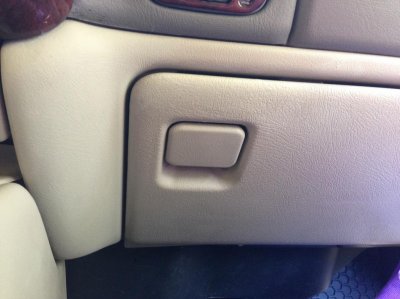
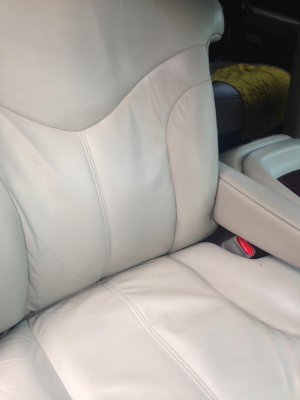
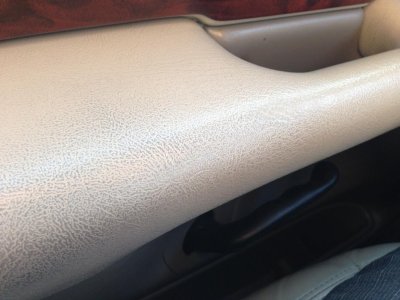
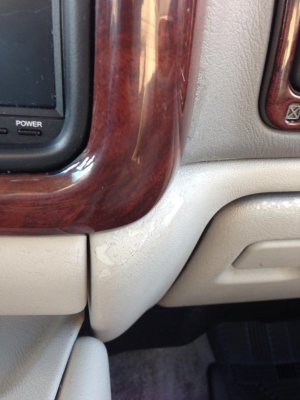
Attached is a pic of the first part that needed to be restored.
 

Attachments

  • image.jpg
    image.jpg
    86.6 KB · Views: 273
Last edited:
OP
OP
Yukongk

Yukongk

Full Access Member
Joined
Apr 14, 2013
Posts
776
Reaction score
12
Location
NY
So I sprayed a "Prep cleaner" onto the surface and wiped it with a lint free paper towel. I then took a green scuff pad and CAREFULLY scuffed the area to be painted. You need to take caution with this step so you don't end up peeling up more of the factory paint. Once dry, I applied "Plastic Primer" with a foam brush. Make sure you apply it evenly without drips. I let it dry 8 hours and then applied a second coat of primer (company says you can use a hair dryer to speed up drying times). Once dry, I applied a light coat of Shale "Dye Colorant." The idea is to BUILD the color with 3-4 coats of dye. If you apply too much dye on any coat, you will be able to tell it was painted and you might cover the grain of the plastic. Do not try to completely cover on the first coat. Here is what it looked like after 2 coats. I ordered "low gloss" dye which is a little too dull for my dash, but once it is fully cured, I will use an interior cleaner to shine it up slightly. I also purchased a top coat in semi gloss that I will experiment with.

Edit: uploaded a clearer pic.
 

Attachments

  • image.jpg
    image.jpg
    95.4 KB · Views: 226
Last edited:
OP
OP
Yukongk

Yukongk

Full Access Member
Joined
Apr 14, 2013
Posts
776
Reaction score
12
Location
NY
Now onto the grey area (the actual color is medium Dk pewter). I prepped the area and applied 2 coats of primer yesterday. This morning I applied a coat of colorant. I will post pics once I get a few coats on there.

Something to keep in mind: Over the years the factory paint may change color due to uv rays ,etc, so some areas will require you to paint more than just the peeled area. You may want to paint a whole section for better blending.

On a side note, my seats were filthy and looked like they needed to be replaced. I cleaned them with a degreaser and they look like night and day. I purchased a "leather filler" and adhesive to patch holes and fill scratches. I am just waiting for the right time to dye them since I won't be able to use my Yuk while the dye is curing!
 

Attachments

  • image.jpg
    image.jpg
    98.6 KB · Views: 214
Last edited:
OP
OP
Yukongk

Yukongk

Full Access Member
Joined
Apr 14, 2013
Posts
776
Reaction score
12
Location
NY
Well, here it is. Looks pretty good. I could have peeled a larger area of the existing paint and made a "seam" in an inconspicuous area, but I'm happy with how it looks now, so I'll stop here.
 

Attachments

  • image.jpg
    image.jpg
    95.1 KB · Views: 215

BubsXL

Full Access Member
Joined
Feb 7, 2011
Posts
104
Reaction score
6
Location
TN
Looks good. Would you mind sharing where you got the stuff.
 
OP
OP
Yukongk

Yukongk

Full Access Member
Joined
Apr 14, 2013
Posts
776
Reaction score
12
Location
NY
Looks good. Would you mind sharing where you got the stuff.

Yea, http://leatherworldtech.com
There are many sites that sell their own kits/products. I happened to find this site and their CS walked me through the process, so I ordered from them. Make sure you get water based dyes, not solvent based. I'm doing my seats now, I'll post pics when done.
 
OP
OP
Yukongk

Yukongk

Full Access Member
Joined
Apr 14, 2013
Posts
776
Reaction score
12
Location
NY
Drivers Seat Cover Before.......
(Note the creases and cracks and the hole in the seat. One panel was dry and rough like sandpaper. This seat cover was really ready for the trash. My restoration came out great considering how bad the condition of the seat cover was)
 

Attachments

  • image.jpg
    image.jpg
    66.7 KB · Views: 239
OP
OP
Yukongk

Yukongk

Full Access Member
Joined
Apr 14, 2013
Posts
776
Reaction score
12
Location
NY
After......
DISREGARD THE "dot" YOU WILL SEE IN ALL MY PICS. My iphone 5 has a piece of dust in the lens.
 

Attachments

  • image.jpg
    image.jpg
    90.3 KB · Views: 256
OP
OP
Yukongk

Yukongk

Full Access Member
Joined
Apr 14, 2013
Posts
776
Reaction score
12
Location
NY
Passenger seat after......
(Don't have a before pic but it was the same color as the drivers side, but in slightly better condition with only a couple of scrapes and cracks that I used adhesive and filler to fix)
 

Attachments

  • image.jpg
    image.jpg
    87.7 KB · Views: 191
OP
OP
Yukongk

Yukongk

Full Access Member
Joined
Apr 14, 2013
Posts
776
Reaction score
12
Location
NY
Driver side door handle before.......

(At first I thought it was just dirt in the cracks but upon cleaning and further inspection, I realized the paint was worn off)
 

Attachments

  • image.jpg
    image.jpg
    92.3 KB · Views: 171
OP
OP
Yukongk

Yukongk

Full Access Member
Joined
Apr 14, 2013
Posts
776
Reaction score
12
Location
NY
Driver side door handle after.....
(2 coats of plastic primer and 4 coats of dye colorant. I'm going to let it cure overnight and coat it with semi gloss clear topcoat)
 

Attachments

  • image.jpg
    image.jpg
    93.3 KB · Views: 179

Colby82

Member
Joined
Jul 3, 2013
Posts
52
Reaction score
0
How did you determine your interior color? I posted a thread tonight since I'm having trouble with this. My RPO code shows light neutral, but the upper dash panels look darker than the light neutral color. I purchased a can of SEM spray in the light neutral color but it doesn't look to match much of anything in my interior. No other color codes other than the exterior paint color are in the RPO's....any suggestions? Your lower dash panels look similar to mine but your upper panels look almost like an olive color, mine are more of a tan/brown tone.

---------- Post added at 12:40 AM ---------- Previous post was at 12:39 AM ----------

Nice work BTW....I'm interested in the product you used now.....but I just want a color that will be a close match lol
 
OP
OP
Yukongk

Yukongk

Full Access Member
Joined
Apr 14, 2013
Posts
776
Reaction score
12
Location
NY
How did you determine your interior color? I posted a thread tonight since I'm having trouble with this. My RPO code shows light neutral, but the upper dash panels look darker than the light neutral color. I purchased a can of SEM spray in the light neutral color but it doesn't look to match much of anything in my interior. No other color codes other than the exterior paint color are in the RPO's....any suggestions? Your lower dash panels look similar to mine but your upper panels look almost like an olive color, mine are more of a tan/brown tone.

---------- Post added at 12:40 AM ---------- Previous post was at 12:39 AM ----------

Nice work BTW....I'm interested in the product you used now.....but I just want a color that will be a close match lol

I found RPO code 92I and 922 on my sticker in the glovebox. I did research and found that the beige color is called "Shale" and the grey color is pewter. Here is where things got tricky with the Pewter color bc GM has a few variations: Medium pewter, Medium Dk pewter, dark pewter, etc. I was looking into SEM paints before my purchase and a rep called the dealership with my Vin # to confirm the colors, so my advice to you is to call the dealer and give them your Vin to interpret your interior color. I ended up still taking a chance and ordered the Medium Dk pewter colorant bc the rep at Leatherworldtech said it was the most common color for GM in the early 2000's.

PS- I don't have olive trim, probably just the lighting in the picture.
 

Colby82

Member
Joined
Jul 3, 2013
Posts
52
Reaction score
0
I found RPO code 92I and 922 on my sticker in the glovebox. I did research and found that the beige color is called "Shale" and the grey color is pewter. Here is where things got tricky with the Pewter color bc GM has a few variations: Medium pewter, Medium Dk pewter, dark pewter, etc. I was looking into SEM paints before my purchase and a rep called the dealership with my Vin # to confirm the colors, so my advice to you is to call the dealer and give them your Vin to interpret your interior color. I ended up still taking a chance and ordered the Medium Dk pewter colorant bc the rep at Leatherworldtech said it was the most common color for GM in the early 2000's.

PS- I don't have olive trim, probably just the lighting in the picture.

I know it's not olive....I guess dark gray would be a better description for your color.

I'll try the VIN route....will they be able to identify 2 colors? Obviously something in mine is identified as light neutral, I'm just not sure what.
 
OP
OP
Yukongk

Yukongk

Full Access Member
Joined
Apr 14, 2013
Posts
776
Reaction score
12
Location
NY
I know it's not olive....I guess dark gray would be a better description for your color.

I'll try the VIN route....will they be able to identify 2 colors? Obviously something in mine is identified as light neutral, I'm just not sure what.

Can't hurt to call them. I think they do identify the 2 tone colors
 

Colby82

Member
Joined
Jul 3, 2013
Posts
52
Reaction score
0
Can't hurt to call them. I think they do identify the 2 tone colors

The dealer is not able to identify the 2nd color of the interior with the VIN. They provided the same information that the RPO codes indicated, which is only 1 color - Light Neutral.
 

DCT

Full Access Member
Joined
Mar 27, 2012
Posts
351
Reaction score
4
To identify the colors, try theseatshop.com.

Dash look great. I need to do this in a couple of spots.

Regarding the seats, the creasing may return because the seat cushion wears over time, so the leather is not tight. Seat cushions are available from the dealer. I used upholstery foam material to rebuild the areas of the seat cushion that had become flat. Most common in seat bottom side where people get in and out of the vehicle.

The leather looks really good too. Please post an update in the future to show how it lasts.
 
OP
OP
Yukongk

Yukongk

Full Access Member
Joined
Apr 14, 2013
Posts
776
Reaction score
12
Location
NY
To identify the colors, try theseatshop.com.

Dash look great. I need to do this in a couple of spots.

Regarding the seats, the creasing may return because the seat cushion wears over time, so the leather is not tight. Seat cushions are available from the dealer. I used upholstery foam material to rebuild the areas of the seat cushion that had become flat. Most common in seat bottom side where people get in and out of the vehicle.

The leather looks really good too. Please post an update in the future to show how it lasts.

The only creases that are giving a slight issue are the creases on the drivers seat on the panel closest to the door. But this panel was destroyed- hard and rough, creases and cracked all over. It still looks great but there are a couple of small spots where the filler developed slight cracks. It's barely noticeable however when nobody is sitting on it. It's also soft and smooth feeling now. If I would have replaced the foam underneath I'm sure I would have avoided this slight issue.

---------- Post added at 11:08 AM ---------- Previous post was at 11:06 AM ----------

Update:
Everything is holding up extremely well except my interior armrest- not durable. After speaking with support over at Leatherworldtech, they told me that I shouldn't have used the plastic primer on this part because it is a soft vinyl. I plan to peel it off and re coat without primer.
 
OP
OP
Yukongk

Yukongk

Full Access Member
Joined
Apr 14, 2013
Posts
776
Reaction score
12
Location
NY
Thanks for the feedback guys. Here's a glimpse of my interior (I think I'm done ......for a little while anyway, until I work up the patience for the double din conversion) :
 

Attachments

  • image.jpg
    image.jpg
    89.3 KB · Views: 140

Forum statistics

Threads
137,815
Posts
1,992,814
Members
102,794
Latest member
Drewphil
Back
Top