Mudsport96
Full Access Member
Check the transmission mount. I didn't read where you did or didnt replace it. Maybe it is bad.
Disclaimer: Links on this page pointing to Amazon, eBay and other sites may include affiliate code. If you click them and make a purchase, we may earn a small commission.
Mount is about 6 months old but I will double check it anyway. Thank you!Check the transmission mount. I didn't read where you did or didnt replace it. Maybe it is bad.
Hey all. A few days ago, I just got done with doing my first transmission rebuild on my 4l60e for my `00 Tahoe 4x4. I have barely 100 miles on her so far and with no issues (knock wood).
I am just giving you a brief description of what I’ve done and hopefully answer some question for any other novice like myself who wish to give this a try. Photos included is not a complete teardown. Just snippets of after the removal it’s guts and the mostly reassembled unit.
I ordered the bulk of my rebuild kit from Transmission bench which also provided the rebuild video (that I paid separately. However, if you order the full kit the video is included).
I cannot stress how important that video was for me. It was the sole purpose for me to even consider doing this build on my own. The level of accuracy and this man’s ability to not miss a step made doing this rebuild so much easier. His instructions were very thorough and intuitive.
All together it took about 16 days for completion. What caused the delay? Getting parts. Everything was either backordered, delayed shipping or “we are not sure when this part will be back in stock” messages (Amazon, JEGS, Summit Racing).
Parts and pricing for this rebuild:
Master rebuild kit ($185.99) from Transmission bench which includes all clutches, steels, pan gaskets and all O-rings. The Ultra-kit has a ton more and includes the thumb drive for instructions.
Bushing kit $34.06 (Transmission Bench).
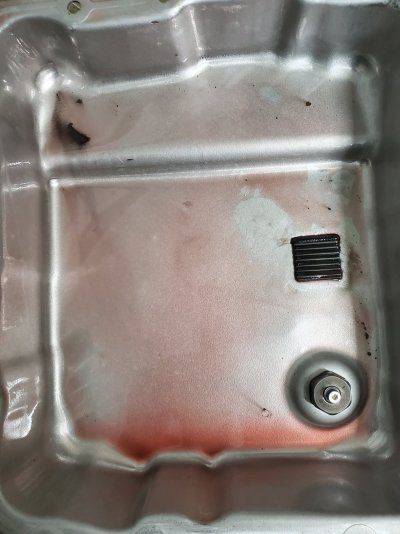
ACDelco transmission case (Rock Auto $348.00) Had no choice on this one. Once I got my tranny apart it was scored pretty bad inside so I opted to replace it.
Sonnax input shaft (300MM non-reluctor style) $360.00 from Summit Racing.
Sonnax Output shaft 4WD/AWD (Rock Auto) $361.00. Rock Auto actually had this the cheapest. Even out of Amazon, JEGS, Summit and others. As their prices were north of $500+ dollars.
Sonnax Smart shell $126.98 (Amazon)
Sonnax HD clutch hub (Summit Racing) $215.73
ACDelco Sun gear ($83.96)
ACDelco 5 pinion planets (maybe $200 dollars?) I got them used off of ebay almost 2 years ago when I was first thinking about doing a rebuild. I don’t remember how much I paid for them. Don’t worry I already checked them. No abnormal wiggles from the pinions.
Raybestos intermediate wide band: $18
Shift Rite Corvette servo: $63.99
Borg Warner Low/Reverse sprag $19.81
Borg Warner Forward clutch sprag $46.57
Misc: $100.00 (AKA my “Oopsies”). Seals and bushings I destroyed doing it for the first time. Input shaft seal rings I ripped. I was able to use the Teflon ring installer correctly but when I used the tool to re-shrink them back into place, I ripped two of the three Teflon rings on removal so I had to order more.
Bushing replacements was a few more “oopsies” getting them pressed in where one would get cocked in the bore of a gear going in. lessons learned.
Ok. I know some of you are already doing the math and figuring (heck for that amount of money he could get one professionally built!) And you would be right…however I don’t believe I could get it with the more exotic (Sonnax) parts included and the labor for the total cost.
Also, I seen enough nightmare stories from supposedly “built” Trannys from so called expert shops. So, I figured what the heck. Do it myself. You only live once…
And for you 4l80e guys. I understand. The 4l80 is a great transmission, but this is what I wanted. Win, lose or draw I’m happy with it.
God willing there will be more “winning” and less “losing.”
Results? So far very firm and more positive shifts (probable due to the wide band and corvette servo). Also, my clunking is gone? Every since I had my Tahoe (almost 5 years now) I always had a noticeable clunk when I placed my Tahoe into reverse (very rarely in drive) but primarily in reverse.
One thing I will mention (again for those like me who is doing for the first time) what was not touched on in the video was torque converter spacing between the converter and the flywheel. Spacing has to be between 1/8 minimum to 3/16th maximum for proper heat expansion for the torque converter and transmission pump.
Problems or issues during and after build?
The steels in the rebuild kit gave me a bit of an issue. A thickness issue, to be exact. During the video the instructor stated that the steels (for the forward clutch, if I remember) normally would be around .087 thickness. Checking my factory steels, they were in fact .087 thousandths. However, the replacement steels in the rebuild kit was actually .090. After installing both new clutch and steels I did not have the necessary endplay of .030-.065 required. I think I was around .020 or something (don’t quote me). Not feeling good about this I opted to reuse my original steels. All my original steels were fine. Nothing warped, bowed or scorched. Actually, they looked brand new So, I felt comfortable reusing them to get me back to spec.
I think the 3-4 was the same. The new ones were out of spec as well so I reused my factory steels.
Well only time will tell how good of a job I’ve done and I will keep everyone who may be interested posted. Even if it’s bad so anyone here will not make whatever mistake I made, if any.
View attachment 367760View attachment 367761View attachment 367762View attachment 367763View attachment 367764
4x4Is it 4x4 or awd? 4x4 yes awd no
Still original anti-clunk clip. It was actually in very good shape. Yup will keep case. Will grab case saver. Will make a great back up transmission! Thanks!Total end play looks good and indicates all is fitted and assembled correctly. Maybe save the old case, they may make "case saver," for it. Did you get a new anti clunk clip?
Thank you!
Transmission bench. Those videos is what got me through it all! He never missed a step of what to do! You can go to youtube to watch all of his videos. Also he did the full rebuild using basic tools minus on or two specialized items (feeler guage, dial calipers...). Like you, my transmission was off-limits for me. However I was creeping up on 300k miles and though the transmission was performing fine I knew I was living off borrowed time. I figured "what the heck" I would rather tackle it myself and deal with the outcome instead of a local shop, no knowing what was actually done.This is very cool. I am approaching 200k on a transmission with unknown service history. I have always been reluctant to build a transmission, they seem like an engineering marvel and so many special tools needed to do it right. Not to mention, I hate having other people work on my stuff, and finding a reputable transmission guy seems as difficult and overhauling a transmission used to be. Watched through transmission bench's overhaul videos on youtube, while tedious and time consuming, this task does not seem impossible anymore.
Oh and sorry for the late reply. Work been a bear lately!This is very cool. I am approaching 200k on a transmission with unknown service history. I have always been reluctant to build a transmission, they seem like an engineering marvel and so many special tools needed to do it right. Not to mention, I hate having other people work on my stuff, and finding a reputable transmission guy seems as difficult and overhauling a transmission used to be. Watched through transmission bench's overhaul videos on youtube, while tedious and time consuming, this task does not seem impossible anymore.
Hat's off to you OP for tackling a 4 speed autotrans. Are you an engineer?
Since it's already together and running down the road (congratulations) I'll only comment a couple of things.
Personally I've never used a Zpak since the ones I've seen are putting many thin frictions in place of OE. The ones I have seen have been smoked on tear down. I have not had good luck with long term durability of any Red Alto frictions except Dodge Diesels Autos 46/47/48re. The only reason I used them is because the shop owner liked them. Alto makes some nice red bands for Dodges and they used to make some high energy friction for different units.
Every 700-r4/4L60e I build gets (7) .080" high energy borg warner 3/4 friction with .078" steels. IMO the trick is to get the 3/4 clearance right and not use friction or steels that are too thin (.060"ish) because they can't take the heat. Never used the wide bands on 60/60e's because I've never had a stock width high energy fail. Band disclaimer- not built one of these that was behind much more than 600hp. Using 6 friction with .100" steels is good to go.
I do know that just because I haven't had good luck with a product doesn't mean there's not 50 guys saying the opposite. My .02c
OP, don't through out your case. From the picture I believe you were worried about the indentations that the lo/reverse steels made. Most likely you can clean that up so that the steels won't catch on an edge and use it or sell it.
I'm glad to hear your input on these things. It seems you and I have the same opinion, other than the wide band thing. I had the stock on fail in my camaro and caused 2nd gear flare at WOT through the shift. Band was toast and the drum was glazed.Raybestos are a great factory replacement clutch too, great choice. I use them regularly.
Doesnt have one.Did you have to replace your transmission contol module?