Paint Prep / Body Work Tips

Disclaimer: Links on this page pointing to Amazon, eBay and other sites may include affiliate code. If you click them and make a purchase, we may earn a small commission.

Matthew Jeschke

Full Access Member
Joined
Dec 28, 2017
Posts
1,836
Reaction score
1,230
Location
Sahuarita, Arizona
I think there's some other threads on this but I'm having trouble finding them. I have some specific questions to my build and want to connect with any body shop people (or those who have been down this path) on this forum.

I have some questions about prepping the truck for paint. First my strategy is to paint panel by panel as I get my technique down.

  • 3:11 Will it hurt my truck's body / paint if I drive it around prepped for paint as I show in the video? Or do I basically have to keep it in the garage till it's repainted?

  • 0:012 I'm roughing up the old paint and will apply paint directly over it where possible (no primer). In some spots gray starts to show through, I'm assuming that's factory primer. Do I need to paint more primer over that again?

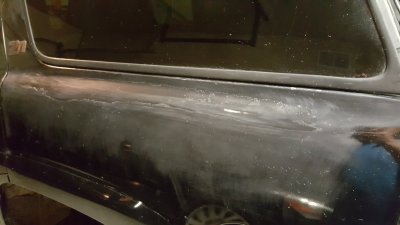
  • 2:40 Clear coat damage goes into the seam around the rear quarter panel window. How do I remove that window?

  • 0:42 Any tricks to install badges back in same location?

  • 2:05 Assuming I will have to use primer (possibly a little fill?) where the paint is chipped through to the metal? If so I don't think I'll need much primer. Is there a brand or type I can buy in a rattle can? One that comes highly recommended?

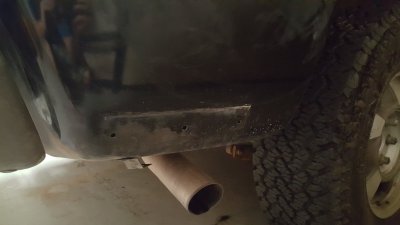
  • Bottom of right rear quarter panel has a crease where old trim attached. However, I have no way to get a dolly back there. Any tips to clean that up? Picture below, I forgot to get it in the video.

Drywall damage wraps around and into the seam with quarter panel glass. Not sure how to clean that up without removing the window and not sure how to remove the window.
20190826_194600.jpg

There is a crease in the body panel at bottom there (along gray line). I'd love to get it pulled out, however, I cannot get a dolly or anything behind there as a second piece of metal is blocking access. There is a small rubber plug there but not sure I can get tools in side that void. Any tips? Or does this have to be repaired with body filler?
20190826_194635.jpg
 

SteveB

Full Access Member
Joined
Jun 20, 2019
Posts
312
Reaction score
518
How are planning to paint it , spray gun or rattle can? What color? Single stage or base/clear? Can you drive around in prepped car , sure you can. Just mindful of new chips that could occur in the prepped areas. When feathering out chips , scratches always try to pull each of paint roughly an inch around the area. This is to try and prevent bulls eyes under the paint. Any bare metal I highly suggest an etching primer, any bodywork I suggest the etching primer followed by a high build primer. As for emblems and such pick a reference point and measure the height of the emblem or moulding write the measurement down , the when putting the back on the measurement will give the spot to reapply them. Pretty sure the window is glued in and not fun to remove. I suggest a couple of layer of masking tape on the rubber and prep as far as possible between the window moulding and body. The dent in the bottom of the quarter best bet would be a stud spotter and slide hammer. I would pop out the plug and see how far you can reach in with anything that can get in there and pry /push the dent out. Remember paint depends on what's under it to look good. Oh get lots of wax and grease remover too.
 
OP
OP
Matthew Jeschke

Matthew Jeschke

Full Access Member
Joined
Dec 28, 2017
Posts
1,836
Reaction score
1,230
Location
Sahuarita, Arizona
I ended up moving my discussion from this tread to here as topic has changed a bit. Original discussion was about color selection: https://www.tahoeyukonforum.com/thr...-grey-off-road-z71.112047/page-3#post-1368852

How are planning to paint it , spray gun or rattle can? Spray gun, scored a Devilbiss GTI Pro off craigslist.

Single stage or base/clear? 2 Stage, Base & Clear. PPG Omni Black (ever so slightly lighter than Jet Black Spec'ed by GM).

any bodywork I suggest the etching primer followed by a high build primer. So etch and prime entire truck? Over top of roughed up paint?

Oh get lots of wax and grease remover too. Got a half gallon to start with. Think I need more?

Curious how much forgiveness is there in the timing of spraying layers? I am not exactly sure how much paint to mix for each coat and don't want to mix too much and not have a panel to spray. Woundering if I have enough time to mix more up in between coats or what happens if I run out of paint part way through spraying a panel. My paint was so cheap last time I sprayed I didn't care too much about waste lol

Sanding tricky spots? Assuming I have to hand sand? what do you recommend for final sanding pass, 1000 grit or higher? I see online a lot of people only go to 600 or so.

https://studio.youtube.com/video/mAtlRcbltlg/edit
 

SteveB

Full Access Member
Joined
Jun 20, 2019
Posts
312
Reaction score
518
That's a decent gun. No need to prime the whole truck unless you want , just any bare metal and bodywork areas for primer. Might be enough wax and grease remover , doesn't hurt to have more. You mentioned panel painting your truck you will have lots of time between coats. I find 3 coats of base in black more than enough for coverage, usually that will be a pot full of paint on most panels , the roof is the only panel where I think you might use 2 or 3 pots of paint or clear. 10-15 mins between coats for the paint to flash(dry enough to tack off). Never had problem waiting 24hrs between base and putting on the clear. Once you start to clear the panel , don't stop until you have your 3 coats on it. Wait 10-15 between coats to flash( touch your masking paper to see if it is stringy to tachy to the touch. Base and clear flash times will depend on your reducers and temp. You want base dry to the touch so it can be tached off between coats. Clear doesn't get tached off between coats. I used 320 and red scotch for final sanding everything. I use 600 and finer papers for cut and buff. Remember anywhere high build primer is put has a very good chance to shrink , if possible wait a couple of days to prep for paint. Yes high build primer has to be sanded before being painted.
 
OP
OP
Matthew Jeschke

Matthew Jeschke

Full Access Member
Joined
Dec 28, 2017
Posts
1,836
Reaction score
1,230
Location
Sahuarita, Arizona
That's a decent gun. No need to prime the whole truck unless you want , just any bare metal and bodywork areas for primer. Might be enough wax and grease remover , doesn't hurt to have more. You mentioned panel painting your truck you will have lots of time between coats. I find 3 coats of base in black more than enough for coverage, usually that will be a pot full of paint on most panels , the roof is the only panel where I think you might use 2 or 3 pots of paint or clear. 10-15 mins between coats for the paint to flash(dry enough to tack off). Never had problem waiting 24hrs between base and putting on the clear. Once you start to clear the panel , don't stop until you have your 3 coats on it. Wait 10-15 between coats to flash( touch your masking paper to see if it is stringy to tachy to the touch. Base and clear flash times will depend on your reducers and temp. You want base dry to the touch so it can be tached off between coats. Clear doesn't get tached off between coats. I used 320 and red scotch for final sanding everything. I use 600 and finer papers for cut and buff. Remember anywhere high build primer is put has a very good chance to shrink , if possible wait a couple of days to prep for paint. Yes high build primer has to be sanded before being painted.
You are very helpful. I have been watching hours of youtube trying to figure this out lol

I will only primer where I have to repair damage to body and has bear metal spots. Thanks for clarifying that.

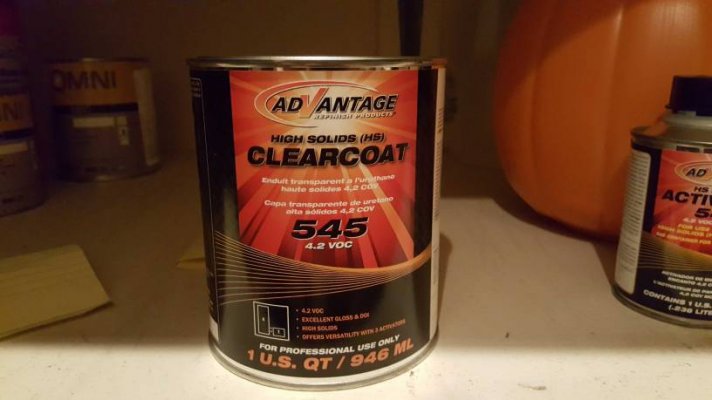
I have a picture of what paint shop sold me for clear below. Not sure if is 2k. I def want to polish it after so hopefully will work for that. It says high solids on it.

Thx about the gun. Last time I used a single stage paint. I did primer and sand before hand. Thr prep was great but was only for a couple panels. Where I went wrong last time was in the gun. I borrowed a generic suction gun. It was HORRIBLE finish. I spent hours sanding and buffing to make it look decent. The next panel I used a detail gun and worked perfect but was very slow using detail gun. This time I wanted a decent gun, just got lucky to find the GTI, I paid 100$ for it :)

You think those moisure filters will work? Guy I bought gun from gave me handful of those cheap little plastic ones that mount below the gun. e27e6fcab36d99e2ec16877c49884cec.jpg

Sent from my SM-G925V using Tapatalk
 

SteveB

Full Access Member
Joined
Jun 20, 2019
Posts
312
Reaction score
518
I work in a bodyshop , so I do this stuff everyday. Yes you can polish a high solids clear. I have sprayed gallons of high solids clear...lol. Yes a good gun makes a world of difference in spraying paint and clear. Yes use the filters , compressors have oil in them , create water as they build air. Thinking you are going to need more clear than that for sure. I would have planned on a gallon of clear for doing the whole truck.
 
OP
OP
Matthew Jeschke

Matthew Jeschke

Full Access Member
Joined
Dec 28, 2017
Posts
1,836
Reaction score
1,230
Location
Sahuarita, Arizona
I work in a bodyshop , so I do this stuff everyday. Yes you can polish a high solids clear. I have sprayed gallons of high solids clear...lol. Yes a good gun makes a world of difference in spraying paint and clear. Yes use the filters , compressors have oil in them , create water as they build air. Thinking you are going to need more clear than that for sure. I would have planned on a gallon of clear for doing the whole truck.
Crazy helpful thx. Yeah I am buying in stages. Idea is to buy rest as I get my technique down on first few panels.

I am getting a lot more comfortable with the process. Really appreciate the tips.

Do you think I should do a guidecoat at all when I am sanding these panels?

Sent from my SM-G925V using Tapatalk
 

SteveB

Full Access Member
Joined
Jun 20, 2019
Posts
312
Reaction score
518
I'm going to try and just keep all my replies in this thread. I wouldn't be worried about the color match to the door jambs or under the hood. If there is a bit of difference it would hardly be noticeable. That gutter you mention in your video is ugly from the factory , its where there roof and quarter panel join together. they are spot welded together the seam sealer is smeared in it to seal it up. Some companies put a moulding in that channel. When I took my roof rack off I didn't pay enough attention if my Yukon had a moulding in it or not.
 

SteveB

Full Access Member
Joined
Jun 20, 2019
Posts
312
Reaction score
518
Only time a guidecoat is really needed is on bodywork. Its just another step to make sure the bodywork is straight.
 
Top