Has anyone been able to upgrade a Tahoe to add the ZM1 feature, or at least support for the Trailer cameras for a vehicle that was manufactured without them? I picked up the vehicle last week. The salesman showed me a vehicle with the camera connectors but the one that was ultimately ordered does not have them. I would have been willing to wait on delivery for 6 months to get this feature. The Tahoe has Supercurise, so it is possible that only the camera wiring harness and connector is missing.
You are using an out of date browser. It may not display this or other websites correctly.
You should upgrade or use an alternative browser.
You should upgrade or use an alternative browser.
Does GM accessory camera require option ZM1 (Enhanced Trailering Technology Package)?
- Thread starter jgraves
- Start date
Disclaimer: Links on this page pointing to Amazon, eBay and other sites may include affiliate code. If you click them and make a purchase, we may earn a small commission.
Any luck with this?I have a 22 Tahoe Z71 that is loaded. In the infotainment system it shows the ability to add cameras to a trailer however I don't have camera inputs at the rear. I'm wondering if I could get my hands on the parts/cables if this could be plug and play since the head unit indicates they can be added. Not trying to steal your thread but if it could work for me maybe it could work for you as well.
To update this old thread, I finally ordered the digital rear view mirror kit from infotainment.com with the primary intent of using it to display a camera mounted to the back of my trailer. My short term solution will be a connector near the rear fuse panel to switch between the liftgate camera and the trail mounted camera. I'll likely go with a second mirror camera in a custom housing on the trailer vs the trailer camera kit from GM.
The digital rear view mirror kit arrived today and I installed the mirror this evening. Mirror and cameras / license plate light assembly appear to be genuine GM parts (as claimed). The camera assembly included both the backup camera and mirror camera (video and website state mirror camera only). I will not be installing the camera for a few weeks but I did try it briefly. I'll purchase second mirror camera for the back of my trailer.
The mirror camera field of view is too narrow to use as an interior trailer camera. I couldn't see floor or ceiling of my 14' V-nose, only the ramp door and a bit of the walls when fully zoomed out. I'm hoping the standard reverse camera works with the mirror as it has a wide angle lens. The only difficulty is it's Fakra connector is keyed differently (M code vs C code).
The mirror camera field of view is too narrow to use as an interior trailer camera. I couldn't see floor or ceiling of my 14' V-nose, only the ramp door and a bit of the walls when fully zoomed out. I'm hoping the standard reverse camera works with the mirror as it has a wide angle lens. The only difficulty is it's Fakra connector is keyed differently (M code vs C code).
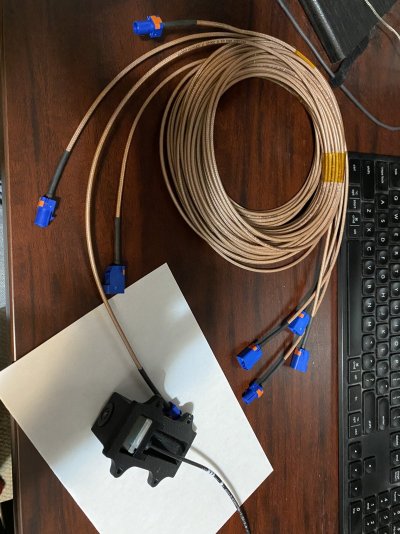
This is progressing slower than I would like, but I passed my last technical risk for a minimal level of functionality. I was concerned about the overall cable length and connector loss with a connector at the hitch and more than twice as much cable as the infotainment kit came with (and likely an OE installation). With this in mind I purchased 25m (~80') of what I think is the best quality / performing cable available which is still small enough to work with Fakra connectors. What is discovered is connectors claiming to be compatible with RG-316 are not exactly compatible with RG-316DS (dual shield) and RG-316DS cable is expensive. I ordered the following from Digikey:
Digikey: 3628-22510218-DS-ND MFG : Huber+Suhner, Inc. / K_02252_D
Digikey: WM10362-ND MFG : Molex / 0734036262
Digikey: WM10369-ND MFG : Molex / 0734036282 (This is the wrong p/n (C key, blue) to connect to the mirror! The infotainment plug Z key (water blue, equivalent to Molex 73403-6290).)
The electronics lab tech at work assembled the connectors for me, using a Amphenol? crimper with SMB dies. He commented the connectors weren't intended to be used with dual shield cable (he had to thin the braid to fit the crimp tube), the SMB dies weren't ideal for the center contact but worked, they were the correct size for the crimp tube and something about me being impatient, which i ignored. I took his recommendation to install connectors on both ends of the spool and test the connection before cutting the cable to the lengths I need.
Before leaving the office, I had to test the cable. This is when I discovered the mirror connection was not C key. The infotainment cable has a Z key plug (mirror end) and a C key jack (camera end). The camera is very obviously C key (has blue band on die cast plug). The mirror jack is dark (black, or brown?) and difficult to see with the mirror installed. It's obviously not C or Z key (Z is universal), but I can't tell for certain if its A (black), F (brown) or something else without a flashlight and moving the mirror. I modified my C key to a Z key by shaving off the 2 keying ribs with a pocket knife. Everything was finally connected (we also installed the connectors on wrong ends of the spool so I had unspooled 80' of cable into the passenger foot well) and flipping the toggle yielded a clear image on the mirror. I could drive home happy.
Once home, I tried my 25m (80') cable as an extension on the infotainment 25' cable, to test signal integrity margin. This introduces signal loss via an additional connector pair (I'll have a pair at the hitch and another pair near the rear fuse panel (to select the lift gate camera)) and 25' of lower quality RG-174 cable. Considering my final cable length will be approximately 60', I likely could have purchased 1/2 as much RG-174 (at 20% the cost per meter of RG-316DS and still Huber+Suhner), used the infotainment cable to get to the hitch and saved several hundred dollars.
My next steps are to determine the length of each section, have the additional connectors installed, 3D print a housing for the camera, install then further testing on a 1500km tow to my parents place.
Additional notes and observations:
- the Fakra housings (at least these Molex ones) are easy to install and remove. This will come in handy for pushing cables with connectors pre-installed through grommets and to change the housing to a different key is necessary.
- these are not waterproof connectors. I'm going to use these as is for my upcoming trip and will wrap in electrical tape when not in use (and may tape the connection for this trip). Longer term I may investigate adapting the OE 7 pin + 2 video connector (I'm not a huge fan from photos I've seen online) or an IP67+ rated connector which can also be capped to protect the unmated contacts. There are IP69 rated Fakra connectors but I haven't found any which are water tight in the unmated condition.
- this is as (or more) expensive than the ZM1 option with GM trailer camera and will yield a different user experience. I would have purchased the ZM1 option if available and likely would have been satisfied with it. I think glancing in the interior rear view mirror to see traffic behind me (as I do without the trailer) will superior to looking a the dash. There are clearly uses where the ZM1 option is superior, such as backing guidance, integration with the side cameras, exterior and interior cameras, checking an option box vs dumping many hours into researching a diy option, etc.
Jeff
A bit more progress this week.
I measured each run of cable last night: mirror to rear fuse block, rear fuse block to hitch, hitch to rear of trailer and hitch to front of trailer and with, some guidance, made up the remainder of the connectors. I'll eventually modify the infotainment cable to run from the rear fuse block to lift gate for the OE camera location but I'm won't install that camera until after vacation. After installing 5 of the connectors on my own, they're small and a bit involved but not too technically challenging. I am glad i was doing it at a lab bench set up for soldering PCBs and made good use of the microscope, and not laying in the driveway under my Yukon.
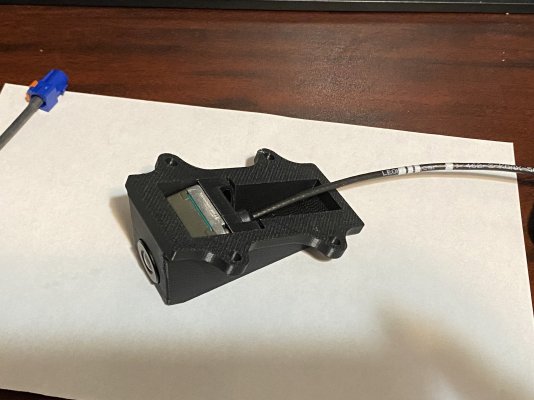
I also designed and 3D printed a housing for the exterior trailer camera. I will mount under the spoiler and above the ramp door of my trailer. There is about 1/4" clearance when the door opens but I didn't have to recess the camera body into the spoiler.
This weekend I'll run the cable for both trailer cameras and install the exterior camera. The second camera is on order and can be used for either the OE location of the interior. I'm still not happy with the narrow field of view with the mirror camera in the interior but want to run both cables while the wall is apart.
I measured each run of cable last night: mirror to rear fuse block, rear fuse block to hitch, hitch to rear of trailer and hitch to front of trailer and with, some guidance, made up the remainder of the connectors. I'll eventually modify the infotainment cable to run from the rear fuse block to lift gate for the OE camera location but I'm won't install that camera until after vacation. After installing 5 of the connectors on my own, they're small and a bit involved but not too technically challenging. I am glad i was doing it at a lab bench set up for soldering PCBs and made good use of the microscope, and not laying in the driveway under my Yukon.
I also designed and 3D printed a housing for the exterior trailer camera. I will mount under the spoiler and above the ramp door of my trailer. There is about 1/4" clearance when the door opens but I didn't have to recess the camera body into the spoiler.
This weekend I'll run the cable for both trailer cameras and install the exterior camera. The second camera is on order and can be used for either the OE location of the interior. I'm still not happy with the narrow field of view with the mirror camera in the interior but want to run both cables while the wall is apart.
Attachments


Last edited:
After a long day of installing the camera, disassembling the trailer, running the cable, reassembling the trailer and short lived disappointment (the hatch must be closed for the video mirror to work), I successfully have a camera on the back of my trailer! 
I still have to run the cable through the truck but that should be easy. This will be such an improvement over the stock exterior mirrors which just barely provide a view along side my 7' wide trailer.


I still have to run the cable through the truck but that should be easy. This will be such an improvement over the stock exterior mirrors which just barely provide a view along side my 7' wide trailer.
Last edited:
Here is the cable from the rear view mirror, and the rear fuse panel. It is quire straight forward to route the cable to here following infotainment's YouTube video (example is an Escalade but the Yukon and Tahoe are the same) and then feeding the cable down behind this panel from the top. The infotainment cable is black and a bit smaller diameter (RG-174) than the RG-316DS I used. My intent is to plug into either a cable going to the lift gate (OE location) camera or a cable going to the hitch, from this access panel. Longer term, I would like to have a remotely operated video switch here.

After extensive searching for a OE grommet, I decided this plug was the best location to pass my hitch cable from the interior to exterior. I still had to drill a hole but at least it was in an easily placed plug, rather than sheet metal which could be a future spot for rust. It is under the rear storage compartment.

The plastic body of the Fakra connector is easily removed. The infotainment plugs are slightly different but the concept is similar, pry the locking clip out then the housing slides off. This allows passing it through smaller holes or replacing the body if it is damaged or the wrong code.

I used a section of 1/4" split loom and a grommet to protect the cable under the storage compartment and where in passes through the plug. The grommet was just something that's been laying around the garage for years.


After extensive searching for a OE grommet, I decided this plug was the best location to pass my hitch cable from the interior to exterior. I still had to drill a hole but at least it was in an easily placed plug, rather than sheet metal which could be a future spot for rust. It is under the rear storage compartment.
The plastic body of the Fakra connector is easily removed. The infotainment plugs are slightly different but the concept is similar, pry the locking clip out then the housing slides off. This allows passing it through smaller holes or replacing the body if it is damaged or the wrong code.
I used a section of 1/4" split loom and a grommet to protect the cable under the storage compartment and where in passes through the plug. The grommet was just something that's been laying around the garage for years.
Last edited:
Here is the hitch cable tucked under the side panel and into the rear fuse panel / jack (missing in this photo) compartment.

You can't tell the cable is there once the insulation is replaced.

Under the truck, the cable is near the frame rail, approximately in line with the fuel filler.

I ran the cable above the frame rail and later zip-tied it to the existing hoses and harnesses.


You can't tell the cable is there once the insulation is replaced.
Under the truck, the cable is near the frame rail, approximately in line with the fuel filler.
I ran the cable above the frame rail and later zip-tied it to the existing hoses and harnesses.
Last edited:
The cable eventually joins the OE trailer harness and is zip-tied to it before exiting beside the 7-pin trailer connector.


I will install 1/4" split loom over the full length of cable under the truck, I just used what I had left-over from the camera install on the trailer today.


I will install 1/4" split loom over the full length of cable under the truck, I just used what I had left-over from the camera install on the trailer today.
Last edited:
The plug I drilled is located approximately here under the storage compartment. There is plenty of space for the cable due to the feet on the bottom of the storage tray.

The storage tray is easy to remove. Unscrew these 2 thumb nuts (1 on each side) and lift the entire tray and lid out in as one unit.


The storage tray is easy to remove. Unscrew these 2 thumb nuts (1 on each side) and lift the entire tray and lid out in as one unit.
Last edited:
Finally, here is the trailer connected to the truck. The trailer cables are tied to the 7-pin harness so the video cables and connection are supported by the much more substantial 7-pin harness.

The second Fakra connector is for an interior trailer camera. It is only pre-wired at the moment and won't be useful until I install a remote video switch.

This is a close-up of the garage door my trailer is parked in front of. It is only 6" from the camera so I'm impressed the camera is able to focus on the texture.

I'm quite pleased with how this install has gone so far. I'm towing 1500km (900+ miles) later this week and am looking forward to a clear view of what's behind me, rather than the marginally adequate view if I positioned my head just right through the outside mirrors last time I towed.
For reference, I'm towing a 7x14 enclosed cargo trailer. The OE outside mirrors provide a clear view of the adjacent lane and a marginal view of the lane your in. A 7.5' trailer would block any view of your lane and a 6.5' trailer would likely allow a pretty good view with OE mirrors.
The second Fakra connector is for an interior trailer camera. It is only pre-wired at the moment and won't be useful until I install a remote video switch.
This is a close-up of the garage door my trailer is parked in front of. It is only 6" from the camera so I'm impressed the camera is able to focus on the texture.
I'm quite pleased with how this install has gone so far. I'm towing 1500km (900+ miles) later this week and am looking forward to a clear view of what's behind me, rather than the marginally adequate view if I positioned my head just right through the outside mirrors last time I towed.
For reference, I'm towing a 7x14 enclosed cargo trailer. The OE outside mirrors provide a clear view of the adjacent lane and a marginal view of the lane your in. A 7.5' trailer would block any view of your lane and a 6.5' trailer would likely allow a pretty good view with OE mirrors.
Last edited:
Quick update, I've towed 3100 - 3200km (approximately 2000 miles) in the past 5 weeks and overall am really pleased with this camera installation. The camera mirror functioned flawlessly during this period and was quite natural to look in the interior mirror to see traffic behind me. If the front corner of a car I passed was visible in the mirror, I was safely past it. While it was helpful for backing, a taller field of view would be better. The only 2 short comings I noted were I angled the camera a few degrees too low as I couldn't see to the horizon most of the time (typically I could only see 1/2 km), and the camera got dirty after towing through intermittent rain (still usable but a bit blurry).
Considering the factory trailer camera option was not available to me, I'm very happy with the outcome. I like the placement of the display and integrating the smaller camera into the trailer. I do not get any of the integration into the vehicle systems that the factory option has and I won't suggest this is an overall better or less expensive alternative to the factory option, but it is a viable alternative if you don't have the factory option and likely better quality components than aftermarket options.
Considering the factory trailer camera option was not available to me, I'm very happy with the outcome. I like the placement of the display and integrating the smaller camera into the trailer. I do not get any of the integration into the vehicle systems that the factory option has and I won't suggest this is an overall better or less expensive alternative to the factory option, but it is a viable alternative if you don't have the factory option and likely better quality components than aftermarket options.
Similar threads
- Replies
- 2
- Views
- 732
- Replies
- 6
- Views
- 3K
- Replies
- 22
- Views
- 23K