Denali double din and 4 channel installed

Disclaimer: Links on this page pointing to Amazon, eBay and other sites may include affiliate code. If you click them and make a purchase, we may earn a small commission.

83 Bimmer

Full Access Member
Joined
Jun 22, 2013
Posts
149
Reaction score
11
*UPDATED PICS*Denali double din and 4 channel installed

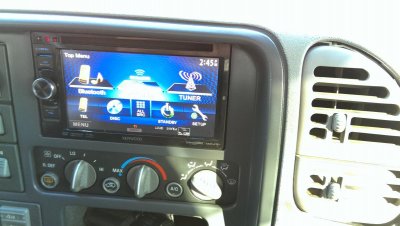
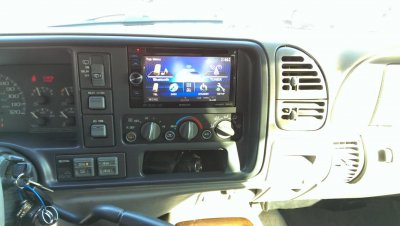
Update: Finished dash panel, added some pictures below

After lots of cutting and adjusting the kenwood double din with Sirius adapter and new JL XD400/4 are installed. The 4 channel is where the cd changer used to be in the center console, gotta love the size of the new digital amplifiers! A cover comes off the side of the amp allow access to all of the adjustments. Still have to mold the kenwood trim ring to the dash panel and fill in all the gaps but it's sitting right where I want it.
This combined with the JX 500/1 under the rear seat, the JL 10in W3 in the back, and the hertz speakers this stereo finally sounds respectable.
And just for you qukon 95 I left the factory bose amp with the bose sub still connected and operational, that little thing just sounds so good

a7u9eder.jpg
jabybepa.jpg
eremu2y7.jpg
ase5ytan.jpg
9egenuja.jpg
raqa7u3a.jpg
 

Attachments

  • IMAG0092.jpg
    IMAG0092.jpg
    95 KB · Views: 54
  • IMAG0093.jpg
    IMAG0093.jpg
    93.6 KB · Views: 59
  • IMAG0094.jpg
    IMAG0094.jpg
    92.3 KB · Views: 47
Last edited:

laredo1307

Member
Joined
Dec 17, 2013
Posts
87
Reaction score
35
Looks good. I couldn't bring myself to cut up my dash so I went with the single din JVC Kameleon KD-AVX77. It's actually been a really great stereo.

The only thing, I would see if you can cut-back the 4-points and make the whole rail look flush on the sides. Then maybe fill in the background with something.
 
OP
OP
83 Bimmer

83 Bimmer

Full Access Member
Joined
Jun 22, 2013
Posts
149
Reaction score
11
What I want to do with that actually is bond the kenwood trim ring to the factory dash panel then either bondo or gorilla hair the entire thing to make it all one piece so it looks like a factory made part. That's a whole different weekend project though. That is why the cuts on the sides are not exactly perfect, I didn't care too much about them because I always intended on covering them up

Sent from my HTCONE using Tapatalk
 
Last edited:

qukon 95

Full Access Member
Joined
Apr 7, 2011
Posts
556
Reaction score
5
That's good bimmer that the sub isn't going to waste and how are you using the Bose amp? Nice DD
Install and using the CD player case to hide the amp I hope you don't have heating problems in the summer months with the 4 channel amp.
I wish I can compare a Bose amp verses my mtx amp driving this sub .
 
OP
OP
83 Bimmer

83 Bimmer

Full Access Member
Joined
Jun 22, 2013
Posts
149
Reaction score
11
The new digital amps don't get hot, not like the old ones. When I first put the double din in there I didn't have the 4 channel so everything ran through the bose amp, when I hooked up the 4 channel I disconnected all the speaker output wires from the bose amp except for the subwoofer

Sent from my HTCONE using Tapatalk
 
OP
OP
83 Bimmer

83 Bimmer

Full Access Member
Joined
Jun 22, 2013
Posts
149
Reaction score
11
Attached a few pictures to the first post of the finished dash panel
 
OP
OP
83 Bimmer

83 Bimmer

Full Access Member
Joined
Jun 22, 2013
Posts
149
Reaction score
11
Yes I did, only way to make it look nice

Sent from my HTCONE using Tapatalk
 
Last edited:
OP
OP
83 Bimmer

83 Bimmer

Full Access Member
Joined
Jun 22, 2013
Posts
149
Reaction score
11
Just some rtv silicone, let it dry overnight inside the garage, absolutely no problems. Drilled it from inside out. Once I pulled the overhead panel off of the headliner it was really easy to eyeball the center of the roof

Sent from my HTCONE using Tapatalk
 

livingez_123

Full Access Member
Joined
Feb 18, 2013
Posts
1,798
Reaction score
114
Location
Sandy, OR
The finished product looks real nice, just takes some time planing, filling, sanding, etc...etc...etc...
 
OP
OP
83 Bimmer

83 Bimmer

Full Access Member
Joined
Jun 22, 2013
Posts
149
Reaction score
11
Yes, took a lot of tedious hand work, but very happy at the end. I like it a lot better than the detailss kit

Sent from my HTCONE using Tapatalk
 

chaingun427

OBS Mad Scientist
Joined
Feb 1, 2014
Posts
435
Reaction score
38
Location
Mooreland, OK
How would I go about texturing the bondo or.gorilla hair filler after its painted?

Sent from my SAMSUNG-SGH-I537 using Tapatalk
 
OP
OP
83 Bimmer

83 Bimmer

Full Access Member
Joined
Jun 22, 2013
Posts
149
Reaction score
11
Actually I was wondering how that was going to work also but when I painted it there was enough natural orange peel that it blended in nicely

Sent from my HTCONE using Tapatalk
 

chaingun427

OBS Mad Scientist
Joined
Feb 1, 2014
Posts
435
Reaction score
38
Location
Mooreland, OK
I ask because my center console is going to require some material be added to it so it fits better

Sent from my SAMSUNG-SGH-I537 using Tapatalk
 

qukon 95

Full Access Member
Joined
Apr 7, 2011
Posts
556
Reaction score
5
Hey bimmer!! You need to move that little ant on the roof 1/8 " to the left.
Just kidding!!!!
 
OP
OP
83 Bimmer

83 Bimmer

Full Access Member
Joined
Jun 22, 2013
Posts
149
Reaction score
11
No I think you're looking at it wrong, take your computer and flip it upside down then it'll look right

Sent from my HTCONE using Tapatalk
 

Forum statistics

Threads
137,750
Posts
1,991,163
Members
102,739
Latest member
D Rollins
Back
Top