Changing rotted backing plates/dust shields

Disclaimer: Links on this page pointing to Amazon, eBay and other sites may include affiliate code. If you click them and make a purchase, we may earn a small commission.

dogerme32

TYF Newbie
Joined
May 16, 2010
Posts
1
Reaction score
0
Rotted?? you haven't seen rotted!!!

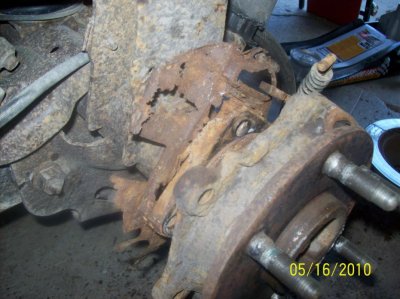
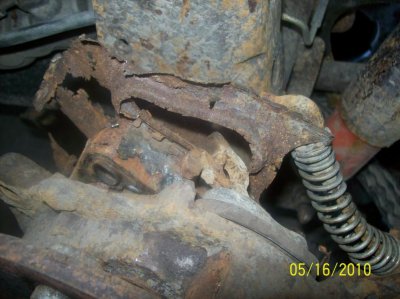
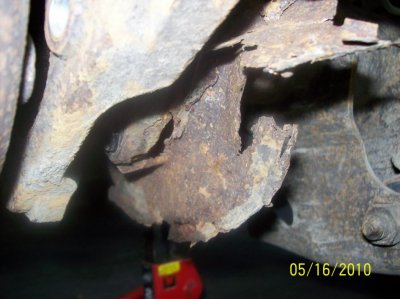
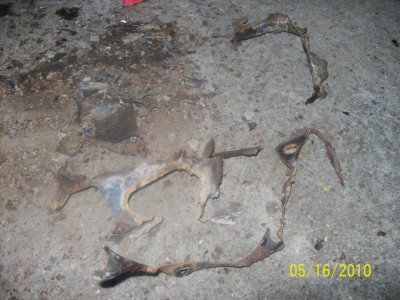
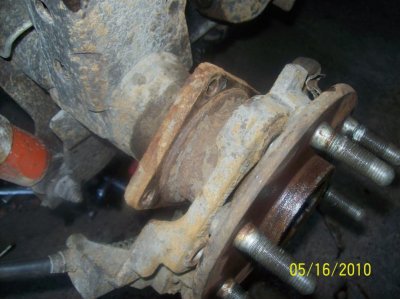
I just got this vehicle about 2 months ago. I knew there would be things to do to make it a decent ride for my wife, but not this. the backing plates were non existant, as well as the parking brake shoes and all hardware were gone. both rotors are warped, and both outer wheel bearings are loose. so I started this project with the intent on just replacing wheel bearings, but will end up with new backing plates, wheel bearings, seals, parking brake shoes, hardware, and rotors...LOL bout 350.00 later, doing it myself, i should have no more rear end problems...LOL Great job with the posting on how to replace these, i found you trying to figure out how to remove the axle shafts. without your post I would be stuck at that point. so again, GREAT JOB AND THANKS ALOT. Here are some pics after some of it is apart...you can see hardly any backing plate left to speak of.!!
 

Attachments

  • 000_0008.jpg
    000_0008.jpg
    93.4 KB · Views: 102
  • 000_0009.jpg
    000_0009.jpg
    92.4 KB · Views: 94
  • 000_0010.jpg
    000_0010.jpg
    87.3 KB · Views: 89
  • 000_0011.jpg
    000_0011.jpg
    96.3 KB · Views: 85
  • 000_0012.jpg
    000_0012.jpg
    91.1 KB · Views: 89

k5blzt

TYF Newbie
Joined
Jan 5, 2010
Posts
4
Reaction score
0
Location
Graf, Iowa
I just did this on my wifes 03. Did it laying on my back and it was pretty straight forward. The biggest problem I had was getting the diff cover to seal. Took 3 tries and I was pretty PO'd. Diff has a tapper to it on the sealing surface which is different from any other rear end I have ever worked on. Ended up using a high dollar gasket with some indian head gasket shelac and it finally sealed. Make sure both surfaces are CLEAN!
 
OP
OP
B
Joined
Mar 1, 2010
Posts
46
Reaction score
0
would this be any different on an axel on a Z71?

No, assuming the rear ends are the same, (even if they're not it doesn't matter) it's the same process.

I'm just glad this writeup has been able to help so many people so far :)
 

Hiceman

TYF Newbie
Joined
May 4, 2010
Posts
2
Reaction score
0
Location
Greer, S.C
Just seen in the new 2010 summer edition LMC truck catalog that they have the rear disc brake shield for 20 bucks and its a 2 piece design claiming you dont have to remove the axles....
 
OP
OP
B
Joined
Mar 1, 2010
Posts
46
Reaction score
0
They've had the 2 piece out for awhile, but you still need to remove the axles to get the old ones out. And the 2 piece flex a bit, so they'll rub the rotor opposed to the solid ones that are more stable...
 

10Gauge

TYF Newbie
Joined
Jul 11, 2010
Posts
1
Reaction score
0
its just flimsy, stamped metal, surely you can just cut/tear away the old plate without removing the axle, no ? All the rust should make it a simple job.
 
Last edited:

YUOnDaGround

Full Access Member
Joined
Jun 27, 2010
Posts
93
Reaction score
0
Location
Central Virginia
Just seen in the new 2010 summer edition LMC truck catalog that they have the rear disc brake shield for 20 bucks and its a 2 piece design claiming you dont have to remove the axles....

HAHAHAHA, sorry that was just funny. I was all "excited" to do a project now I don't have to. Probably save 2 hours off the whole job.
 

YUOnDaGround

Full Access Member
Joined
Jun 27, 2010
Posts
93
Reaction score
0
Location
Central Virginia
I was looking at the project again of replacing the backing plates and can somebody tell me what is the actual function and purpose of the backing plates?
 

oneradride

Member
Joined
Apr 30, 2009
Posts
51
Reaction score
6
Location
Omaha, NE
Besides containing some (very little) of the brake dust and keeping it off your wheels….. The main function is to hold/secure the e-brake cable.
 

SMDBIOS

TYF Newbie
Joined
Oct 15, 2010
Posts
1
Reaction score
0
I just performed this repair on my 2004 Yukon SLT, the instructions here helped me greatly! It took about 4 hours for both sides..

Here are some helpful tips that I learned along the way...


#1 Make sure you can remove the differential fill plug BEFORE you start any of the diff cover removal process. I would suggest that you start the whole process by making sure you can loosen that plug.

#2 Use a 5/16 - 1/4" socket with a swivel adapter on the Cross Shaft Bolt, mine was not budging with the wrench and any more force would have stripped it.

#3 One of my spider gears fell out during the project. Don't rotate the axles once that cross shaft is removed (as stated in the photo directions) Mine fell out because I bumped the axle by accident.

If you do happen to lose a spider gear, it simply goes back in on the exact opposite side of the other one. They also have a metal cup that they sit on, make sure you pull that out with your magnet (because it probably fell to the bottom of the carrier). place the cup on the bottom of the spider gear that fell out and rotate the carrier to position the other spider gear (that's still in the carrier) away from you, then insert the spider gear and cup by gently rotating the gears in one direction. You know you have it right when you're able to slide the cross shaft back in place as it goes through the center of both spider gears.


#4 The C clips may be tapered if you have some mileage on the truck. Mine has 82k on it.. if you reverse the C clips when you put them back in, your axles will push back out.. but not all the way, then you're cross shaft will catch the axle ends and will require some force to get the cross shaft past the axle ends.
 
Last edited:

dogbert2521

TYF Newbie
Joined
Oct 18, 2010
Posts
1
Reaction score
0
Thanks for the writeup, it gave me the confidence to attempt this job and it went very well. This job was relatively easy in the end (about 4+ hours of work, would be around 3ish now that I know what to do).

I agree with SMDBIOS #1 recommendation about removing the fill plug FIRST. I got the job done and then had trouble getting the diff fill plug out (3/8" drive rounded off). To fix this, I cleaned out the plug, got a 3/8" axle key from Home Depot, drove it in until it was fully seated, then put my largest crescent wrench on and tapped the end with hammer. Now I just need to find a replacement diff fill plug (nearly impossible online anyway).

I'd also recommend sliding the pinion shaft out partially when it is pointing up, then putting a clamp on it so it cannot slide out. This should (I think) prevent problems with rotating the axle and having the spider gears fall out.

Pete

I just performed this repair on my 2004 Yukon SLT, the instructions here helped me greatly! It took about 4 hours for both sides..

Here are some helpful tips that I learned along the way...


#1 Make sure you can remove the differential fill plug BEFORE you start any of the diff cover removal process. I would suggest that you start the whole process by making sure you can loosen that plug.
 

smurphy80

Full Access Member
Joined
Jun 14, 2010
Posts
92
Reaction score
0
Just also wanted to comment, not to rain on anyone's parade. But they do make 'two-piece' backing plates for our trucks that do not require you to remove or mess with the axles.
 

mike

TYF Newbie
Joined
Nov 1, 2010
Posts
1
Reaction score
0
hello and remember that if you have serviced your rear differential on a regular basis and don't want to pull the rear end, Dorman makes a two-part dust shield that can be ordered thru amazon for about $28.00. You still have to pull apart some of the brakes; however, once the four bolts holding the dust shield are exposed, the job is almost done with the help of a par of tin snips to remove what is left of the old shield. Dorman #924-213
Mike

---------- Post added at 02:53 PM ---------- Previous post was at 02:48 PM ----------

hello and remember that if you have serviced your rear differential on a regular basis and don't want to pull the rear end, Dorman makes a two-part dust shield that can be ordered thru amazon for about $28.00. You still have to pull apart some of the brakes; however, once the four bolts holding the dust shield are exposed, the job is almost done with the help of a par of tin snips to remove what is left of the old shield.
Mike
 
Last edited:

54Rich

TYF Newbie
Joined
Jun 27, 2010
Posts
3
Reaction score
0
Help, the job is almost done

I should have read all the responses before I stated, now I'm stuck. Just finished the backing plates, actualy had a rear seal go, so I had to pull apart the rear. Put it back together and it's ready, except for some rear end lube. I can't get the darn plug out! I'm soaking it right now, I've heated it. It will not move.

Any tricks?

Thanks,

Rich

As an update, I never did get the plug out, never even got it to move! Ended up magintizing some drill bits (to keep the junk out) and going through the plug, tapped it at 12mm and then used a 12mm OS drain plug. What a PITA. A 1/2 to 3/8 impact adapter with my impact wrench would not move it.
 
Last edited:

TALL00TAHOE

Member
Joined
Dec 14, 2010
Posts
44
Reaction score
6
Damn wish i had this instructional about a year ago. Fought those things for about a day trying to figure it out.
 
OP
OP
B
Joined
Mar 1, 2010
Posts
46
Reaction score
0
Yeah, sorry to hear about everyone's problems with the stuck fill bolt. I didn't have to worry about that as I have a diff cover that has a fill plug built into it..
 

ESV_Platinum

TYF Newbie
Joined
Jun 19, 2011
Posts
11
Reaction score
0
Hey guys, I have an 04 Escalade ESV, the backing plates for the rear brakes are completely shot at 75k miles.

I'm wary of pulling the whole rear end apart as is described by the OP, does buying the 2 piece backing plate (Dorman #924-213) mean that I don't need to pull the axles out and mess with the diff?

http://www.autozone.com/autozone/pa...hByPartNumber=true&itemIdentifier=973701_0_0_

Thanks for your help, sorry that im a noob
 

oneradride

Member
Joined
Apr 30, 2009
Posts
51
Reaction score
6
Location
Omaha, NE
Never apologize for being new at something, we all were before we tried it.....
There are two schools of thought on this...


1. I pulled my axles and did the one piece replacement plates, and if I had to do it again this is still what I would do. It's not that bad, follow the directions and have 3+ hours. There is a reason people say if its worth doing, it's worth doing right.... (page 2 of this thread)


2. Get the 2 piece, remove the rusted ones with tin snips, blow torch whatever.... and be pissed because they squeak every time you turn. YES they flex, EVEN in the rear. I had to bend the one piece backing plates a little so they didn't rub on the rotors... I can't even imagine how much trouble the 2 piece would be.


Inevitably it's your call and your truck. Have faith in yourself and go kick its ass.... :)
 

ESV_Platinum

TYF Newbie
Joined
Jun 19, 2011
Posts
11
Reaction score
0
Never apologize for being new at something, we all were before we tried it.....
There are two schools of thought on this...


1. I pulled my axles and did the one piece replacement plates, and if I had to do it again this is still what I would do. It's not that bad, follow the directions and have 3+ hours. There is a reason people say if its worth doing, it's worth doing right.... (page 2 of this thread)


2. Get the 2 piece, remove the rusted ones with tin snips, blow torch whatever.... and be pissed because they squeak every time you turn. YES they flex, EVEN in the rear. I had to bend the one piece backing plates a little so they didn't rub on the rotors... I can't even imagine how much trouble the 2 piece would be.


Inevitably it's your call and your truck. Have faith in yourself and go kick its ass.... :)


Thank you for the response, I have to say, this is a much better forum than cadillacforums.com

I swear all they care about are their HP numbers and quarter mile times for their insanely fast CTS-V's :sleepy10:


I see exactly what you are saying, the 1 piece design looks much stronger for sure.

Unfortunately I'm the guy that's going to mess up a seal or pull everything apart and then never get it back together. :emotions122:

I'm going to have to think about this one, I have the new fluid and gasket ready to go into the rear diff so I need to decide soon.

Thanks again for the help.
 

Forum statistics

Threads
137,715
Posts
1,990,289
Members
102,707
Latest member
rossida

Latest posts

Back
Top