06 denali xl cd changer removal

Disclaimer: Links on this page pointing to Amazon, eBay and other sites may include affiliate code. If you click them and make a purchase, we may earn a small commission.

OP
OP
about20ninj45

about20ninj45

Full Access Member
Joined
May 13, 2014
Posts
1,120
Reaction score
330
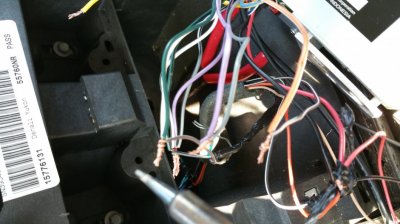
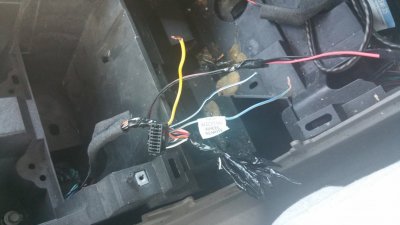
Vital step, read here! So of you kept the whole cd changer because you werent comfortable or you disected the cd changer, you should have by now cut, splice and extended the wires on the cd changer harness by about 16-18 inches. We primarily want this length, incase you decide to store the cd changer under a seat, in the glovebox or center arm rest. Hell, you might even make it long enough to move it to the back of the truck in the jack storage area, just make sure you chose the length to your liking. On the main harness coming from the radio to the c_d changer, you want to make sure you connect these wires together, to the eires they were attached to before you cut them ( hopefully you labled both ends)
 

Attachments

  • 20150301_173258.jpg
    20150301_173258.jpg
    97.8 KB · Views: 36
  • 20150302_161830.jpg
    20150302_161830.jpg
    95.4 KB · Views: 38
OP
OP
about20ninj45

about20ninj45

Full Access Member
Joined
May 13, 2014
Posts
1,120
Reaction score
330
Upon completion, now your on to the fun part, installing you secondary radio. The first step to this is to figure out your dimension of the aftermarket head unit vs the dimensions of the cd changer opening. You may need to open this up by trimming and filing the edges. I used a dremmel so use what works for you. If your using a rotary tool, keep in mind, that this is plastic, and if you keep that dremmel in the same spot for to long, it will melt the plastic, which is No Bueno ( not good ). Be sure to test you secondary radio for fitment in the plastic, as well as the cubby hole in the dash.
 

Attachments

  • 20150302_155800.jpg
    20150302_155800.jpg
    96.6 KB · Views: 38
Last edited:
OP
OP
about20ninj45

about20ninj45

Full Access Member
Joined
May 13, 2014
Posts
1,120
Reaction score
330
*attention* find your wiring diagram specific the radio that you've chosen, and wire accordingly. Positive (+) left front and (+) left rear should be twisted together , Positive (+) right front and (+) right rear should be twisted together. Now tie all the speaker negatives together,because they all get attached to Pin 12,[The common wire] (black with white tracer). Be careful not by to attach it to the other black with white tracer, because thier are two of them . The left positives get wired and tied into pin 11 and the right positives go to pin 10. Attach your battery wire to the orange wire on pin 15.

You may need an additional power source, and if you do, tie your secondary power wire into the cigarette lighter connector on the hot side, which should be orange ( Use your multimeter if you are unsure ). Once you have everything wired correctly and youve checked continuity, its time to solder and tape the wires away
 

Attachments

  • 20150302_131627.jpg
    20150302_131627.jpg
    99.2 KB · Views: 37
  • 20150302_161821.jpg
    20150302_161821.jpg
    94.5 KB · Views: 33
OP
OP
about20ninj45

about20ninj45

Full Access Member
Joined
May 13, 2014
Posts
1,120
Reaction score
330
Now the fun part. Turn on your car or put it in the acc position. Change your input to cdx, fire up that second radio, and test your volume. If you have sound,CONGRATS!!! if you dont, dont fret because you have 3 ways of turning up the volume via steering wheel, stoxk headunit or aftermarket head unit, they have to be adjusted so i recommend settimg your aftermarket radio to a volume level of 8 and then turn up the stock headunits volume. If for any reason you want to use xm on your stock, be aware that your xm inputs get overided by the cdx input, so if u change out of cdx input youncan hear it on the xm inputs. If you dont want to hear it over the xm, just turn the radio off.


Once you button everything back up, you are now finished! Hats off to you :party52: COMPLETE. IF YOU HAVE ANY QUESTIONS, I WILL DO MY BEST TO RESPOND TO THEM IN A TIMELY MANOR! ENJOY!!!!!!
 

Attachments

  • 20150302_205014.jpg
    20150302_205014.jpg
    92 KB · Views: 39
Last edited:

06caddykeith

TYF Newbie
Joined
Feb 28, 2015
Posts
5
Reaction score
0
Why it that a guy cannot, just tie into the harness going to the head unit? Using ur pin out diagram up have power, ground, and speaker outputs. Also the May answer my first question but what purpose does the data wire serve on the pin out?
 
OP
OP
about20ninj45

about20ninj45

Full Access Member
Joined
May 13, 2014
Posts
1,120
Reaction score
330
Why it that a guy cannot, just tie into the harness going to the head unit? Using ur pin out diagram up have power, ground, and speaker outputs. Also the May answer my first question but what purpose does the data wire serve on the pin out?

The data wire tricks the head unit into thinking that the cd changer is there, and creates the cdx input on the stock headunut, once it senses the cd changer brain. If you remove that wire, it not work. That pinout diagram is only for the cd xhanger, not the headunit. The headunit uses different wire colors and the headunit communicates over the databus wire. Remove that wire from the back of the radio and nothing wirks, that's why you would to splice the cd changer. Going directly to the headunit does not give you an input to source.
 

sdgros01

TYF Newbie
Joined
Jul 17, 2014
Posts
27
Reaction score
0
Now the fun part. Turn on your car or put it in the acc position. Change your input to cdx, fire up that second radio, and test your volume. If you have sound,CONGRATS!!! if you dont, dont fret because you have 3 ways of turning up the volume via steering wheel, stoxk headunit or aftermarket head unit, they have to be adjusted so i recommend settimg your aftermarket radio to a volume level of 8 and then turn up the stock headunits volume. If for any reason you want to use xm on your stock, be aware that your xm inputs get overided by the cdx input, so if u change out of cdx input youncan hear it on the xm inputs. If you dont want to hear it over the xm, just turn the radio off.


Once you button everything back up, you are now finished! Hats off to you :party52: COMPLETE. IF YOU HAVE ANY QUESTIONS, I WILL DO MY BEST TO RESPOND TO THEM IN A TIMELY MANOR! ENJOY!!!!!!


I'm looking into doing this as someone broke into my truck and stole my pioneer nex 4000 so I'm back to a factory hu. Dismantling the cd changer to get the boards out could you go into a little more depth? Also did you just stash the boards up in the console and then splice the wiring for the second headunit into the cd changer harness going to those boards?


Sent from my iPhone using Tapatalk
 
OP
OP
about20ninj45

about20ninj45

Full Access Member
Joined
May 13, 2014
Posts
1,120
Reaction score
330
Yes, the CD changer is only held together by a couple of screws,Phillips to be exact. Save the wiring and the connector. Its pretty str8 forward. Remember, you don't need to take the boards out if you don't want to, you could keeps the CD changer intact, its just harder to hide it lol
 

sdgros01

TYF Newbie
Joined
Jul 17, 2014
Posts
27
Reaction score
0
Turns out the boards are completely different in the 01-02. I ended up having to get ahold of a working cd changer and then doing a relocate to the center console


Sent from my iPhone using Tapatalk
 
OP
OP
about20ninj45

about20ninj45

Full Access Member
Joined
May 13, 2014
Posts
1,120
Reaction score
330
Turns out the boards are completely different in the 01-02. I ended up having to get ahold of a working cd changer and then doing a relocate to the center console


Sent from my iPhone using Tapatalk

Did you complete it?
I would like to see pics of your progre
 

Sub

Full Access Member
Joined
May 29, 2012
Posts
94
Reaction score
8
Damien... just gotta say what you came up with here is badass! Very clever thinking in working around the Class 2 data bus communications issue with the factory head unit!

For years, I've wanted to add a secondary head unit in the slot, with a motorized screen, that would add other features like bluetooth, HD Radio, USB inputs, DVD playability, etc that the factory TNR nav does not offer. I think you solved the issue.

I'm not ready to do this mod yet, but I'm subscribed now, and just wanted to thank you and say congratulations on thinking outside of the box and being innovative.
 
OP
OP
about20ninj45

about20ninj45

Full Access Member
Joined
May 13, 2014
Posts
1,120
Reaction score
330
Damien... just gotta say what you came up with here is badass! Very clever thinking in working around the Class 2 data bus communications issue with the factory head unit!

For years, I've wanted to add a secondary head unit in the slot, with a motorized screen, that would add other features like bluetooth, HD Radio, USB inputs, DVD playability, etc that the factory TNR nav does not offer. I think you solved the issue.

I'm not ready to do this mod yet, but I'm subscribed now, and just wanted to thank you and say congratulations on thinking outside of the box and being innovative.

Thank you sir, your compliment is greatly appreciated!!!
 

Mike H

TYF Newbie
Joined
Jan 23, 2016
Posts
8
Reaction score
4
Jumping into this late but want to say thanks for posting it, very helpful for my '04 Denali, the CD Changer was all but useless and I don't want to go to an aftermarket head unit. I've pulled the CD Changer and mine only needed a single circuit board to fool the head unit that it was still attached, I pulled the L/R/AG wires to run audio up and just connected them to a regular 3.5mm jack and hooked it up to my phone. I don't want/need all the stuff a second head unit will bring, just an AUX for my phone so I can stream music and take calls, hear GPS directions etc.....it worked great for that in my test. Now I just need to make it look good. Have USB panel jacks on the way and a 3.5mm panel jack, going to keep the CD changer housing and mount the circuit board in there along with a 12V Audio Amp and the wiring for the panel mounts. Making a new face plate for it with the jacks and a control for the amp. Will get some pics as I go and when it's done.
 

Tonyrodz

Resident Resident
Joined
Feb 16, 2012
Posts
33,178
Reaction score
51,384
Location
Central Jersey
Jumping into this late but want to say thanks for posting it, very helpful for my '04 Denali, the CD Changer was all but useless and I don't want to go to an aftermarket head unit. I've pulled the CD Changer and mine only needed a single circuit board to fool the head unit that it was still attached, I pulled the L/R/AG wires to run audio up and just connected them to a regular 3.5mm jack and hooked it up to my phone. I don't want/need all the stuff a second head unit will bring, just an AUX for my phone so I can stream music and take calls, hear GPS directions etc.....it worked great for that in my test. Now I just need to make it look good. Have USB panel jacks on the way and a 3.5mm panel jack, going to keep the CD changer housing and mount the circuit board in there along with a 12V Audio Amp and the wiring for the panel mounts. Making a new face plate for it with the jacks and a control for the amp. Will get some pics as I go and when it's done.
Sounds really interesting, can't wait to see it once you're done.
 

Mike H

TYF Newbie
Joined
Jan 23, 2016
Posts
8
Reaction score
4
Well here are the pics...as promised. 2 USB ports provide 2.1A each so they'll charge just about anything. Appreciate the help here with the DataBus info, worked great.

20161206_152229.jpg
20161210_080308.jpg
20161210_080906.jpg
20161210_081629.jpg
20161210_082546.jpg
 
Last edited:

Tonyrodz

Resident Resident
Joined
Feb 16, 2012
Posts
33,178
Reaction score
51,384
Location
Central Jersey
Well here are the pics...as promised. 2 USB ports provide 2.1A each so they'll charge just about anything. Appreciate the help here with the DataBus info, worked great.

Board mounted in the housing.....
AzC-TcY1Edq-x-srmYDLDrvUZxOBXeYoMgiGG7SLJ7zfC2Me7sdq3Ty59MRJneLnxL0jFWJEQWWULhYTBH8wmL3BWjbwJ-0rhoUG8Bvq6xIfAwTomgzmWeEF5MkCP1re5rUVSlYdavaahmprAKdklOjJNjmG-wtem9p1Lua4Ld140DfWidk_zApmFKkTf8MGgI5H5_9yVuMfQ-bhcRB-ICTN6T-zuGqdltJUZcx1wa_MDAk9qh4YTAZInMnG4pSOzGiiPRkG3rhNMZtx_r_AcT9FO4sTcXlbARverBNAP9-WjW7pm-K_bRszGYFVrHJ-F4bsisKHCNJg4MSRpw3QfXEIpvW5m9cx8PQPxNWHHKh0qQ0oTvj_cYTzzP3mTQIU2ecoUOU2EGSITENs9Op9LlS-5b10EcXGkO_Cz-ObTk70_94SmThc57K3mnpSpEGUilcZnFy4Uzct-i6mpORFF9LR7lncwO4RunoXnSknMB5Io843Cx-aPBWuFsFPmMbSUbXcDZQ3S_mxilzeAz_88xszTsZm3xBU8M7sSVyB5sb3lInRCfCvz6dLPJgXVBPFxgcz9W6OMTEwsOkdGK14rIXonQ6J_FbYzsdzSAtJOU0OMOzn=w1920-h1080-no


12V Line Amp and way too much wiring stuffed into place, Amp and controller will be 2-sided taped to housing once it's ready to put the cover on.
Imqw7MY4G43QR2326nkAn5oRAo8QG9gCTH3oGSL5yRjxyEOOt08D-7-5OdAQhpfUovVP0yIbhRIkp3JYOzoXabjOUgdY3GidpapJOmUOPcL0rmfhXUkjDbABecril4XhxjN0LUl2Dm9nGdi47TjVbEds6w-DeRspTuOb4ZxhtNPaX68Im4YtrtWhRbDDTORQlIAWwZPyMO7q4UqaA-1caYihDJzUECwdU_bJP_EbAD1ruy9b4GFTm-ritG8pXJf1ktpjoJ3rudY0k4Rd93--HM7u0Euk4Enj4dZJMjHUx4B5YzG32qaGiq4C7QBC82CFfTZFTVAZdEQm0EDdihjYM3uvPD9VMuyit7s4YWk0iQSOYFrcrjxzDTTGNNtAOD4KJAzvp-1ApDLObn3ZSDwM3fll84dcSKz7J01Zibo9l1KhrGE0GNSCQgR-du1eXglGSA9vPYnivbt-0odFqDvmpL12rb_KWeLFOJ4BkTULUO7eZajerI_tuNpdSM_PBrAyFjkeuU4SbwD2OaJLR4-VSTwQXK-nVN19sQga7DtK-NFA7XUztlfwBwvocF7LB4r-oypPCQoFb7Upa0_tHSCrKXc00nZB-kxArZ6_fg0kH_pHdHy_C133=w1920-h1080-no


Front cover installed, and some more wiring.....
2iCv-Y_sdO-4cqv58L9W1qo9etOflTDeTfpckObvCg3s6sZd-65fouY2P6yev7jFQ7Hqj5wPiKSEh7ivlTwiHtxXeiXHn_eEOJOw8VX6FikZMSRUwbjNcqgth-aGpDGahlar4AuBrJhVgw6sweobQdsiEw7HSOS-EdczWBJDA7BFquRon498hiXYqAMYjXpQdu2Fm6Xj95oWuRLHMzAnJxvrtYBMMiEAJmr9ZWJdVzSlU2vv6h6a0Palh7H4kkgIsXuO1WY3Z33y3KxAYzFdtAkX3NKSadkUzMrrRZHCd8R0owMdCtPP9A-6EuwXReRk2kYtiz-0tP7F5cfMSTI6jznT7obJWNDKVH7bjaN0QZEwSp7uAJn2Z06k0IwjGy2OOjgcIiAFzRWAx2yuqdmLQamUeXULQyqb7AqmFk7oj9S8hkik0HjLhctHQDwpipAU1AFXX6KxNsa5NcBPRiP8_lrKPuL34ge_p30-h7vigYY87jnBqhuGkM7osz9jZc6Y93qZz9gpgv9oRmBb52JeaK6s5kNt6Dt45fxUB4Emdr6amGDPnltI7NlY-fsonTuxpBEvosRCi8FgGr0A4iuWy_eFDPLVEFSVZCrL3o5knoLdYYfp=w1920-h1080-no


Covers on and ready for install....
thxHlcDVMgO1toP3X5tWL4z7945TjOpn4Kl7pijImMHmYy1hdDNTnHaKg0xgH6S6h1JxIAqs5lGx-UPZD0rULLHAvj4sFLlWTR85YIlVwFFla9XBenJkg-mIuEf7lt91BJbTKkkBJSWhxQL5j2NIIKgEMC3SzS2b2Az_UyGjJBe__FGJUlvdoflWnCo1xaHAE51z1Za1TL-DpqwT2rW8Y2BJ7GYoKSk_9bruF88IwHfHzKFACbVU9XWKDRY2-3RxwROkgYPXE9lqECVZrb8PYLRZyqAtVvNmUNrtyL1SgzHC1_XO_4aUXXvHCmC9TEFR6xwaYyHZR4q_vTpWu1JGH_7lzrPCsuMuNEGpCECMO9GlGPf6OFwUkAJpplFr7s7xXASJBpfqISw4hxn2XY3tPDn63ImxUy137-TwkH0N95BRNxKeoBgbVON-JEl_T6rVQbz70Z8lARH6oypRumw2__khQJm0uy_Rfoi4_msUgZtKudpwg96i6fJKrsGwJzPEerR2_ZoiV-bOEQp79wojysVYS7i4EjIqbPQJlUe69wCZuaftO1EkE4K0sN8Vhy5yfza6L8X2HoaeEyMA-BXYVf1ByyLug6PcJB2azNkGWV6NnH00=w1920-h1080-no


Ready for use....
TuSfNG7NOpd4LF_9EXxeUkgWs1Mu2e4u8mgdDoaXJPvUWajJBenjZHWWwTfwy77_4Fbv2qoaws2SwS2LGONT2if6aJMVOvq7cmFcHhbYJ37BDNa-StgFNrL1JrWJV_b4n_VYUU4BWXFea0kUNVVXI-n_ywXc9Me4f9IXUXuIDOCTBVuhMgXf_ogRTGGFPhUxl0C9QxWScbcziENvgjAWR2s40CCgpXi5GAIupX__jR6X4tmT3QkPmXdJJXALPBTDkeTDPxeSWuYkdkf7b1vgdSfPrjbNmsCy7caiQCWvpTfd9EIfSA-ZKUKWGGAlCkXQWFM-QLdbVMpy0FGkfhPLOu_Kt1KsyiXdDJhcFQu1KNIIrXIPhGc1aCT6P3P5MRazkDWqmQ06U17lT3oTng1E51Tud6-qb5fGQbkdWoOTD4WOCSAi48r744pUyaDYYfzT9vFTQwsqxgqSN0w2zUNNoL743hde_n7oeLLunmZQkCB-6ZpUOsF5fW_ITU2YRXn7OhtftlfBNjoQq5FHUMovm1XDk571mdEBil4vrAvOrrEt47jeb8pTWMxIpvmOtHeqj3xDHat5gJA_W5-Pf4eNkxMDp_q4SN0BR4Nx5hf-L1p07JV_=w1920-h1080-no
No pics.
 

adventurenali92

Full Access Member
Joined
Feb 16, 2015
Posts
7,722
Reaction score
9,172
Location
Big Bear Lake, ca
So I've already done an aftermarket head unit. Nav built in, bluetooth, and radio. Anyways, I don't have aux or sub inputs although my head unit toes have an iPod cable. Not sure if it works though a dive never used it. I just stream over bluetooth. Aneyays i want to do something different with the cd changer cuz I never use it. Like ever. Any ideas as to something somewhat simple to mod in there that's functional? That does something?
 

Forum statistics

Threads
137,712
Posts
1,990,213
Members
102,704
Latest member
Ralph Turner

Latest posts

Back
Top