I figured mine out and thought I would share since this forum has helped me before. I did it with chatgpt help so had it rewrite the instructions.
2021–2024 Chevy Tahoe / GMC Yukon Center Console Armrest Lid Replacement
This write-up shows how I replaced the center console armrest lid on a 2021–2024 GM full-size SUV style console. My vehicle is a 2022 Chevrolet Tahoe. The replacement lid was a complete armrest assembly with the hinge arms and wiring for the console lid electronics/wireless charging area.
This is not a simple “remove a few bolts” job. The lid is held in by a long hinge rod with two torsion springs, and there is also an electrical connector that must be unplugged before the old lid comes out.
Tools Used
- Plastic trim removal tool
- Small flat screwdriver or pick
- Needle-nose pliers
- Paint marker or Sharpie
- Flashlight
- Small punch or screwdriver to help move the hinge rod
- Patience
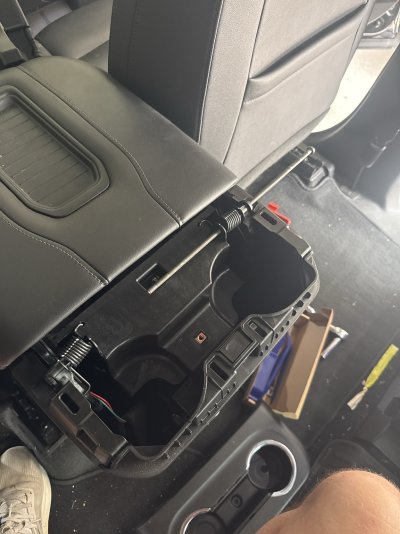
Step 1: Remove the rear cupholder / rear console trim
Start by opening the center console lid. The rear cupholder/trim section behind the console needs to be removed to expose the hinge area. Remove the cup holder padding then the screw below (torque head screw).
Use a plastic trim tool and carefully pop the rear cupholder/trim panel loose. Work slowly so you do not break the plastic clips.
Once removed, the hinge mechanism will be visible.
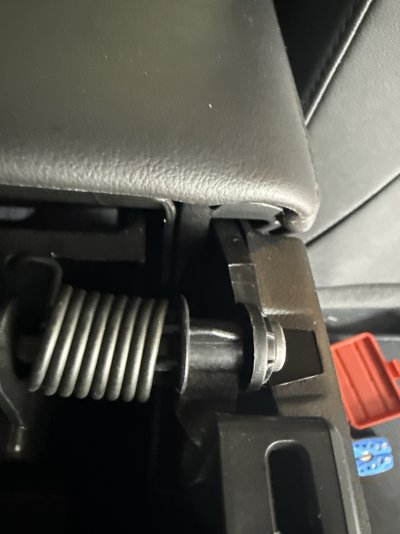
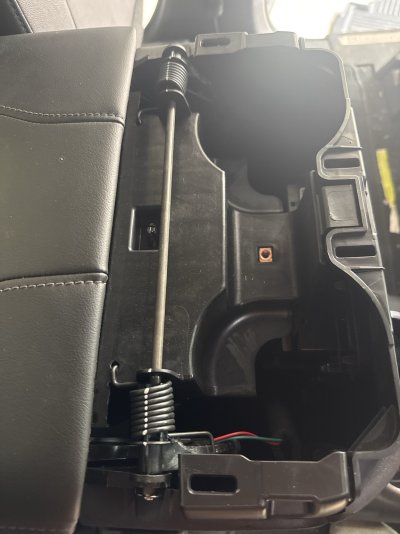
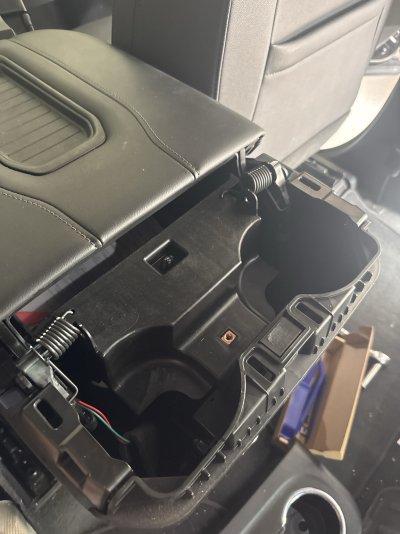
Step 2: Expose and inspect the hinge assembly
With the rear trim removed, you will see the actual hinge setup.
The armrest lid is held in place by:
- One long silver hinge rod/pin running across the width of the console
- Two torsion springs, one on each side
- Push-on retaining clips/washers at the ends of the hinge rod
- An electrical wire/plug routed down through the hinge area
The springs are under tension, so do not just pull the rod out quickly.
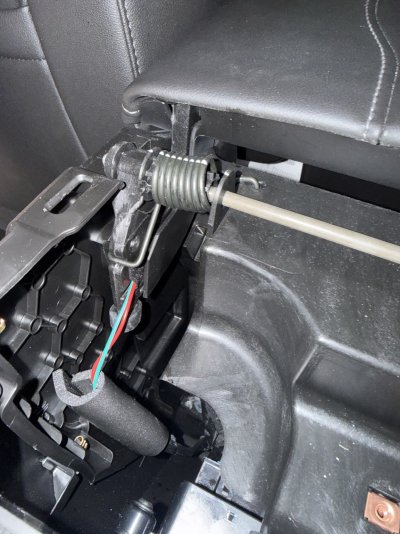
Step 3: Mark the spring orientation
Before removing anything, take clear photos of both springs from multiple angles.
I also used a paint marker to mark the springs and their position. This helped me know how the springs were clocked before removal.
Pay close attention to the spring “tails.” These are the long ends of the spring that hook into the plastic bracket and create the lid tension. The spring tails must go back into the same locations during reassembly.
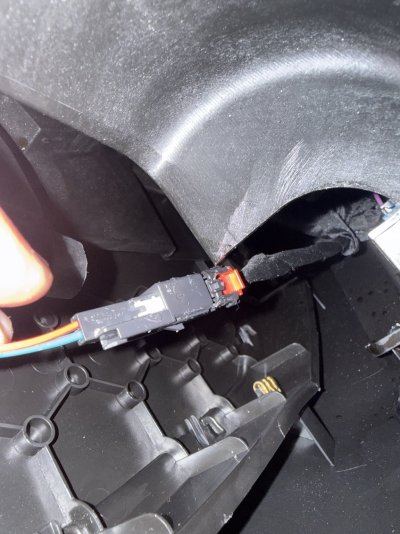
Step 4: Find and unplug the electrical connector
There is a red/green wire pair coming from the lid and going down through the hinge area into the console. This wire must be unplugged before the lid can be removed.
Follow the wire down into the console until you find the connector.
The connector may have a red safety lock on it. To unplug it:
- Push the connector halves together first to release pressure.
- Move or slide the red lock slightly.
- Press the release tab/latch.
- Pull the connector apart by holding the plastic connector body.
Do not pull on the wires.
Once unplugged, feed the connector/wire back up so it will come out with the old lid.
Step 5: Remove the retaining clip from the hinge rod
Look at the ends of the long silver hinge rod. There should be a small push-on retaining washer/clip on at least one side.
Use a small screwdriver, pick, or needle-nose pliers to carefully remove the retaining clip. It may bend during removal. These clips are meant to grip tightly.
Be careful not to lose it.
Step 6: Slide the hinge rod out slowly
Support the console lid while doing this. A second person helps.
Slide the hinge rod out slowly from one side. Do not yank it out.
As the rod begins to clear the first spring, hold the spring with your hand or needle-nose pliers so it does not unwind or fall out unexpectedly.
Remove one spring at a time and keep everything laid out in the same order it came off.
Recommended order:
- Retaining clip
- First spring
- Hinge rod through the lid hinge
- Second spring
- Opposite-side hinge area
Take photos during the removal process so you can reference them later.
Step 7: Remove the old armrest lid
Once the hinge rod has been slid out far enough and the springs are released, the old armrest lid can be lifted out.
Make sure the electrical wire is fully free and not caught on anything.
Step 8: Compare the old lid to the new lid
Before installing the new lid, compare the old and new assemblies.
Check:
- Hinge shape
- Stitching color
- Latch location
- Rubber tray/charging pad area
- Electrical plug
- Wire length and routing
- Overall fit and shape
If your new lid does not have the rubber insert/tray on top, transfer it from the old lid.
Step 9: Install the new lid
Set the new lid into place in the same position as the old one.
Start feeding the hinge rod back through the hinge pockets. Reinstall the springs in the same orientation as they came out.
This is the tricky part. The spring tails must hook back into the same plastic notches/brackets as before.
Go slowly:
- Start the hinge rod through one side.
- Install the first spring in the correct orientation.
- Continue sliding the rod through the lid hinge.
- Install the second spring.
- Push the rod fully into place.
- Reinstall the retaining clip/washer.
Step 10: Reconnect the electrical plug
Route the new lid’s wire the same way the original wire was routed.
Reconnect the plug and make sure the wire is not touching the hinge rod, springs, or any moving parts.
Open and close the lid slowly while watching the wire to make sure it does not pinch or pull tight.
Step 11: Test before reinstalling trim
Before snapping the rear cupholder/trim panel back on, test everything:
- Lid opens smoothly
- Lid closes and latches properly
- Springs assist the lid correctly
- Lid sits even
- No binding at the hinges
- Electrical wire is connected and safely routed
- Wireless charging/electronics work if applicable
Step 12: Reinstall rear cupholder / console trim
Once everything works correctly, reinstall the rear cupholder/trim panel by lining up the clips and pressing it back into place.
Make sure all clips are seated and the trim sits flush.
Notes and tips
- Take lots of photos before removing the hinge rod.
- Mark the springs before taking them apart.
- Do not pull on the electrical wires.
- The connector may have a red safety lock that must be released first.
- The springs are under tension, so control them as the hinge rod comes out.
- Do not try to split the leather lid apart. The complete lid assembly comes out through the hinge rod and spring setup.
- This job is much easier with a second person holding the lid while the hinge rod is removed and reinstalled.
The hardest parts are unplugging the electrical connector and reinstalling the torsion springs correctly. Once those are handled, the lid swap is straightforward.