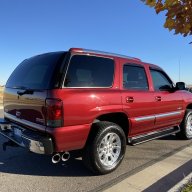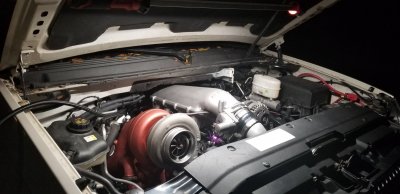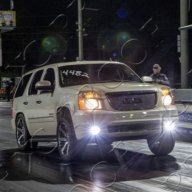
Randeez 2012 Budget Yukon Denali Build (stick on hood scoops galore)

Disclaimer: Links on this page pointing to Amazon, eBay and other sites may include affiliate code. If you click them and make a purchase, we may earn a small commission.

OP
OP
randeez

randeez

Full Access Member
Joined
Sep 29, 2017
Posts
8,188
Reaction score
25,927
Location
south florida
been plucking away at it... didn't take many pics most of this is just tedious put it on, measure it, mark it, take it off, fix, repeat.

i "heard" there was some clearance issues with the passenger side motor mount and ac compressor bracket. started fitting up motor mount, wasnt to bad just needed to chop the front bottom corner down a little bit, i dont even see how a stock motor mount would have fit but no big deal took about 2 seconds with a grinder to get what i needed.
the ac compressor bracket on the other hand :emotions122: needs to have almost 1/4" of the ribbing in a few places taken off the back to get it to sit on the mounting bosses. and it isnt flat so you need to trim/grind it in an arc, pain in the ass. finally got it to sit flat. not sure if its just a truck spacing issue or what but it kinda sucked.

made a fuel pressure regulator return pipe that runs down the tunnel of the intake with a slight turn down that i will connect to ptfe hose back to tank. I am going to join the stock fuel feed and secondary pump feed into a y-block under the truck. With it that way i can get rid of stock fuel line connected at the regulator, the y-block has a 1/8" npt (for fuel pressure gauge) that im going to throw the fuel pressure sensor into so it will accurately measure pressure when 2nd pump comes on - before it was in the stock line (with a check valve) so whatever pressure was on the stock feed is what it saw. it does seem like a lot of unnecessary work but i am still trying to retain remote start and not have to hear big pump and worry about it overheating during longer cruises.

stuff to plumb in steam vents should be here next day or two, also going to see how it comes out with 1/4" hard tube. most of the kits seemed to use so many extra fittings and i dont really like any of them, afraid its probably going to look cluttered up anyway but will see how it goes. also going to plumb to top of waterpump to keep front of engine neat.

PCV system, i had -10an bungs welded on each valve cover, those are going to an open air catch can and will be the "supply" air most of the time. I will be pulling vacuum from the intake to the valley cover through a catch can ( and check valve) sucking under vac, when its in boost whatever crank case pressure builds up can escape out the valve covers/free air can. if i have problems it'll prob just be left free air and i'll cap the valley

 

Rocket Man

Mark
Supporting Member
Joined
Dec 25, 2014
Posts
26,679
Reaction score
52,954
Location
Oregon
been plucking away at it... didn't take many pics most of this is just tedious put it on, measure it, mark it, take it off, fix, repeat.

i "heard" there was some clearance issues with the passenger side motor mount and ac compressor bracket. started fitting up motor mount, wasnt to bad just needed to chop the front bottom corner down a little bit, i dont even see how a stock motor mount would have fit but no big deal took about 2 seconds with a grinder to get what i needed.
the ac compressor bracket on the other hand :emotions122: needs to have almost 1/4" of the ribbing in a few places taken off the back to get it to sit on the mounting bosses. and it isnt flat so you need to trim/grind it in an arc, pain in the ass. finally got it to sit flat. not sure if its just a truck spacing issue or what but it kinda sucked.

made a fuel pressure regulator return pipe that runs down the tunnel of the intake with a slight turn down that i will connect to ptfe hose back to tank. I am going to join the stock fuel feed and secondary pump feed into a y-block under the truck. With it that way i can get rid of stock fuel line connected at the regulator, the y-block has a 1/8" npt (for fuel pressure gauge) that im going to throw the fuel pressure sensor into so it will accurately measure pressure when 2nd pump comes on - before it was in the stock line (with a check valve) so whatever pressure was on the stock feed is what it saw. it does seem like a lot of unnecessary work but i am still trying to retain remote start and not have to hear big pump and worry about it overheating during longer cruises.

stuff to plumb in steam vents should be here next day or two, also going to see how it comes out with 1/4" hard tube. most of the kits seemed to use so many extra fittings and i dont really like any of them, afraid its probably going to look cluttered up anyway but will see how it goes. also going to plumb to top of waterpump to keep front of engine neat.

PCV system, i had -10an bungs welded on each valve cover, those are going to an open air catch can and will be the "supply" air most of the time. I will be pulling vacuum from the intake to the valley cover through a catch can ( and check valve) sucking under vac, when its in boost whatever crank case pressure builds up can escape out the valve covers/free air can. if i have problems it'll prob just be left free air and i'll cap the valley
Sounds like fun. But that thing is too beautiful to put anywhere but in the middle of a man cave lmao. It’s a work of art, reminds me of the custom Harley Davidson bagger I built in my family room.
 
OP
OP
randeez

randeez

Full Access Member
Joined
Sep 29, 2017
Posts
8,188
Reaction score
25,927
Location
south florida
Sounds like fun. But that thing is too beautiful to put anywhere but in the middle of a man cave lmao. It’s a work of art, reminds me of the custom Harley Davidson bagger I built in my family room.

coming from the guy with 2 badass trucks to daily :lol:

it'll be safe and sound under the hood for many years (hopefully) theres still more crap i want to do but i need to get it moving for a while and be content with it.
reading to much crap online people got me thinking i have to small a turbo for a 427. atleast a 100mm exhaust turbine seems to be the common theme. so either this "little" turbo gonna spool up like a diesel and be out of breath by 5k rpm or i dont know but need to keep focus on just getting it running lol.

biggest turbo i can run that will directly swap is a borg warner s491/102, vs racing makes a 92/102 i think a few hundred cheaper, and those should flow plenty for a while. injectors will need to be replaced if i wanted to keep running e85 other wise it's onto expensive race fuel...after a couple tanks@$100+ i would have just paid for new injectors anyway. fuel not sure how much intercooler will flow, maybe go to air to water set up...would also like to change charge pipe to 4" to allow maf sensor to work a little further into boost, makes for quick tuning the low end.
 
OP
OP
randeez

randeez

Full Access Member
Joined
Sep 29, 2017
Posts
8,188
Reaction score
25,927
Location
south florida
20191103_195841.jpg
20191103_195823.jpg
20191103_195832.jpg
 
OP
OP
randeez

randeez

Full Access Member
Joined
Sep 29, 2017
Posts
8,188
Reaction score
25,927
Location
south florida
it gets dark early now apparently :(

got a little more done, put engine in. wasnt going to but fittings to finish up steam vents arent going to be here for a few days and figured i would just finish it up hunched over. couple of things i need to finish up under the truck; throw on crossover - not even sure if its going to fit as heads sit slightly higher than before. need to work all of the fuel lines differently than they were before. put some fluid in the transfer case, down pipe....

up top, intake cant go on till steam vents done, waterpump same thing going to connect steam vents to it, accessories will just be in the way of everything else but only take a few hours to throw on along with the wiring.

hopefully during the week after work i can get everything buttoned up and together and start tuning, will prob set up dyno tune with the same place that i had before.
 
OP
OP
randeez

randeez

Full Access Member
Joined
Sep 29, 2017
Posts
8,188
Reaction score
25,927
Location
south florida
so i wanted to get these two steam vents into the water pump, drilled and taps 1/8" npt blahblah. but doesnt look too good to me. so i can either cross them at 45* into a 90 on top of water pump, but they are offset of each other so they wont be even.
i can run driver side over to passenger side and go into the back of the hose snout. or i can just join them together and change it over to flex line and run it to the radiator lol

if these make any sense:
1.jpg
2.jpg
3.jpg
 

HiHoeSilver

Away!
Joined
Feb 28, 2017
Posts
10,918
Reaction score
14,578
Location
Chicago
so i wanted to get these two steam vents into the water pump, drilled and taps 1/8" npt blahblah. but doesnt look too good to me. so i can either cross them at 45* into a 90 on top of water pump, but they are offset of each other so they wont be even.
i can run driver side over to passenger side and go into the back of the hose snout. or i can just join them together and change it over to flex line and run it to the radiator lol

if these make any sense:
View attachment 233764 View attachment 233765 View attachment 233766

Tough call. I've been going round and round at your pics for 20 minutes.

I think I like #2, although I'm trying to picture a cool routing for a braided hose to the radiator...
 
OP
OP
randeez

randeez

Full Access Member
Joined
Sep 29, 2017
Posts
8,188
Reaction score
25,927
Location
south florida
Tough call. I've been going round and round at your pics for 20 minutes.

I think I like #2, although I'm trying to picture a cool routing for a braided hose to the radiator...

They (Earl's) also makes a port adapter that goes up, not sure if that opens any other ideas. In my head steam wants to rise so I'd rather not go up and have to come back down, that just leaves a location for it to get trapped. But that's how the stock is ran so prob not an issue

20191105_080057.jpg


The flex hose to radiator is kind of the f-it I just want to put it together and not get hung up on this
 
Last edited:
OP
OP
randeez

randeez

Full Access Member
Joined
Sep 29, 2017
Posts
8,188
Reaction score
25,927
Location
south florida
Should be able to turn it over today, but wont be running.
Got rest of turbo on, all accessories, belt, wiring, turbo oil feed/drain, downpipe connected to exhaust, engine cross member, sway bar.

I need to rewire the flex fuel sensor and the fuel pressure sensor (now on y fitting). Put in the fans and charge pipes (easy)
 

Sam Harris

Elite Member
Supporting Member
Joined
Sep 26, 2018
Posts
7,445
Reaction score
14,977
Location
Texas
Should be able to turn it over today, but wont be running.
Got rest of turbo on, all accessories, belt, wiring, turbo oil feed/drain, downpipe connected to exhaust, engine cross member, sway bar.

I need to rewire the flex fuel sensor and the fuel pressure sensor (now on y fitting). Put in the fans and charge pipes (easy)
Looking forward to it!! :party:
 
OP
OP
randeez

randeez

Full Access Member
Joined
Sep 29, 2017
Posts
8,188
Reaction score
25,927
Location
south florida
i was being lazy and hoping someone made some extension harnesses for flex fuel and fuel pressure sensor, but apparently those arent hot ticket items :(
i need to grab some small wire to make both of those work.

passenger side ignition coils i need to relocate, they wont go back on the valve cover with crankcase vent and crap.

steam vent i have tied together behind the waterpump will prob just change over to a hose barb and run to radiator to not worry about it for now.


done:

i put on one catch can to both valve covers (-10an on both) that is open air, it will act as "supply" for the other catch can that will be a closed can between valley cover and intake with a check valve (-8an the whole way). the closed can has some weird thread, 3/8 npt will thread into it a few threads then jam up. 14mm will thread into it fully but not sure i can find 14mm x 8an fittings. so i will probably run the 3/8npt tap into them a little further and use it - only for pcv not to concerned with perfect seal

charge pipes are done.

driverside ignition coils are on.

vac lines to BOV/wastegate/fuel tank vent

all the other sensors are in

i tried to keep it all neat but theres just so much crap to put on
 
OP
OP
randeez

randeez

Full Access Member
Joined
Sep 29, 2017
Posts
8,188
Reaction score
25,927
Location
south florida
I need some real catch cans... these are a couple of cheapy ones off Amazon. I actually knocked the screen/filter out of the fresh air can it took a good amount of effort to blow thru. Just dont really feel like spending 400+ for a pair of mighty mouse or motion raceworks

20191110_195543.jpg
20191110_195552.jpg
20191110_195601.jpg
 

iamdub

Full Access Member
Joined
Apr 23, 2016
Posts
20,821
Reaction score
45,014
Location
Li'l Weezyana
I put one of those on my brother's truck after adding a stainless scrubber pad to it. I took it to Home Depot and found barbed fittings with the oddball port thread size. I don't recall what that size was, though.
 

Forum statistics

Threads
138,108
Posts
1,999,247
Members
103,033
Latest member
JasonW4141
Back
Top