Seat Trim Panel Reinstall Nightmare

Disclaimer: Links on this page pointing to Amazon, eBay and other sites may include affiliate code. If you click them and make a purchase, we may earn a small commission.

S33k3r

Elite Member
Supporting Member
Joined
Aug 14, 2017
Posts
2,893
Reaction score
4,189
Location
Dallas, Texas
1783530936956.png


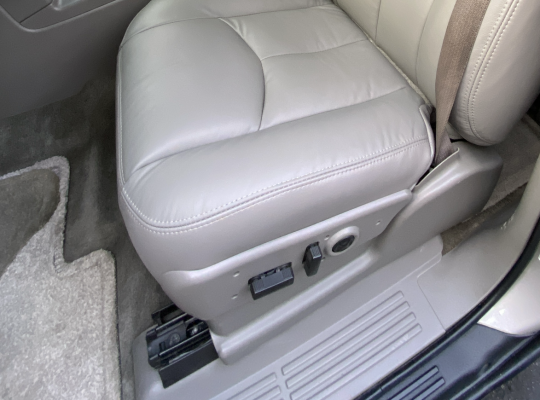
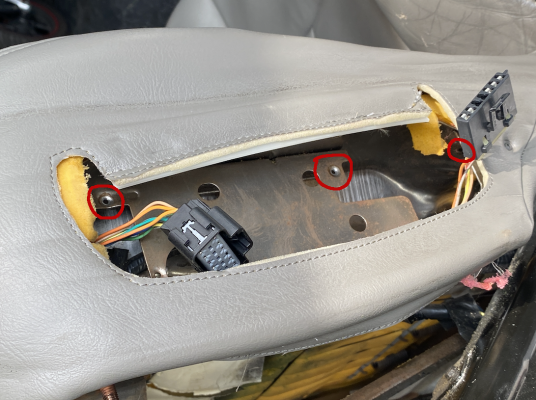
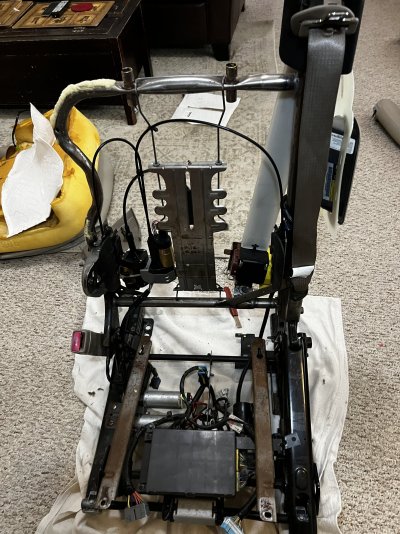
There are 5 screws that hold that plastic trim panel in place. They only stick out less than 1/2 an inch beyond the plastic of the trim panel. To get them installed, They have to be lined up with the holes in the seat fram, and the leather and the padding have to be compressed to get the plastic/screw close enough to the frame to screw in. I have spent 3-5 days failing at this task. Does anyone have advice?

I can't get screws to center things in place. I tried centering things with cut coat-hanger, but they won't stay in place, even with silicon sealer. And they pulled out of the silicon sealer before I could get things to line up (the coat-hanger wire is too thin to properly hold things lined up).

Keep in mind that when you sufficiently compress the leather and the cushioning that you can no longer see the back of the plastic, the bottom of the screw, or the frame holes...

I **REALLY** don't want to pull the seat out. And, at this point, I'm not even sure that would really help.

Can someone please offer suggestions -- either on how they've done it themselves, or how they someone else did it?

[EDIT: This is on a 2004 Escalade Platinum, and the driver's seat if not obvious. Thanks again.]

Thanks!

 
OP
OP
S33k3r

S33k3r

Elite Member
Supporting Member
Joined
Aug 14, 2017
Posts
2,893
Reaction score
4,189
Location
Dallas, Texas
Longer screws?
Get someone to assist and compress while you screw?
Get a strap and ratchet around the seat cushion to compress it?


Just quick thoughts.
Thanks. The compression isn't the issue. It is making sure the holes of the panel and the seat frame are aligned when I can't see the holes of the seat frame.
 

mikez71

Full Access Member
Joined
Mar 9, 2023
Posts
3,337
Reaction score
4,139
Keeping tension on the screw with the screwdriver, while fishing for the hole doesn't work?
(Dragging the tip of the screw around the frame until it falls into a hole?)

Maybe the foam is throwing off your alignment more than you think..
If you push hard enough to see where your screw tip scratches the frame and adjust your position?
 
OP
OP
S33k3r

S33k3r

Elite Member
Supporting Member
Joined
Aug 14, 2017
Posts
2,893
Reaction score
4,189
Location
Dallas, Texas
Keeping tension on the screw with the screwdriver, while fishing for the hole doesn't work?
(Dragging the tip of the screw around the frame until it falls into a hole?)

Maybe the foam is throwing off your alignment more than you think..
If you push hard enough to see where your screw tip scratches the frame and adjust your position?
Yup, tried that -- But thank you just the same. Finally figured out a semi-solution:

I can't remember exactly what it is -- it's out in the car at the moment, but will edit this when I bring it in [EDIT: 6-32 and 1 foot long]. Anyway, I have two rods that will partially thread and hold in the holes. Now my problem is that the lumbar support button case keeps getting stuck on the outside of the seat frame, no matter how many times I start with it pushed in.

On the flip side, I got to buy my first ratcheting wrench today. :cool:

I'll try again tomorrow. I'm likely going to look at one of my other seats to see how they are sitting in there. Wish me luck, please.
20260709_160349.jpg
 
Last edited:

mikez71

Full Access Member
Joined
Mar 9, 2023
Posts
3,337
Reaction score
4,139
Good luck!

And I can't wait to hear how you do it, otherwise I'm scared to try and replace my seat covers!
 

NoReverseYukon

Full Access Member
Joined
Feb 27, 2019
Posts
749
Reaction score
1,859
Location
NE Wisconsin
When I found and replaced the fabric seat cushion for my brother in his 2006 Sierra, I ran into the exact same problem. Pissed me off to no end how something so simple could be so difficult. If I remember correctly, I used 2 long thin philips screwdrivers to align 2 of the holes while I got the 3rd to thread in. I then removed 1 at a time to get the others threaded. Luckily for me the Sierra only had 3 screws - not the 5 you are dealing with.
 

Roilux

Senior Member
Firefighter Supporting Member
Joined
May 15, 2022
Posts
183
Reaction score
478
Location
Burbank, CA
When I found and replaced the fabric seat cushion for my brother in his 2006 Sierra, I ran into the exact same problem. Pissed me off to no end how something so simple could be so difficult. If I remember correctly, I used 2 long thin philips screwdrivers to align 2 of the holes while I got the 3rd to thread in. I then removed 1 at a time to get the others threaded. Luckily for me the Sierra only had 3 screws - not the 5 you are dealing with.
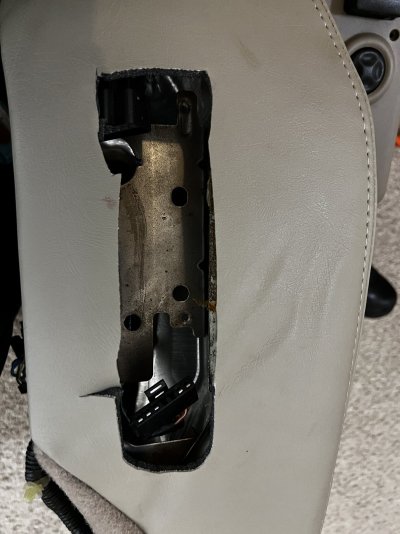
Ditto. I replaced the seat springs, seat foam and seat cover with a 5 screw setup securing the panel like the OP. Thin phillips were inserted in the front and rear holes to line up the two center holes. Once those were secured the rest lined up easily without a fuss. I didn't tighten any screw completely until all had a good start.


*edit* I looked for a photo where the screws attach and noted mine are slightly indented. If your panel (OP) is the same, a light touch should guide them home once the outer holes are aligned.
 

Attachments

  • trim.png
    trim.png
    1.4 MB · Views: 6
  • holes.png
    holes.png
    1.2 MB · Views: 4
Last edited:
OP
OP
S33k3r

S33k3r

Elite Member
Supporting Member
Joined
Aug 14, 2017
Posts
2,893
Reaction score
4,189
Location
Dallas, Texas
Ditto. I replaced the seat springs, seat foam and seat cover with a 5 screw setup securing the panel like the OP. Thin phillips were inserted in the front and rear holes to line up the two center holes. Once those were secured the rest lined up easily without a fuss. I didn't tighten any screw completely until all had a good start.


*edit* I looked for a photo where the screws attach and noted mine are slightly indented. If your panel (OP) is the same, a light touch should guide them home once the outer holes are aligned.
I wish my mess were as trimmed as nicely as yours! That's likely a large part of my problem.
 

dps01

Senior Member
Navy Supporting Member
Joined
Nov 25, 2017
Posts
227
Reaction score
585
Location
N. TEXAS
I wish my mess were as trimmed as nicely as yours! That's likely a large part of my problem.
When I did the drivers side it was a PIA.
IIRC, I used two long screws on the most rearward hole & a front hole and just ended up searching for the other holes using an ice pick.

Considering doing the passenger side now… The Seat Shop is running a sale …
IMG_2375.jpegIMG_2376.jpeg

I actually found reattaching the sun visors to be an even larger PIA… searching for holes, defying gravity & being a contortionist….
 
OP
OP
S33k3r

S33k3r

Elite Member
Supporting Member
Joined
Aug 14, 2017
Posts
2,893
Reaction score
4,189
Location
Dallas, Texas
When I did the drivers side it was a PIA.
IIRC, I used two long screws on the most rearward hole & a front hole and just ended up searching for the other holes using an ice pick.

Considering doing the passenger side now… The Seat Shop is running a sale …
View attachment 489004View attachment 489005

I actually found reattaching the sun visors to be an even larger PIA… searching for holes, defying gravity & being a contortionist….
Can you come do mine, please? :cool:
 

Joseph Garcia

Elite Member
Supporting Member
Joined
Aug 2, 2018
Posts
10,521
Reaction score
15,268
I've had the driver seat bottom leather cover and foam cushion bottom (from the Seat Shop) in my garage for over a year, dreading that replacement task. Now that it's been done here, with photos, I am dreading it even more. But, you've also given me a kick in the butt to get the job done. Thank you.
 
Last edited:

dps01

Senior Member
Navy Supporting Member
Joined
Nov 25, 2017
Posts
227
Reaction score
585
Location
N. TEXAS
I've had the driver seat bottom leather cover and foam cushion bottom (from the Seat Shop) in my garage for over a year, dreading that replacement task. Now that it's been done here, with photos, I am dreading it even more. But, you've also given my a kick in the butt to get the job done. Thank you.
I cannot tell you how long mine was in a box in a corner… it was W-A-Y long…

Still think pulling the new seat bottom over the new foam took more effort. That said, finding the holes is tedious at best.
 

Roilux

Senior Member
Firefighter Supporting Member
Joined
May 15, 2022
Posts
183
Reaction score
478
Location
Burbank, CA
Still think pulling the new seat bottom over the new foam took more effort. That said, finding the holes is tedious at best.
Getting the seat bottom to 'clip in' was a PITA. The seat back however was a monstrous PITA. I'd not set seat adjustments to their minimum positions. That oversight was only made once. :cool:
 

dps01

Senior Member
Navy Supporting Member
Joined
Nov 25, 2017
Posts
227
Reaction score
585
Location
N. TEXAS
I've had the driver seat bottom leather cover and foam cushion bottom (from the Seat Shop) in my garage for over a year, dreading that replacement task. Now that it's been done here, with photos, I am dreading it even more. But, you've also given my a kick in the butt to get the job done. Thank you.
Torn all the way down….
IMG_2386.jpeg
 
Last edited:

dps01

Senior Member
Navy Supporting Member
Joined
Nov 25, 2017
Posts
227
Reaction score
585
Location
N. TEXAS
Getting the seat bottom to 'clip in' was a PITA. The seat back however was a monstrous PITA. I'd not set seat adjustments to their minimum positions. That oversight was only made once. :cool:
Anyone who has done seat leather replacement has the scars on their hands to prove it…
 

Forum statistics

Threads
138,040
Posts
1,997,654
Members
102,976
Latest member
Capybarbro
Back
Top