Overland Disco
TYF Newbie
- Joined
- Aug 9, 2022
- Posts
- 15
- Reaction score
- 38
Hello all - I recently had the joyous (!) experience of the seemingly common transmission shift cable bushing failure, at the end of a 1400-mile trip.
It reared its head when I tried to shift into park in the hotel parking lot of our next-to-last night out, in Holbrook AZ. Nothing, nada, zip, zilch. So I put the emergency brake on, turned it off, pulled the key, and checked into our hotel for the night.
Next, I fired up the laptop, logged into AllDataDIY, and saw what looked to be a simple - not necessarily easy - fix.
Back down to the Yukon - I wriggled my arm far enough under to engage park and looped the cable end on the shift arm, had my wife start it, and pulled up onto the curbing so I could crawl underneath - after engaging the E brake and in Park.
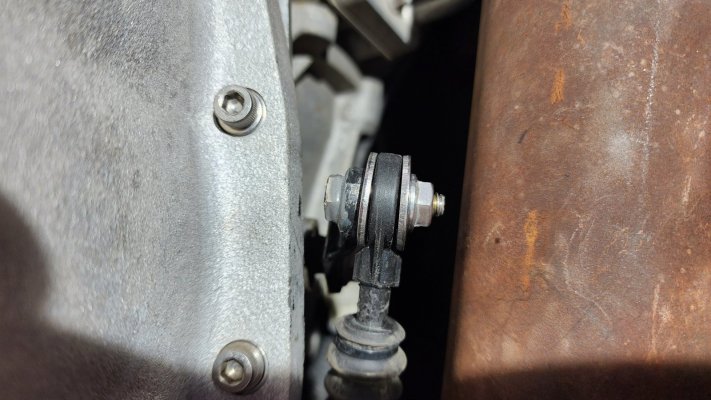
The bushing was brittle and broken in half, so I used electrical tape and 2 zip-ties in a figure 8 to secure the shift cable to the trans shift arm.
Went to dinner - wasn't even late!
Searched "6L80 trans shift bushing" on TahoeYukon forum and saw about 800,000 hits, more or less. Copied the Dorman part #, picked it up in Flagstaff the next day as insurance that I wouldn't need it until getting home.
Installed the Dorman bushing, which was noticeably softer than the old one and gently tried to disconnect the shift cable. It came right off with almost no effort - re-installed a zip-tie in a figure 8 and went back to the forums.
Found the Fitzall post, ordered their bushing. Installed it and noticed that it snapped into place on the shift lever groove, but it had a bit too much sideways movement for my liking. I then realized that one of the prongs on the clip had snapped off on installation, so back to researching.
I happen to have a spare shift cable from the LS swap I'm doing on my Land Rover, so I took the shift cable portion to my local hardware store to cook something up.
The first part to figure out was the bushing in the shift cable - I wanted a nylon or other solid plastic that would hold up, but still be a "fusible link" to protect the transmission if something went wrong with the shifter.

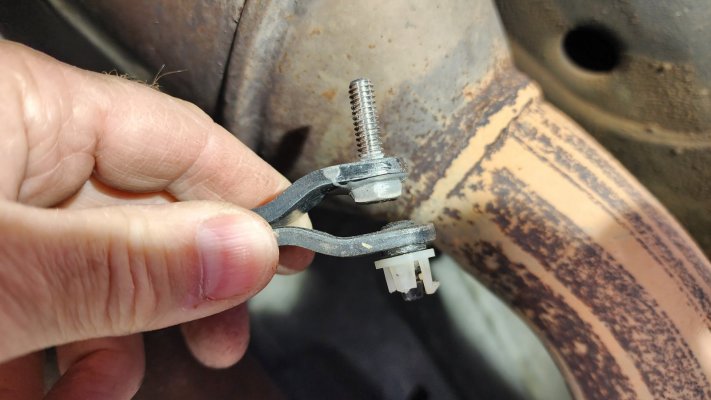
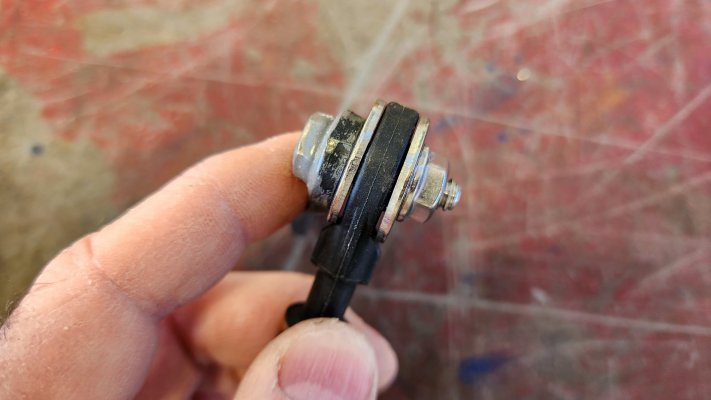
Here's what I came up with - 1/4" Nylon Flanged Bushing - x2.
Another view with just one in the shift cable eye.
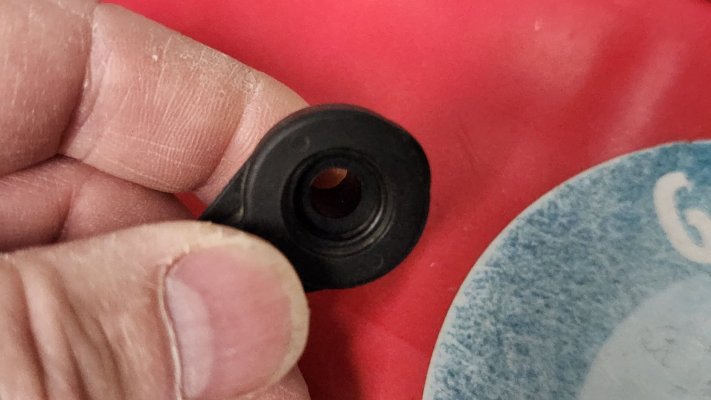
Surprisingly, it fit like the proverbial glove.
Next, I wanted to eliminate the chance of being stranded if/when the bushing broke down the road, so I captured the bushings with M8 fender washers.
This is what it looked like at the hardware store -
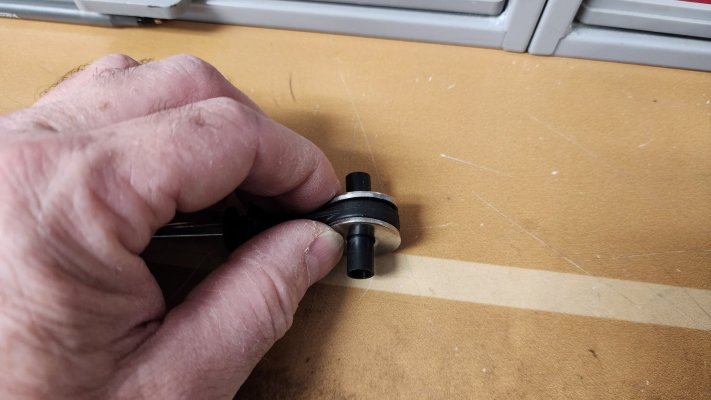
The "ears" sticking out of the washer will be trimmed flush.
Next was finding a suitable bolt that fit snugly inside the flanged bushings - 1/4 x 20 bolt worked just fine.
So, back at the workshop I removed the spare shift lever from the LS swap transmission - the swap is still in progress, so it wasn't being used - and removed the shift lever nub and drilled to fit the 1/4x20 bolt.

I didn't have access to a welder, so I used Original JB Weld on the bolt head and threads going through the shift lever.
Once cured and test fitted, it looked good.
Continued on next post...
It reared its head when I tried to shift into park in the hotel parking lot of our next-to-last night out, in Holbrook AZ. Nothing, nada, zip, zilch. So I put the emergency brake on, turned it off, pulled the key, and checked into our hotel for the night.
Next, I fired up the laptop, logged into AllDataDIY, and saw what looked to be a simple - not necessarily easy - fix.
Back down to the Yukon - I wriggled my arm far enough under to engage park and looped the cable end on the shift arm, had my wife start it, and pulled up onto the curbing so I could crawl underneath - after engaging the E brake and in Park.
The bushing was brittle and broken in half, so I used electrical tape and 2 zip-ties in a figure 8 to secure the shift cable to the trans shift arm.
Went to dinner - wasn't even late!
Searched "6L80 trans shift bushing" on TahoeYukon forum and saw about 800,000 hits, more or less. Copied the Dorman part #, picked it up in Flagstaff the next day as insurance that I wouldn't need it until getting home.
Installed the Dorman bushing, which was noticeably softer than the old one and gently tried to disconnect the shift cable. It came right off with almost no effort - re-installed a zip-tie in a figure 8 and went back to the forums.
Found the Fitzall post, ordered their bushing. Installed it and noticed that it snapped into place on the shift lever groove, but it had a bit too much sideways movement for my liking. I then realized that one of the prongs on the clip had snapped off on installation, so back to researching.
I happen to have a spare shift cable from the LS swap I'm doing on my Land Rover, so I took the shift cable portion to my local hardware store to cook something up.
The first part to figure out was the bushing in the shift cable - I wanted a nylon or other solid plastic that would hold up, but still be a "fusible link" to protect the transmission if something went wrong with the shifter.

Here's what I came up with - 1/4" Nylon Flanged Bushing - x2.
Another view with just one in the shift cable eye.

Surprisingly, it fit like the proverbial glove.
Next, I wanted to eliminate the chance of being stranded if/when the bushing broke down the road, so I captured the bushings with M8 fender washers.
This is what it looked like at the hardware store -

The "ears" sticking out of the washer will be trimmed flush.
Next was finding a suitable bolt that fit snugly inside the flanged bushings - 1/4 x 20 bolt worked just fine.
So, back at the workshop I removed the spare shift lever from the LS swap transmission - the swap is still in progress, so it wasn't being used - and removed the shift lever nub and drilled to fit the 1/4x20 bolt.

I didn't have access to a welder, so I used Original JB Weld on the bolt head and threads going through the shift lever.
Once cured and test fitted, it looked good.

Continued on next post...
Last edited:

