We bought this truck in 2019 and in the two 25-30 min test drives we took in 80-85 degree weather the A/C worked just fine. Gave no indications of an issue
A month later we took it on our first road trip where we drove it longer than about 25-30 minutes continuously. Leaving around 4 am the temp was about 55 degrees so we didn’t need the air initially. As the day warmed and we turned on the AC we realized that after about 45 minutes the front AC would stop blowing air (Hot/Cold didn’t matter, no air coming from any vents).
The rear AC still worked so I knew the compressor worked and there was sufficient 134a charge. Every time we stopped for restroom/stretch our legs we’d get back in and the front A/C worked just fine again.
We were able to ‘survive’ the 9 hour trip through Alabama/Florida by cooling the car down as cold as we could for 30-40 minutes and then blast the rear AC that kept the front seats tolerable until about the 2 hour mark where we’d stop for a break, then repeat the process.
I couldn’t figure out what was going on. Mechanically everything works and we could hear the blower motor working just no air coming out. I thought it may be a bad plenum motor that was shutting off the air flow or something.
On the way home at one of the rest stops I popped the hood and our accumulator and low pressure hose was a block of ice. Not frost, ICE. A solid block of it. I knew if the Accumulator was that frozen the evaporator was probably too.
The next time the A/C stopped blowing at 30 min I turned it off completely while still driving for about 3-4 min and turned the fan on high. Sucking in 95 degree outside south Alabama air melted the ice pretty quickly and we got spritzed with some water droplets.
BINGO – Frozen Evaporator. (Our rest breaks in the summer heat driving down had been giving it a chance to melt off).
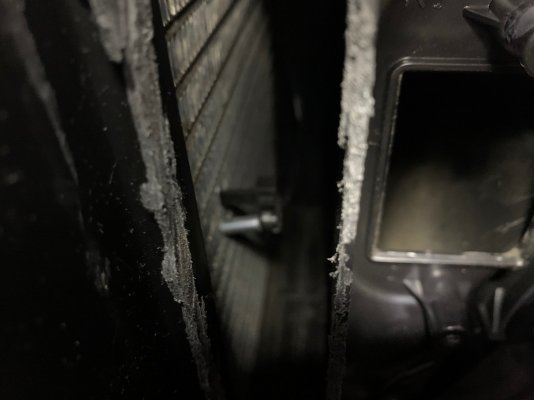
I cleaned the evap with evap cleaner when we got home, it helped a little but not enough. A dirty evap can cause freeze ups. These models did not all have an air filter factory installed so the evap can get very dirty.
For the rest of the trip (and next few months) cycling the AC off manually when we started getting restricted air flow from the front vents was the key. Made it tolerable. I noticed that the cooler the air the faster it would freeze up.
I got a Foxwell Code reader and loaded with GM codes and it showed me that the HVAC module “thought’ the evaporator was 189 degrees. So it was running the compressor continuously because the sensor was sending the temp as 189.
That means it’s the dreaded Evaporator Temperature sensor.
To ‘correctly’ replace the sensor you have to remove the dash, the dash support, draw down the AC system, drain the coolant, remove the airbox with evaporator and heater core, disassemble on work bench, replace sensor, and re-install. A major PITA. BIG $$$ for a shop to replace a $12 sensor.
The post on the SierraSilverado.com page by Charles1911 was my inspiration. He cut a hole on the downstream side of the evaporator and used that to gain access to the sensor then epoxied it back closed. That is the only way to do this and still maintain an air filter for the system, which his had, mine did not.
I decided to put my sensor on the upstream side as there was more working room for me and an easier access point. That way I could also replace it more easily in the future when the POS goes out again. If it didn’t work, I was going to do Charles1911’s method.
If your truck has an air filter installed, like Charles1911, this method will not allow an air filter to be inserted. Most GM trucks of this generation did not have an air filter, however, it does have the slot where an air filter could go (also why the EVAP was so dirty to begin with).
I bought an AC Delco sensor and a Dorman aftermarket air filter door.
Remove the passenger airbag.
- Disconnect Battery (No airbags in your face . . . that’s a bad day)
- Remove kick trim covering bottom of HVAC box in passenger foot well
- Remove passenger airbag – I’d find factory recommendation instructions for your model for this.
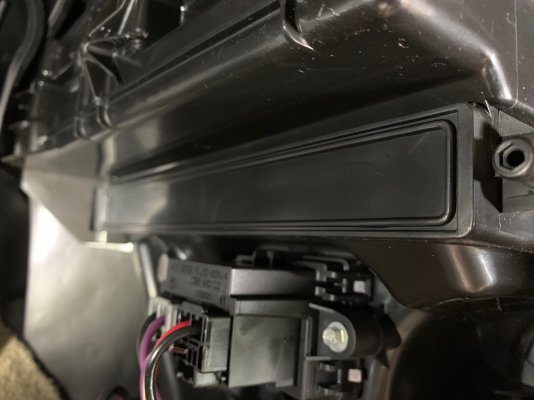
- Use Dremel to cut out blank on bottom of HVAC box where air filter should go/sand smooth.
- Remove Blower motor resistor next to air filter opening (2 screws) it easily comes out
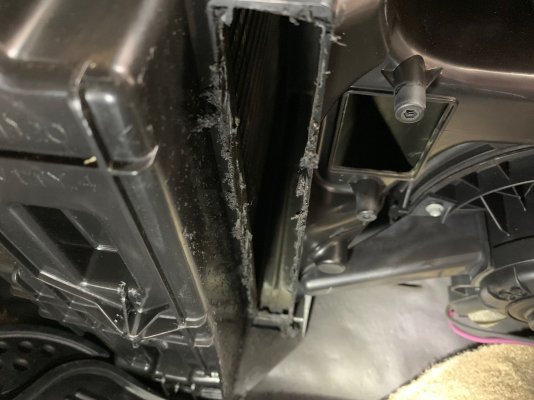
- Drill hole on top of air filter slot. NOT!!!! On top of the evaporator. That will be a VERY BAD DAY.
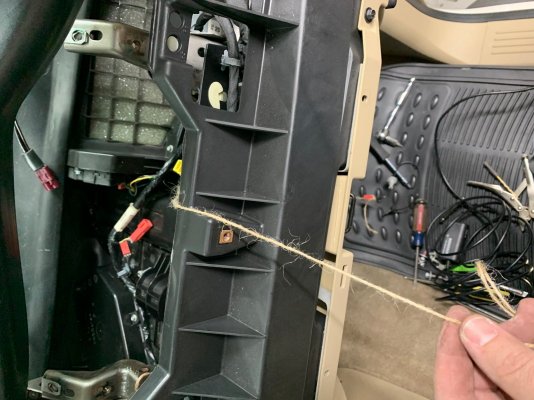
- Drop string through hole.
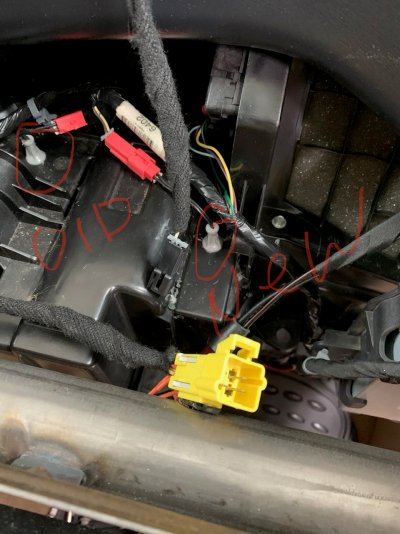
- Pull sensor harness up through hole and set rubber grommet in hole. Can only come from inside the HVAC box.
- Gently push sensor end into fin of evap. taking caution to not puncture the thin aluminum. Use the Blower motor resistor hole to get proper angle.
- I realized at this point I may have been able to get away with installing it solely through the blower resistor hole. Cutting out the air filter slot definitely made it much easier to pull the sensor up into position. However, it may not be required.
- Disconnect old sensor, connect new.
- Install air filter hatch, no air filter
- Reassemble.
AC hasn’t frozen over since
We bought this truck in 2019 and in the two 25-30 min test drives we took in 80-85 degree weather the A/C worked just fine. Gave no indications of an issue
A month later we took it on our first road trip where we drove it longer than about 25-30 minutes continuously. Leaving around 4 am the temp was about 55 degrees so we didn’t need the air initially. As the day warmed and we turned on the AC we realized that after about 45 minutes the front AC would stop blowing air (Hot/Cold didn’t matter, no air coming from any vents).
The rear AC still worked so I knew the compressor worked and there was sufficient 134a charge. Every time we stopped for restroom/stretch our legs we’d get back in and the front A/C worked just fine again.
We were able to ‘survive’ the 9 hour trip through Alabama/Florida by cooling the car down as cold as we could for 30-40 minutes and then blast the rear AC that kept the front seats tolerable until about the 2 hour mark where we’d stop for a break, then repeat the process.
I couldn’t figure out what was going on. Mechanically everything works and we could hear the blower motor working just no air coming out. I thought it may be a bad plenum motor that was shutting off the air flow or something.
On the way home at one of the rest stops I popped the hood and our accumulator and low pressure hose was a block of ice. Not frost, ICE. A solid block of it. I knew if the Accumulator was that frozen the evaporator was probably too.
The next time the A/C stopped blowing at 30 min I turned it off completely while still driving for about 3-4 min and turned the fan on high. Sucking in 95 degree outside south Alabama air melted the ice pretty quickly and we got spritzed with some water droplets.
BINGO – Frozen Evaporator. (Our rest breaks in the summer heat driving down had been giving it a chance to melt off).
I cleaned the evap with evap cleaner when we got home, it helped a little but not enough. A dirty evap can cause freeze ups. These models did not all have an air filter factory installed so the evap can get very dirty.
For the rest of the trip (and next few months) cycling the AC off manually when we started getting restricted air flow from the front vents was the key. Made it tolerable. I noticed that the cooler the air the faster it would freeze up.
I got a Foxwell Code reader and loaded with GM codes and it showed me that the HVAC module “thought’ the evaporator was 189 degrees. So it was running the compressor continuously because the sensor was sending the temp as 189.
That means it’s the dreaded Evaporator Temperature sensor.
To ‘correctly’ replace the sensor you have to remove the dash, the dash support, draw down the AC system, drain the coolant, remove the airbox with evaporator and heater core, disassemble on work bench, replace sensor, and re-install. A major PITA. BIG $$$ for a shop to replace a $12 sensor.
The post on the SierraSilverado.com page by Charles1911 was my inspiration. He cut a hole on the downstream side of the evaporator and used that to gain access to the sensor then epoxied it back closed. That is the only way to do this and still maintain an air filter for the system, which his had, mine did not.
I decided to put my sensor on the upstream side as there was more working room for me and an easier access point. That way I could also replace it more easily in the future when the POS goes out again. If it didn’t work, I was going to do Charles1911’s method.
If your truck has an air filter installed, like Charles1911, this method will not allow an air filter to be inserted. Most GM trucks of this generation did not have an air filter, however, it does have the slot where an air filter could go (also why the EVAP was so dirty to begin with).
I bought an AC Delco sensor and a Dorman aftermarket air filter door.
Remove the passenger airbag.
- Disconnect Battery (No airbags in your face . . . that’s a bad day)
- Remove kick trim covering bottom of HVAC box in passenger foot well
- Remove passenger airbag – I’d find factory recommendation instructions for your model for this.
- Use Dremel to cut out blank on bottom of HVAC box where air filter should go/sand smooth.
- Remove Blower motor resistor next to air filter opening (2 screws) it easily comes out
- Drill hole on top of air filter slot. NOT!!!! On top of the evaporator. That will be a VERY BAD DAY.
- Drop string through hole.
- Pull sensor harness up through hole and set rubber grommet in hole. Can only come from inside the HVAC box.
- Gently push sensor end into fin of evap. taking caution to not puncture the thin aluminum. Use the Blower motor resistor hole to get proper angle.
- I realized at this point I may have been able to get away with installing it solely through the blower resistor hole. Cutting out the air filter slot definitely made it much easier to pull the sensor up into position. However, it may not be required.
- Disconnect old sensor, connect new.
- Install air filter hatch, no air filter
- Reassemble.
AC hasn’t frozen over since.
in your pictures where it shows the old sensor, I have nothing there no spot for one or electrical connector. It's A 2009 tahoe ltz with the auto climate control