How to change your brakes on your 2007 Tahoe

Disclaimer: Links on this page pointing to Amazon, eBay and other sites may include affiliate code. If you click them and make a purchase, we may earn a small commission.

llllljrlllll

Full Access Member
Joined
Mar 15, 2010
Posts
243
Reaction score
2
Location
los angeles
So here it is, Getting ready to go to Las Vegas, and I remembered to change my brakes at 10pm, yes at night, i'm leaving the next day, got the day off, but I got 3 little boys, 6, 3, and a 8 month old, no time in the day. So I did it and took pictures.


Step 1:

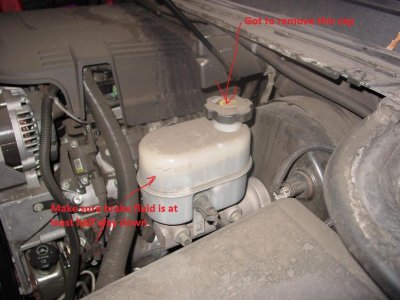
Open the hood, since your facing the hood, on your right all the way back, you'll see the master cylinder

1.jpg
[/IMG]

Now there are 2 things you got to do. First remove the cap, so it can breathe,
2.jpg
[/IMG]
and 2 make sure that the brake fluid is at least half way down (in the middle between Min and max) Why you ask, well when you put the new pads, the brake fluid is going to go up, and the last thing you want is this puppy overflowing.

Remember this, they don't recommend to remove the cap, due to the fact that brake fluid is prone to moisture in the air just by leaving it uncapped. Now this is the way I have always done it, but if you feel better waiting till you push the pistons in, then wait till then, and have somebody remove the cap when you are ready to push in the pistons, and put the cap back on, when your done pushing in the pistons, repeat on the other side.

Step 2:

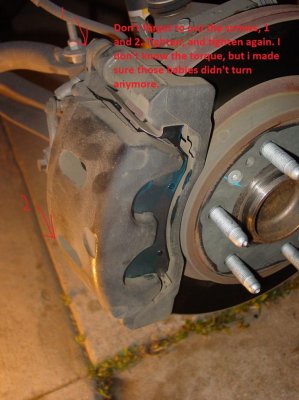
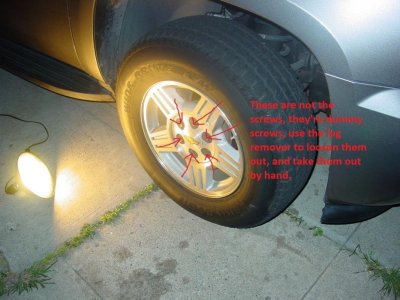
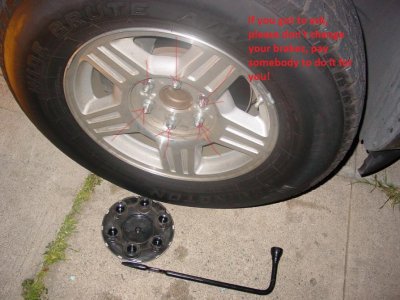
Lets get the tire off, look at the 1rst picture for notes
3.jpg
[/IMG]

Now if you don't know how to change a tire, you got some major issues J/k, just loosen the nuts please, (Do Not take them off)
4.jpg
[/IMG]

Step 3:

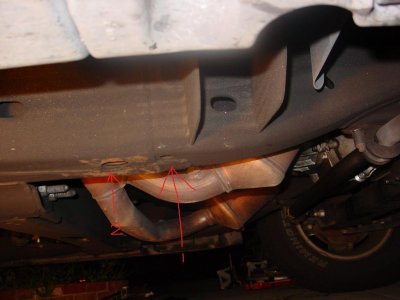
Lift points, (1) is where the your tahoes jack goes, (2) is where you would put a jack stand, but i did it the reverse way, you'll see in the picture. Make sure your jackstand is rated for 2 tons, which is 4000 pounds
5.jpg
[/IMG]
 

Attachments

  • 1.jpg
    1.jpg
    91.5 KB · Views: 276
  • 2.jpg
    2.jpg
    91.8 KB · Views: 264
  • 3.jpg
    3.jpg
    95.2 KB · Views: 270
  • 4.jpg
    4.jpg
    95.8 KB · Views: 261
  • 5.jpg
    5.jpg
    88.2 KB · Views: 270
Last edited:
OP
OP
L

llllljrlllll

Full Access Member
Joined
Mar 15, 2010
Posts
243
Reaction score
2
Location
los angeles
Since I can only upload 5 pixs at a time, be patient with me till I finish, before posting anything
 

Modded

That Guy
Joined
May 3, 2009
Posts
6,942
Reaction score
109
You need to hose off of your engine, too dirty!!
 
OP
OP
L

llllljrlllll

Full Access Member
Joined
Mar 15, 2010
Posts
243
Reaction score
2
Location
los angeles
You need to hose off of your engine, too dirty!!
LOL, youre right. thanks for noticing that. Dont compliment me on my effort to help brothers out. j/k

---------- Post added at 12:25 PM ---------- Previous post was at 12:24 PM ----------

Still on Step 3:

As you can see i put the jack stand (1) where the jack would go, and the jack(2) a little far behind. I lifted the car till the tires were off the floor, then i put the jackstand, and made sure the jackstand was supporting the car, but left the cars jack in the up position, for the just in case. LOL.
6.jpg
[/IMG]

Step 4:

Go ahead and remove the tire, once the tire is removed you should be looking at your rotor. There are 2 screws that you got to remove, on my tahoe the screws were 3/4 inch, so of course i used a 3/4 inch socket to remove.

7.jpg
[/IMG]


8.jpg
[/IMG]

Step 5:

I used a flat head screw driver to remove the caliper, make sure that when you pop it out, your left hand catches the caliper, (Do not let it hang) and rest it on top of the rotor. When removing the caliper with the screwdriver, take care as to not gouge the rotor.. Also, take a good look at the rotor, give it a spin or pull it off when the caliper is off to inspect for any gouging or warping. If found, get it resurfaced at any local autozone, or such store. Most of those stores will resurface for free. If its out of tolerance to resurface (not sure what the numbers are off the top of my head) replacement rotors will run you about 35+


9.jpg


Step 6:

Look at your caliper, it has 2 pistons, those you got to push in with a c clamp,

10.jpg
 
Last edited:
OP
OP
L

llllljrlllll

Full Access Member
Joined
Mar 15, 2010
Posts
243
Reaction score
2
Location
los angeles
Still on Step 6:

12.jpg
[/IMG]

Make sure all the pistons get pushed in with the c clam

Step 7:

Lets remove the brake pads of the rotor. I use a flat head to pop them out, it's faster. Be Careful When removing the brake pads with the screwdriver, take care as to not gouge the rotor.

130.jpg
[/IMG]

Look at the difference between a new one and an old one

11.jpg
[/IMG]

Now look carefully, this is where you have to pay attention to what you are taking out, the back brake pad is different then the one from the front

131.jpg
[/IMG]

Look at the arrows, what those arrows are pointing to is a small clip, that clip is what makes the screeching sound, basically your alarm to change brake pads. This pad goes in the back.

Step 8:

Now lets put the new pads in, once again remember that the back pad has a clip on it. When you buy the brake pads, they usually come with a little bit of grease that goes in the back of each pad. If you look carefully, the arrow to the right, you'll see the blue grease that i put on it. put it on both pads (DO NOT PUT IT ON THE ROTOR)

14.jpg
[/IMG]
 
Last edited:
OP
OP
L

llllljrlllll

Full Access Member
Joined
Mar 15, 2010
Posts
243
Reaction score
2
Location
los angeles
Step 9:

put the caliper back on, make sure to put back the screws, and tighten those babies good. Read the caption

15.jpg
[/IMG]

make sure is tight, and that's it. you're done. Congratulations you just changed your brake pads, now go to the other side and do the same. Once your done make sure that you put back the cap on the master cylinder. Make sure you have plenty of brake fluid, it needs to be at the max level.

1.jpg
[/IMG]

Hopefully you remembered to put on the tires, and tighten the lugs. Turn on the car and pump the brakes at least 20 times, that's what I do. Doing that sets the pads in. Now go take it for a test.


Tools needed:

16.jpg
[/IMG]

Brake pads:

I bought them at pep boys, their the best. Ceramic pads, remember don't be cheap, if your like me, and have kids, you need the best for peace of mind

19.jpg
[/IMG]

20.jpg
[/IMG]

and that is it. Now remember i'm a regular joe, i am not a mechanic, but i sure like to save money here and there, this a very simple thing to do. Once you do it once, you'll never forget, have fun.
 

Attachments

  • 15.jpg
    15.jpg
    90.8 KB · Views: 196
  • 1.jpg
    1.jpg
    91.5 KB · Views: 193
  • 16.jpg
    16.jpg
    97.1 KB · Views: 189
  • 19.jpg
    19.jpg
    89.6 KB · Views: 188
  • 20.jpg
    20.jpg
    88.3 KB · Views: 188
Last edited:
OP
OP
L

llllljrlllll

Full Access Member
Joined
Mar 15, 2010
Posts
243
Reaction score
2
Location
los angeles
aaahhhhhhhhhhhhhhhhh where are my pictures. I spent all day doing this. I can see them in firefox, probably because of the history, but I can't see it on explorer or chrome
 

Modded

That Guy
Joined
May 3, 2009
Posts
6,942
Reaction score
109
Haha good work man, atleast you are contrubuting while a noob, I know I did not do that.
Looks like a pretty straighforward install, and yeah im using IE and can't see some pics above.
 

WICKEDOWESIX

Full Access Member
Joined
Mar 21, 2010
Posts
105
Reaction score
98
FWIW-I would not recommend to leave the cap off of the brake fluid resovior. Brake fluid is prone to moisure in the air just by leaving it uncaped. Great write up though!
 

fixxxer88

Member
Joined
Feb 23, 2010
Posts
46
Reaction score
0
Does anyone happen to know the actual torque for the caliper bolts? Got my hands on some torque wrenches...might as well use them.

---------- Post added at 10:16 PM ---------- Previous post was at 10:06 PM ----------

Forgot to add: Great write up. This is a simple task that can save $$$.

I would add: When removing the caliper with the screwdriver, take care as to no gouge the rotor.

Also, take a good look at the rotor, give it a spin or pull it off when the caliper is off to inspect for any gouging or warping. If found, get it resurfaced at any local autozone, or such store. Most of those stores will resurface for free. If its out of tolerance to resurface (not sure what the numbers are off the top of my head) replacement rotors will run you about 35+
 

SabrToothSqrl

Full Access Member
Joined
Sep 29, 2009
Posts
202
Reaction score
0
wheels

your truck is 99% if not all metric, the wheels are 22mm deep socket. 6 point.

the calipers I assume are also metric, but I haven't had to change my brake pads yet... everything else I've found on the truck is metric (dash parts) etc.

just be sure to use the right tools, else you risk rounding off the bolts, and that's no fun!

but yea, brakes are fairly easy, long as they are disk... i HATE drum.
 
OP
OP
L

llllljrlllll

Full Access Member
Joined
Mar 15, 2010
Posts
243
Reaction score
2
Location
los angeles
Pictures have been fixed, and tips added, from fixxer and WICKEDOWESIX. if you have any tips on this, please post
 
Last edited:
OP
OP
L

llllljrlllll

Full Access Member
Joined
Mar 15, 2010
Posts
243
Reaction score
2
Location
los angeles
Pictures have been fixed, and also tips added from WICKEDOWESIX and fixxxer88 have been added. If you have more tips, please post. Like I said i'm no mechanic so I don't know alot, but what I do know Ill share with you guys. Also let me know if you can see the pictures on every step of the tutorial. thanks and keep on hoeing.:cheers:
 

fixxxer88

Member
Joined
Feb 23, 2010
Posts
46
Reaction score
0
one more thing. I contacted the dealer service department with questions and specs...
Our Stock Rotors CAN handle ceramic brake pads! (some stock rotors cant)
The Torque is 106 Inch LBS for both the caliber bolts, and the caliber bracket bolts (use some sorta thread lock)
 

Forum statistics

Threads
137,704
Posts
1,990,067
Members
102,698
Latest member
JamesinAbilene
Back
Top