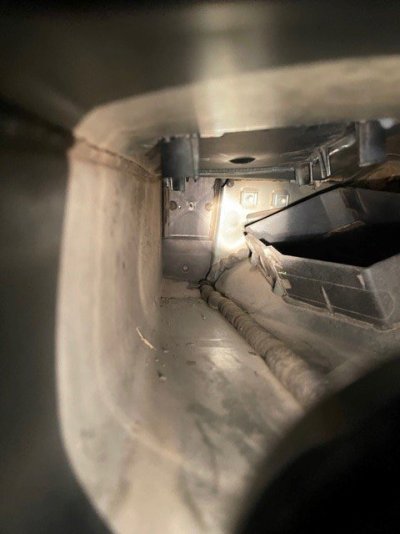
Well, thanks to this rain NC has gotten from Elsa I was able to finally figure out where my wet passenger floorboard issue is coming from (I hope). Lots of downpours over the past few days left my carpet soaked. Beyond pissed off that I thought it was still the EVAP condenser issue, I pulled everything apart only to find that area dry. My next thought was the sunroof drains. Nope, all clear. Then the dreaded windshield seal concern. Before I got into all of that, I was on some other forums and came across a post where a guy found his issue to be some cover in the cowling with a failed seal.
I get the wipers and cowl out of the way and look at the plastic cover. Sure enough, it's cracked all around and when I poured water on it, some seeped in and dripped onto the blower motor. Luckily nothing shorted out in this time, so came the repair:
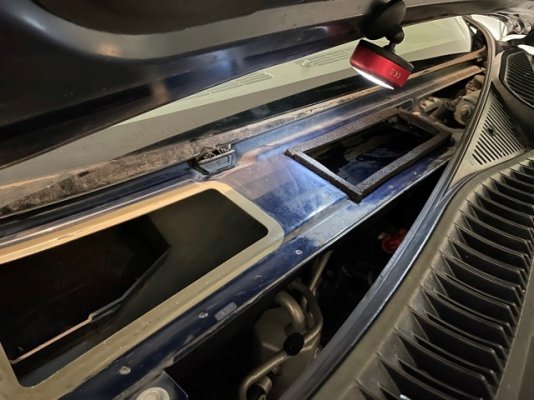
1. Get everything in the cowling area pulled away. Four clips across the front, a push pin in the center, two T15 torx screw on either end underneath the plastic covers, two wiper arms (13mm nut), washer fluid hoses, and here you have it. Note that the weatherstripping around the cetner opening had fallen off and was in the cowling area. The only bit that remained was the bottom left section, as evident by the clean paint remaining after removing the section.
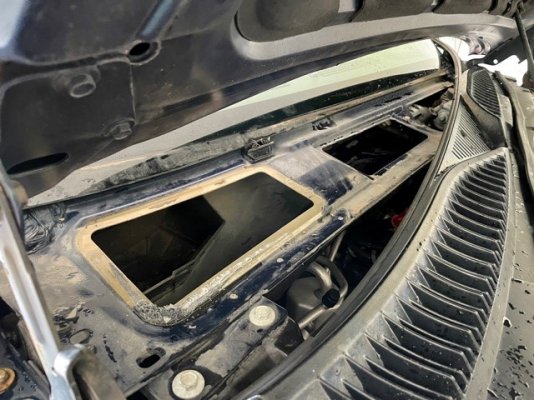
Note that I had already pried off the plastic panel covering the left-hand side opening. The plastic is super sharp and, while my hands are not the softest in the world, I got some nice papercuts across all fingers on one hand.
2. Here's the cowling cover (GM part number 21996643 if you're interested). As you can see between the picture above and this one, only a portion of the sealant was actually still contacting the metal.
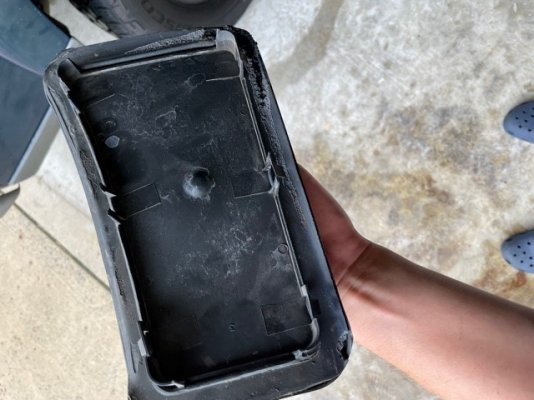
3. My sealant came off fairly easily by going at it with a flat blade screwdriver. I just got up under it and worked it until almost all of it was off. Then I took a small amount of acetone and scrubbed with a shop towel until I got it cleaned up. If you use acetone, be careful with how much you use since this piece is plastic and it is painted. I don't think I used more than a couple tablespoons worth. Again, the plastic edge is really sharp, so watch your fingers.
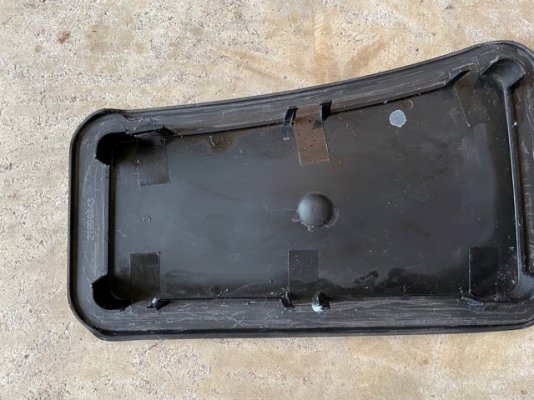
4. Go back over where the sealant used to be with an isopropyl alcohol towel just to make sure all remnants of adhesive were gone. Let air dry. Here it is all cleaned up. It got some scratches and some tabs broke, but I was going to silicone it anyways.
5. Get metal all cleaned up. My old weatherstripping around the opening in the center of the cowling area was shot, and most of it had fallen into the cowl itself. It measured at ~1/2" so I went to Lowes and got some expandable weatherstripping (Lowes item# 2566857). I also had some of this brand that expands to 1" but it's pretty dense and I didn't want the cowling to get pushed up or crack. (Post repair note: I did not apply silicone around the joints of this weatherstripping like I had originally wanted to do. I'll have to keep an eye on it and see if it's a problem). Look at the screen above the blower motor and use a shop vac to get that area cleaned up before reinstalling the plastic cover.
6. Reinstall plastic cowl cover. I applied clear silicone (Lowes item# 17417; GE Clear) to the channel in the plastic cover itself where the sealant used to be as well as inside the primed area of the cowling itself (tan area). Popped the cover back in and weighed it down with a 5 lb mini sledge and 3 lb dead blow. Wiped away any silicone that seeped out to make the next step easier. Waited about an hour for the silicone to set up.
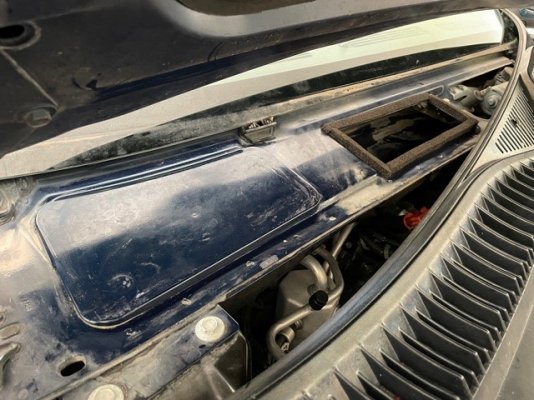
7. After the hour (or so) of waiting, I applied another bead of silicone. This time it was around the border of the cover so I could know that even if the interior silicone bead was not fully watertight, the outer layer would be the primary means of protection anyways. Let it sit for a couple hours. Mine was dry to the touch and poke with a fingernail by then (tested on a piece that had been wiped onto a paper towel during cleanup).
8. Reinstall everything in reverse. Be sure to add a very thin layer of anti-seize (I used white lithium grease) to the splines of the wiper motors if they were not easy to remove. Test wiper arm function --> I had shifted the splined section of the motor during removal of the passenger arm so I wanted to be sure the range of the wipe was still satisfactory. If the floorboard was as soaked as mine is, I'd suggest pulling the blower motor and turning it upside down so no water pools in it.
I am still waiting for the silicone to fully cure before testing it, but I'm hopeful that this solves my problem. I just need the carpet pad to dry out. Luckily it's sunny and hot here today so I've got the door open at work with the carpet pulled as far as it will go. It isn't scheduled to rain until at least the end of this upcoming weekend so I'll try to get it all leak tested; by then the pad should be dry enough for me to be confident in it.
I get the wipers and cowl out of the way and look at the plastic cover. Sure enough, it's cracked all around and when I poured water on it, some seeped in and dripped onto the blower motor. Luckily nothing shorted out in this time, so came the repair:
1. Get everything in the cowling area pulled away. Four clips across the front, a push pin in the center, two T15 torx screw on either end underneath the plastic covers, two wiper arms (13mm nut), washer fluid hoses, and here you have it. Note that the weatherstripping around the cetner opening had fallen off and was in the cowling area. The only bit that remained was the bottom left section, as evident by the clean paint remaining after removing the section.

Note that I had already pried off the plastic panel covering the left-hand side opening. The plastic is super sharp and, while my hands are not the softest in the world, I got some nice papercuts across all fingers on one hand.
2. Here's the cowling cover (GM part number 21996643 if you're interested). As you can see between the picture above and this one, only a portion of the sealant was actually still contacting the metal.

3. My sealant came off fairly easily by going at it with a flat blade screwdriver. I just got up under it and worked it until almost all of it was off. Then I took a small amount of acetone and scrubbed with a shop towel until I got it cleaned up. If you use acetone, be careful with how much you use since this piece is plastic and it is painted. I don't think I used more than a couple tablespoons worth. Again, the plastic edge is really sharp, so watch your fingers.
4. Go back over where the sealant used to be with an isopropyl alcohol towel just to make sure all remnants of adhesive were gone. Let air dry. Here it is all cleaned up. It got some scratches and some tabs broke, but I was going to silicone it anyways.

5. Get metal all cleaned up. My old weatherstripping around the opening in the center of the cowling area was shot, and most of it had fallen into the cowl itself. It measured at ~1/2" so I went to Lowes and got some expandable weatherstripping (Lowes item# 2566857). I also had some of this brand that expands to 1" but it's pretty dense and I didn't want the cowling to get pushed up or crack. (Post repair note: I did not apply silicone around the joints of this weatherstripping like I had originally wanted to do. I'll have to keep an eye on it and see if it's a problem). Look at the screen above the blower motor and use a shop vac to get that area cleaned up before reinstalling the plastic cover.

6. Reinstall plastic cowl cover. I applied clear silicone (Lowes item# 17417; GE Clear) to the channel in the plastic cover itself where the sealant used to be as well as inside the primed area of the cowling itself (tan area). Popped the cover back in and weighed it down with a 5 lb mini sledge and 3 lb dead blow. Wiped away any silicone that seeped out to make the next step easier. Waited about an hour for the silicone to set up.

7. After the hour (or so) of waiting, I applied another bead of silicone. This time it was around the border of the cover so I could know that even if the interior silicone bead was not fully watertight, the outer layer would be the primary means of protection anyways. Let it sit for a couple hours. Mine was dry to the touch and poke with a fingernail by then (tested on a piece that had been wiped onto a paper towel during cleanup).
8. Reinstall everything in reverse. Be sure to add a very thin layer of anti-seize (I used white lithium grease) to the splines of the wiper motors if they were not easy to remove. Test wiper arm function --> I had shifted the splined section of the motor during removal of the passenger arm so I wanted to be sure the range of the wipe was still satisfactory. If the floorboard was as soaked as mine is, I'd suggest pulling the blower motor and turning it upside down so no water pools in it.
I am still waiting for the silicone to fully cure before testing it, but I'm hopeful that this solves my problem. I just need the carpet pad to dry out. Luckily it's sunny and hot here today so I've got the door open at work with the carpet pulled as far as it will go. It isn't scheduled to rain until at least the end of this upcoming weekend so I'll try to get it all leak tested; by then the pad should be dry enough for me to be confident in it.

