Remove 3rd Row Seat

Disclaimer: Links on this page pointing to Amazon, eBay and other sites may include affiliate code. If you click them and make a purchase, we may earn a small commission.

jake24a

TYF Newbie
Joined
Mar 20, 2023
Posts
4
Reaction score
6
Vehicle: 2021 GMC Yukon Denali

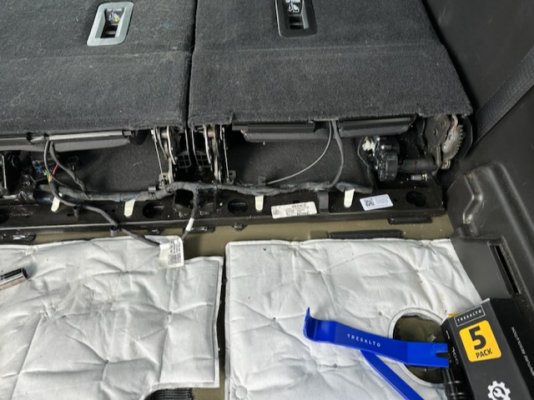
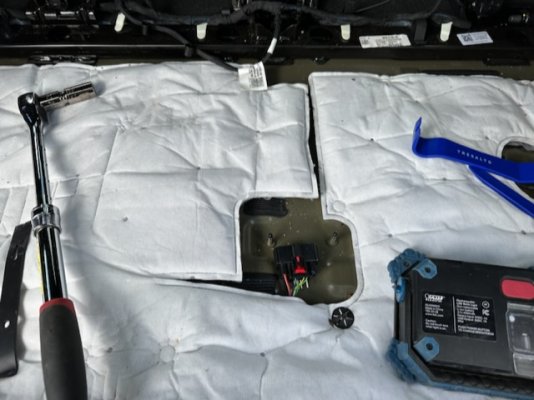
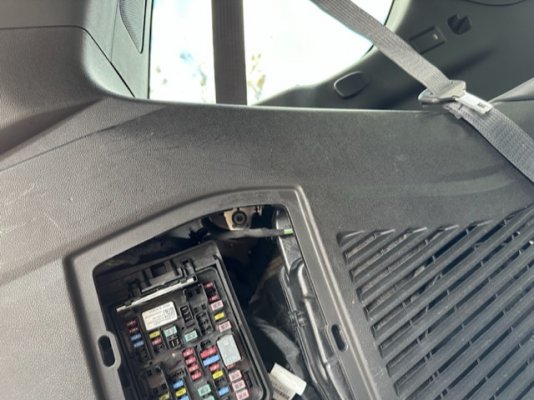
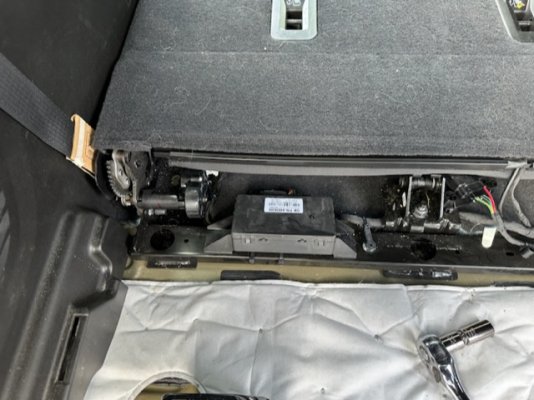
Background: My kids/dog somehow ripped the 3rd row drivers side seat belt and I'm working on replacing the entire seat belt retractor assembly. To replace it, I need to access three bolts: 1) holding on the retractor inside the door panel can be accessed via the cargo panel where the emergency jack is hidden, 2) holding on the guide loop at the top is straight forward and 3) attaching the seat belt down by the passengers hip.

Question: I'm having a hard time accessing the 3rd bolt. I can see it by pulling back the seat cushion from the wall, but the seat appears to be in the way of a wrench whether the seat is folded down or up. Do I need to remove the 3rd row seat, and if so how?
 
Last edited:

StephenPT

Full Access Member
Joined
Jan 16, 2022
Posts
1,013
Reaction score
944
Location
St. Helens, OR
1) Remove Rear Cargo Tray - First remove rear cargo sill by lifting up at one side and slowly disconnecting the metal clips that hold it to the floor. There's also a small plastic close-out piece near the striker for the tailgate latch - use a plastic trim tool to lift it out. Once the sill is out you can remove the rear cargo tray. Lift the lid and you'll see four thumb screws that hold it down.

2) Remove 3rd Row Seat Frame Bolts - There's three 15mm head bolts (gray) holding the back of the seat frame to the floor. On the front side (with the 3rd row seats up) you'll see three black plastic covers next to the carpet. Lift straight up on those covers and you'll find three more 15mm head bolts holding the front of the frame to the floor.

3) Disconnect Wiring - I'm not familiar with this process since I have an SLE w/o the power-fold function, but on a Denali you'll have some wiring going to the motors you'll need to disconnect.

4) Remove 3rd Row
 
OP
OP
J

jake24a

TYF Newbie
Joined
Mar 20, 2023
Posts
4
Reaction score
6
1) Remove Rear Cargo Tray - First remove rear cargo sill by lifting up at one side and slowly disconnecting the metal clips that hold it to the floor. There's also a small plastic close-out piece near the striker for the tailgate latch - use a plastic trim tool to lift it out. Once the sill is out you can remove the rear cargo tray. Lift the lid and you'll see four thumb screws that hold it down.

2) Remove 3rd Row Seat Frame Bolts - There's three 15mm head bolts (gray) holding the back of the seat frame to the floor. On the front side (with the 3rd row seats up) you'll see three black plastic covers next to the carpet. Lift straight up on those covers and you'll find three more 15mm head bolts holding the front of the frame to the floor.

3) Disconnect Wiring - I'm not familiar with this process since I have an SLE w/o the power-fold function, but on a Denali you'll have some wiring going to the motors you'll need to disconnect.

4) Remove 3rd Row
Thanks Stephen, I'll give this a try and report back.
 
OP
OP
J

jake24a

TYF Newbie
Joined
Mar 20, 2023
Posts
4
Reaction score
6
Thanks Stephen, that helped a lot. A few notes from what I saw:
* cargo tray only had two plastic nuts holding it on that you can remove by hand.
* there were five bolts in the rear of the seat and three in the front.
* wiring harness was under the cargo tray and came apart fairly easily once I a) slid the red clip back and b) stuck a screw driver in the slot on top towards the front.
 

DuraYuk

Full Access Member
Joined
Sep 17, 2022
Posts
809
Reaction score
578
Thanks Stephen, that helped a lot. A few notes from what I saw:
* cargo tray only had two plastic nuts holding it on that you can remove by hand.
* there were five bolts in the rear of the seat and three in the front.
* wiring harness was under the cargo tray and came apart fairly easily once I a) slid the red clip back and b) stuck a screw driver in the slot on top towards the front.
Can you snap a pic of what it looks like removed?
 
OP
OP
J

jake24a

TYF Newbie
Joined
Mar 20, 2023
Posts
4
Reaction score
6
Here are the pictures I took. The white pad is what’s beneath the cargo tray and the seats are folded down. I never fully removed the seats, just took all the bolts out and slid it forward a few inches so I could access the lower seat belt anchor.
 

Attachments

  • 43B755C1-942A-46D9-8D62-50A645F6984C.jpeg
    43B755C1-942A-46D9-8D62-50A645F6984C.jpeg
    114.4 KB · Views: 28
  • FE2C4C5B-4507-47E5-8990-6F51B35DA7A7.jpeg
    FE2C4C5B-4507-47E5-8990-6F51B35DA7A7.jpeg
    117.7 KB · Views: 27
  • 002CF532-68A6-4330-9ABF-46803FA006D0.jpeg
    002CF532-68A6-4330-9ABF-46803FA006D0.jpeg
    102.5 KB · Views: 27
  • 8ED20298-B568-4AF3-B35F-6AB3636B460C.jpeg
    8ED20298-B568-4AF3-B35F-6AB3636B460C.jpeg
    113.8 KB · Views: 26
  • 9B79A5E6-E5CA-485F-BCA1-9E32BF953730.jpeg
    9B79A5E6-E5CA-485F-BCA1-9E32BF953730.jpeg
    114.4 KB · Views: 28

StephenPT

Full Access Member
Joined
Jan 16, 2022
Posts
1,013
Reaction score
944
Location
St. Helens, OR
Thanks Stephen, that helped a lot. A few notes from what I saw:
* cargo tray only had two plastic nuts holding it on that you can remove by hand.
* there were five bolts in the rear of the seat and three in the front.
* wiring harness was under the cargo tray and came apart fairly easily once I a) slid the red clip back and b) stuck a screw driver in the slot on top towards the front.
Ah that makes sense - I have the XL version, so the cargo tray is longer and hence 4 nuts holding it down. Glad it was all able to work out for you and thanks for providing some pictures. Those will helps someone else down the line.
 

Forum statistics

Threads
129,210
Posts
1,812,229
Members
92,310
Latest member
Ron505
Top