Ordering parts for a regear, ring and pinion swap, have you ever done one?

Disclaimer: Links on this page pointing to Amazon, eBay and other sites may include affiliate code. If you click them and make a purchase, we may earn a small commission.

snives

TYF Newbie
Joined
Feb 15, 2023
Posts
13
Reaction score
13
Location
Chicago
I'm ordering parts to do a 4.10 ring and pinion swap in the 2017 Tahoe. The rear axle is a GM 9.5" 12-bolt right? It currently has a 3.08 and the G80 locker. From what I gather there is a carrier split at 3.23. I don't know if I can use the same carrier for the 4.10 or what people do. I found a ring gear spacer that says its required for converting from 3.08, so I'm guessing I need that?

I'm also reading that there is something up with the yoke not being compatible with aftermarket pinions? Is that what this conversion yolk is for?, why?

Anyways, I've ordered the ring and pinion and a master overhaul kit since this is the first differential I'm doing. excited! I have no speciality tools for this though, what do I need? A press? A bearing driver kit? I don't know what I don't know so I'm asking. I have watched plenty of videos though! hahaha

If you've done a ring and pinion swap / regear on this GM 9.5 12-bolt I would love to get some advice!

thanks guys
 

RB_Trucker

Full Access Member
Joined
Aug 26, 2015
Posts
147
Reaction score
194
Location
Redondo Beach
I would like to follow this one, I posted on another forum thread here about re-gearing my 2019 Suburban to 3.73 or 4.10 with no luck yet.
 

strutaeng

Full Access Member
Joined
Aug 10, 2023
Posts
669
Reaction score
1,307
Location
Dallas, Texas
I regeared one of these axles (from a truck), but in my garage. It's supposed to be swapped into my 99 Silverado at some point

Anyways, mine was 3.42s originally and I also went with 4.10s.

You need one of those dial torque wrenches and a dial indicator with a magnetic base. Yes, a shop press with bearing separator is required. For the ring gear, I just heated it with a heat gun to get it to drop on the carrier.

I made a homemade "case spreader" out of threaded rod and steel square tube, so that I didn't have to hammer the bearing preload shims too much.

I actually stick welded the axle tubes to the pumpkin too, but that was just for fun.
 
OP
OP
snives

snives

TYF Newbie
Joined
Feb 15, 2023
Posts
13
Reaction score
13
Location
Chicago
Okay, so far the tools I've ordered:
- Dial indicator with magnetic base - to measure backlash
- 1/2 brass punch - to drive out bearing races without marring housing
- Pinion/carrier bearing puller
- 10 piece bearing/seal driver kit
- Beam drive torque wrench - to measure pinion preload

I don't have a hydraulic press yet, but might have to do it for the pinion bearing and the carrier bearings. I've read some people put the bearings in the oven and end up not using a press. Thoughts?

The point about the case spreader is interesting. I've seen people use shim drivers to push those carrier shims in. I don't know how much preload the carrier needs so I don't know how hard it will be to push the shims in. I wonder if the case spreader would prevent me from having to drive the carrier shims in so hard that I would need that shim driver tool?

edit:
I got the shop press and the case spreader anyways, because if I want professional results I need to use the right tool for the job.
 
Last edited:

swathdiver

Full Access Member
Joined
May 18, 2017
Posts
19,148
Reaction score
25,183
Location
Treasure Coast, Florida
I'm ordering parts to do a 4.10 ring and pinion swap in the 2017 Tahoe. The rear axle is a GM 9.5" 12-bolt right? It currently has a 3.08 and the G80 locker. From what I gather there is a carrier split at 3.23. I don't know if I can use the same carrier for the 4.10 or what people do. I found a ring gear spacer that says its required for converting from 3.08, so I'm guessing I need that?

I'm also reading that there is something up with the yoke not being compatible with aftermarket pinions? Is that what this conversion yolk is for?, why?

Anyways, I've ordered the ring and pinion and a master overhaul kit since this is the first differential I'm doing. excited! I have no speciality tools for this though, what do I need? A press? A bearing driver kit? I don't know what I don't know so I'm asking. I have watched plenty of videos though! hahaha

If you've done a ring and pinion swap / regear on this GM 9.5 12-bolt I would love to get some advice!

thanks guys
What are you driving? The 5.3s have a 12-Bolt Salisbury 9.5" axle and the 6.2s use the 12-Bolt Salisbury 9.76" axle.

You can look up parts over at demandaam.com.

The proper carrier is stronger than the adapter to make one for a 3.08 work for 3.42 or larger numerically. Don't have enough knowledge of that though.

Should have no problem reusing your yoke, always use a new nut and washer when you finally torque it down for good.
 
OP
OP
snives

snives

TYF Newbie
Joined
Feb 15, 2023
Posts
13
Reaction score
13
Location
Chicago
What are you driving? The 5.3s have a 12-Bolt Salisbury 9.5" axle and the 6.2s use the 12-Bolt Salisbury 9.76" axle.

You can look up parts over at demandaam.com.

The proper carrier is stronger than the adapter to make one for a 3.08 work for 3.42 or larger numerically. Don't have enough knowledge of that though.

Should have no problem reusing your yoke, always use a new nut and washer when you finally torque it down for good.

It's a 5.3, so a 9.5", it has the G80 and I didn't really know how to search for the different carriers. Thanks for that link, that made it very easy to find the GM PN 40090728 for the 3.42+ carrier, however that is an open differential carrier. I don't see any G80 carriers there. But I have the adapter ring anyhow so I'll try that route.
 
OP
OP
snives

snives

TYF Newbie
Joined
Feb 15, 2023
Posts
13
Reaction score
13
Location
Chicago
Just finished with the job a few days ago and wanted to wrap up this thread, and give back to the community with the experience.

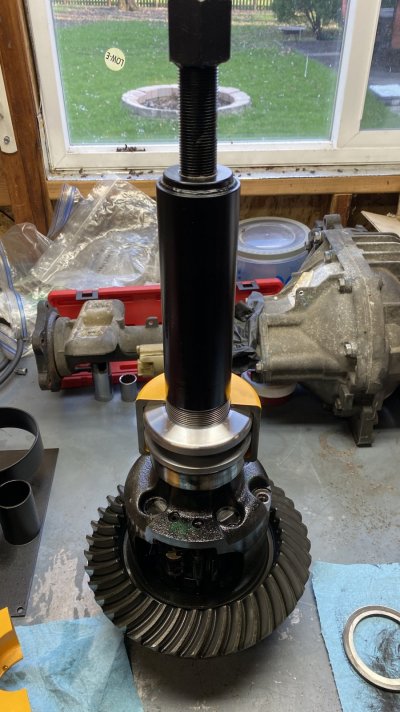
The way I went about it was I found it easier to just remove the entire rear axle from the Tahoe and move it into the garage so I had space to work on it comfortably. I referred to a few YT videos for the basic steps for doing a ring and pinion change. The two most important tools were the shop press and the bearing puller tool. I didn't even use the case spreader because (A) the generic one I got on amazon didn't fit the GM housing and (B) it wasn't actually necessary. The brass punch was necessary for driving out the old bearing races as well as driving them in. I thought the seal drivers would have been the best for that but they just weren't great. Their sizes didn't match the bearing races and I ended up having to use the back side (flat side) for driving the races in once they got started, but they don't do a good job getting the race started straight. I found the brass punch helped get the races started straight in better.

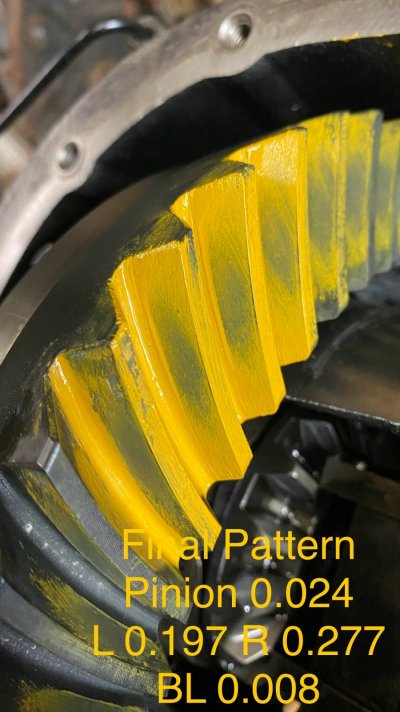
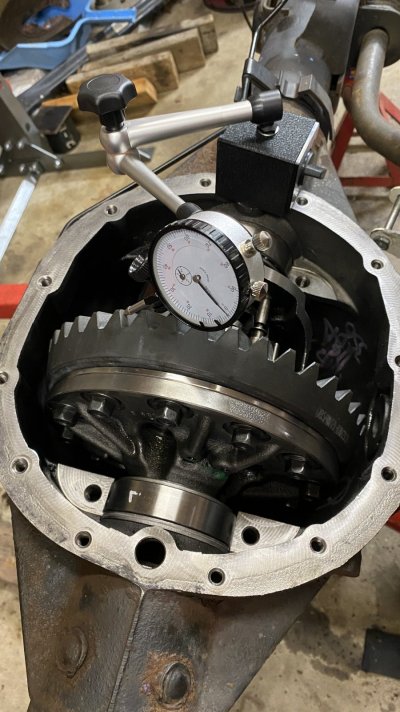
In general the best practice was to get the pinion depth set right first, which is done by starting with the old shim, and assembling the pinion in the housing, using setup bearings, snugging it down, and putting the carrier in, adjusting the backlash into spec with carrier shims, and then running a pattern. Only if your backlash is in spec, your carrier is shimmed right, and snugged down will the pattern tell you what to do. The insight gained in setting the carrier shims is to take out 5-7 thousandths from the total shim stack, (that was what it was for me) to get the carrier to drop in snugly but without having to dead-blow (hammer) the carrier/shims into place. Once you have your pinion depth correct, and your carrier shims correct, then I added in 7 thousandths to the shim stack (split equally among left and right side to keep the backlash in spec) in order to achieve the carrier preload.

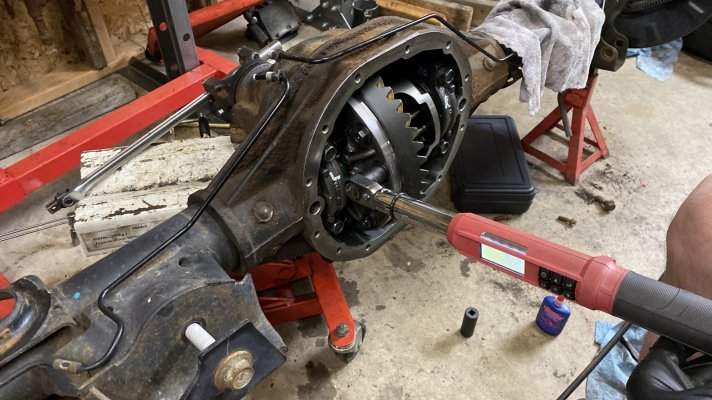
The part I was worried about the most, setting the final pinion pre-load with the crush washer turned out to be easy. I just hit it with the air impact until the bearings pressed into place, and then snuck up on the torque with small blips and rotating the yolk by hand until I started feeling resistance. Once resistance was felt I immediately started using the lb/in torque gauge and measured the dynamic torque. For this application the target pre-load torque was 13-15 in/lbs, the specs were listed in the Yukon installation instructions that came with the ring and pinion. If you measure the torque it takes for the pinion to begin moving that is the static torque, and after its moving, the dynamic torque, the force will be lower. A little tricky to watch a needle as its rotating but I just recorded the scale with my phone as I rotated it and then reviewed the video. Then I would go back and hit it with 1 blip with the impact, thats it, and then re-measure the pre-load torque. It ramps up quickly, but I snuck up on it very slowly, one blip at a time and got it right.

There wasn't really anything tricky to it, just the unknown of never having done one before. One tip to use a c-clamp to push the axles in if the C-clip won't come out with your magnet tool helped. Also, learning how to read gear marking compound patterns was good to gain. The cliffnotes version is you use the pinion depth to adjust the pattern on the drive side gear face root to crown (bottom to top) and the carrier shims control the backlash, which always needs to be in spec to get a valid gear pattern. Once your pattern isn't going off the top (crown) or off the bottom (root), and your backlash is between 6-10 thousandths, everything will be fine, pretty much ignore everything else.

One tip I picked up was to put some ptfe sealant on the pinion yolk splines to prevent gear oil from seeping through the splines. Yes, since this was a G80 3.08 ratio I did need to use the ring gear adapter to go to the 4.10 ratio, but it worked just fine. I put my ring gear in the toaster at 250F for 30 minutes to get it on the carrier and aligned with the bolts just quick enough before it cooled and locked itself into place. I chose to locktite and torque the ring gear bolts last because it made it much easier to hold the carrier in place to torque it with it in the housing and a prybar on the yolk. Also one tip for using the bearing puller, which worked great btw, but you must have the pinion race on the pinion bearing before you pull it. Without the race on it, it will just open the bearing cage and destroy the old bearing which is what happened to me first time. So, I didn't have an inner pinion bearing "setup" bearing to work with but it was easy enough to press and pull the new one on and off to change shims without any damage once I learned to use the tool correctly.

Overall not that bad of a job, second one would probably go much faster. As for the front diff I just bought a whole new front axle with a 4.10 already in it for the same price as a ring and pinion. Anyway, I would say if you don't have a bunch of time and tools it would probably be best to just take it somewhere to get it done, its honestly probably cheaper than DIY, but I enjoy working on my own rig so, for me it was a good experience.
 

Attachments

  • IMG_7918.jpg
    IMG_7918.jpg
    247.4 KB · Views: 2
  • IMG_7803.jpg
    IMG_7803.jpg
    271.3 KB · Views: 2
  • IMG_7908.jpg
    IMG_7908.jpg
    303.8 KB · Views: 2
  • IMG_7868.jpg
    IMG_7868.jpg
    243.1 KB · Views: 2
  • IMG_7878.jpg
    IMG_7878.jpg
    279.7 KB · Views: 2

Forum statistics

Threads
129,239
Posts
1,812,628
Members
92,339
Latest member
Thekenstar
Top