Headlight adjuster broken again

Disclaimer: Links on this page pointing to Amazon, eBay and other sites may include affiliate code. If you click them and make a purchase, we may earn a small commission.

West1

Member
Joined
Dec 26, 2020
Posts
54
Reaction score
14
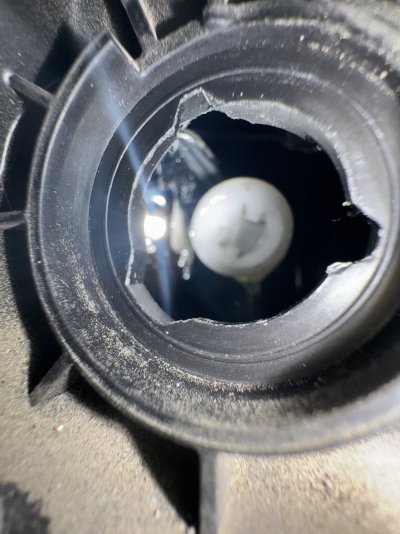
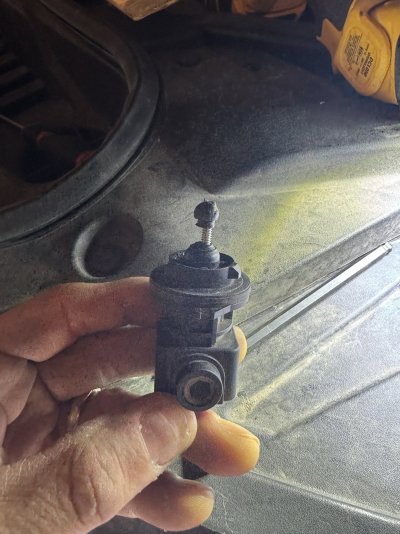
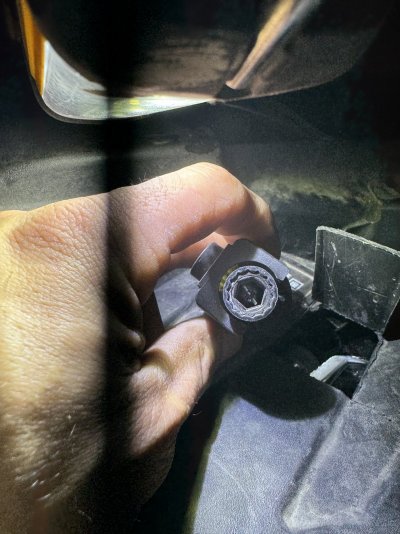
Did mine today. The adjuster doesn’t work tho when I try to turn the Allen wrench.
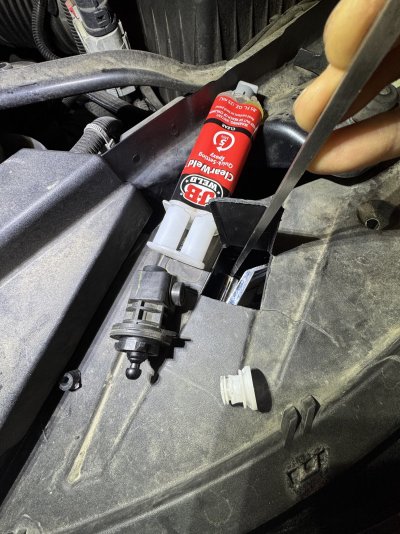
I just used a razor blade to open the top.
Now I think my headlights are to high!
What’s everyone’s ballpark light height from the floor to top of light on a wall?
 

Attachments

  • IMG_7935.jpeg
    IMG_7935.jpeg
    508.9 KB · Views: 112
  • IMG_7941.jpeg
    IMG_7941.jpeg
    341 KB · Views: 114

West1

Member
Joined
Dec 26, 2020
Posts
54
Reaction score
14
Drove around this evening and the light is not even touching the road, it’s lighting up stop signs. I have no adjust control, it’s pop the white plastic over the adjuster ball or nothing. I’m going to try and screw in a finish deck screw through the back of the adjuster housing and through the white plastic/epoxy. Hopefully the finish screw can act as an adjuster.
 

Attachments

  • IMG_7947.jpeg
    IMG_7947.jpeg
    152.5 KB · Views: 81
  • IMG_7945.jpeg
    IMG_7945.jpeg
    281.6 KB · Views: 82

West1

Member
Joined
Dec 26, 2020
Posts
54
Reaction score
14
Ended up going with plan b while trying to screw in a 6-32 threaded screw.

I drilled a pilot hole with the intent to screw in the threaded screw. Once I did that, I realized how tight the screw was on the adjuster. Then it dawned on me to just cutoff the ball and have the screw adjust the headlight. Lo and behold, it worked pretty badass!
 

Attachments

  • IMG_8006.jpeg
    IMG_8006.jpeg
    364.9 KB · Views: 113
  • IMG_8001.jpeg
    IMG_8001.jpeg
    370.3 KB · Views: 109
  • IMG_8008.jpeg
    IMG_8008.jpeg
    227.1 KB · Views: 100

jcasillasgomez77

TYF Newbie
Joined
Dec 28, 2024
Posts
1
Reaction score
0
I had the same problem with broken adjuster, but I did a simple solution.
I just drill a small hole with a small chamfer in the white piece and inserted a small screw. I didn’t have to remove anything on the headlight assembly, just inserted the broken piece back in position, but first only the white piece with the extra screw and then re-attach the white piece with the screw to the adjuster piece still inside the headlight assembly. You need to be careful to hold the white piece with some double sided tape to the screw driver because if that piece falls inside, that’s really bad, then you will need to remove the whole thing to recover it. Once you tighten the screw, you can insert the rest of the adjuster and that’s it! I’ll try to take a picture of tge work I did for better reference.
Hope it helps someone.
 

gonatee

Member
Joined
Aug 22, 2017
Posts
72
Reaction score
18
GM has become a complete joke at this point... What a pos company!
 

New Guy

TYF Newbie
Joined
Jul 27, 2024
Posts
3
Reaction score
11
Thanks for posting this fix. I plan to do this myself also. Your photos are throwing me off a bit. The one with the drill marks on it and the one with the epoxy applied don't look like they are photos of the same headlight. Is that the case? It just looks like the "made in Mexico" label is reversed on one of them. Thanks!
sorry for the delayed response, yes it is the same headlight, I peeled the made in mexico sticker off so i could try to keep it visible on the top of the epoxy. If I had to do it again i would peel that sticker off first so it stays in one piece. I am glad its working for everyone as a reliable fix so far! There's nothing more upsetting than knowing GM never updated this part to fix it after 4 years of having these issues.
 

wompwomp

TYF Newbie
Joined
Oct 25, 2025
Posts
1
Reaction score
0
I just made a quick fix by applying glue to the head of the adjuster and then reinstalling it in the headlight. Make sure to wait until it gets dry. It works for me.

View attachment 432544
Sorry for digging up the past, but my 2021 Burban’s light finally broke. How much material did you add? I cant find a picture of an unbroken adjuster.
 

Hey you

Member
Joined
Jun 27, 2024
Posts
87
Reaction score
61
This is all good info. Much better than ordering another headlight housing, then fighting the bumper removal process.
I carefully followed the procedures from Lanyx, Bdbdzz and Newguy... The pics really helped. I applied the epoxy, letting
it cure now. Fingers crossed!
 

Ubeslife

TYF Newbie
Joined
Jan 27, 2026
Posts
2
Reaction score
1
Sorry I just recently found I have this issue and I have a few questions:
1. is the white piece of the adjuster have part of it breaking off or is it too short and sliding out from wear over time?
2. is the chrome piece the white piece slides into deep enough I could add something to the end of the white piece to fix this?

My thought was pull the adjuster out, add 1/4" or more to the end of the white piece, then reassemble? or will this not work?

Thank you in advance!
 

Hey you

Member
Joined
Jun 27, 2024
Posts
87
Reaction score
61
Hey Ubeslife, #1 Yes, the white adjuster is broken, that is why applying JB weld to cement the two back together seems to works,
the only thing I can add is to be sure to add enough. My first attempt failed, on the second I built it up to about 1/2 inch and that is working.
#2 Building up the epoxy is doing that for you.
Keep us posted
 

Ubeslife

TYF Newbie
Joined
Jan 27, 2026
Posts
2
Reaction score
1
@Hey you, thank you for the info. Ill post back once I get to it. Im nervous to touch it in the current temperatures we have in ohio, so this might have to wait a bit.
 

Hey you

Member
Joined
Jun 27, 2024
Posts
87
Reaction score
61
Every thing is subject to change! My latest repair only lasted a week or so, now I am looking into the other fix here on the forum.
Will keep you posted.
 

Forum statistics

Threads
137,705
Posts
1,990,079
Members
102,699
Latest member
moto
Back
Top