What did you do to your NBS GMT800 Tahoe/Yukon Today?

Disclaimer: Links on this page pointing to Amazon, eBay and other sites may include affiliate code. If you click them and make a purchase, we may earn a small commission.

ivin74

05 NBS Nali
Joined
Aug 3, 2014
Posts
2,420
Reaction score
2,557
Location
Htown, Texas
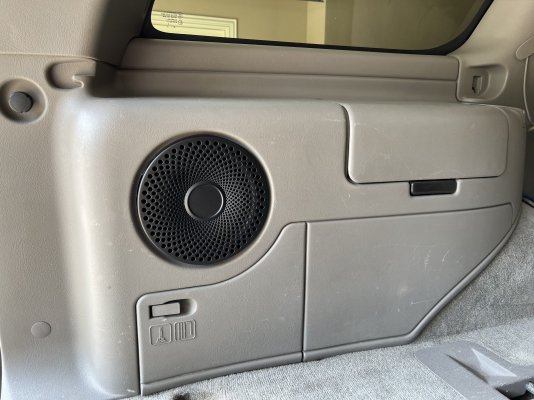
Tried to use cutoff wheels with a dremel to cut out the vents of the cargo trim for the subwoofer like the 00-02, but that was futile. Punted and ordered a grille on bezos-mart and cut the entire opening out. Was able to press this grille in from behind and use a little insulating foam tape around the edge to hopefully avoid rattles.

View attachment 406930
Why didn't you sand the back of it until the grill openings when visible.
 

treehan77

TYF Fiend
Joined
Feb 1, 2015
Posts
1,446
Reaction score
1,216
Location
Crestview, FL
Tried to use cutoff wheels with a dremel to cut out the vents of the cargo trim for the subwoofer like the 00-02, but that was futile. Punted and ordered a grille on bezos-mart and cut the entire opening out. Was able to press this grille in from behind and use a little insulating foam tape around the edge to hopefully avoid rattles.

View attachment 406930
yeah I used a dremel and it took forever to cut out every little slot, but it worked!
 

mattbta

Full Access Member
Joined
Jun 19, 2012
Posts
1,194
Reaction score
2,241
Location
Frisco, TX
Why didn't you sand the back of it until the grill openings when visible.
Did not know you could do that. Oh well.
yeah I used a dremel and it took forever to cut out every little slot, but it worked!
The wheels I tried made a flaky mess and I lost patience quickly. Did you use the OEM rear sub box? If so, how did you end up mounting? The bolt for the jack tools interferes and I'm about to take an angle grinder to it.
 

ivin74

05 NBS Nali
Joined
Aug 3, 2014
Posts
2,420
Reaction score
2,557
Location
Htown, Texas
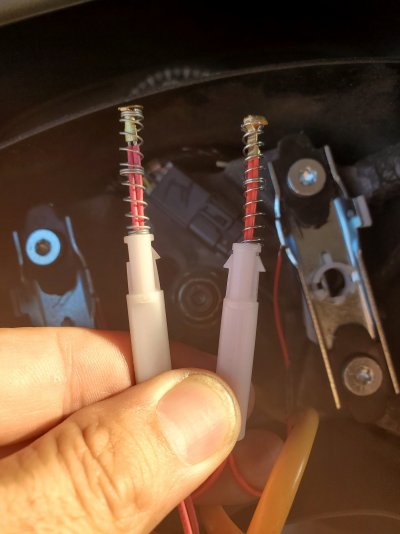
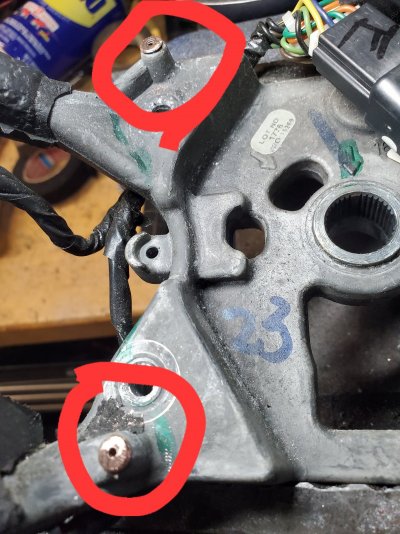
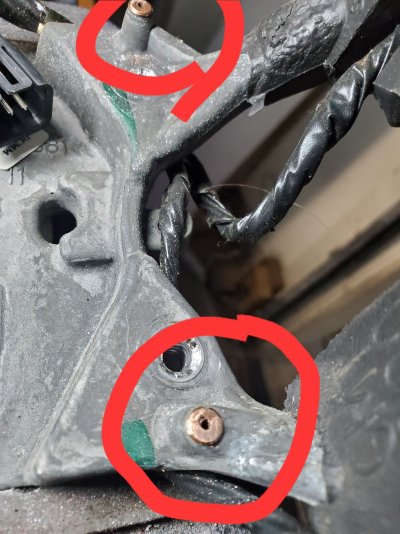
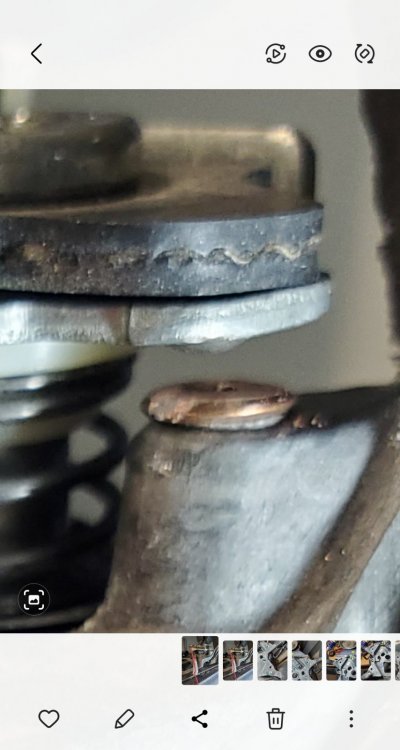
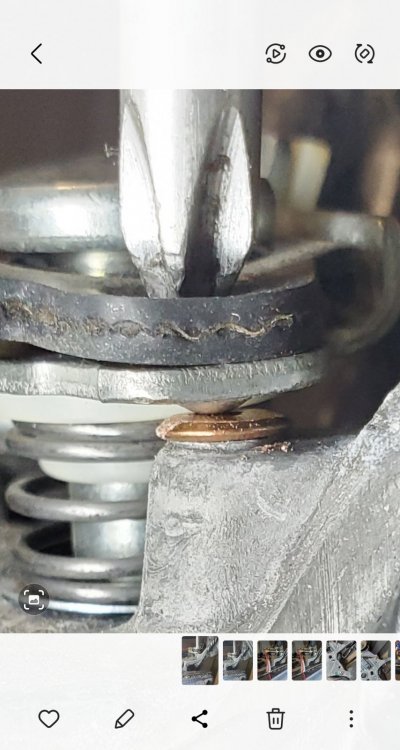
Changed out the horn contacts and was still having issues with the horn not working. I inspected the contact location points on the steering wheel and they were not making a good connection w the new horn contacts. I file them down bit and that solved the issue.
 

Attachments

  • 20230825_183005.jpg
    20230825_183005.jpg
    172.3 KB · Views: 28
  • 20230825_200211.jpg
    20230825_200211.jpg
    392.6 KB · Views: 23
  • 20230825_200217.jpg
    20230825_200217.jpg
    330.1 KB · Views: 26
  • Screenshot_20230825_212014.jpg
    Screenshot_20230825_212014.jpg
    147.7 KB · Views: 25
  • Screenshot_20230825_211955.jpg
    Screenshot_20230825_211955.jpg
    189.3 KB · Views: 26

Logan5

Full Access Member
Joined
Jul 6, 2021
Posts
104
Reaction score
348
Location
Albany, NY
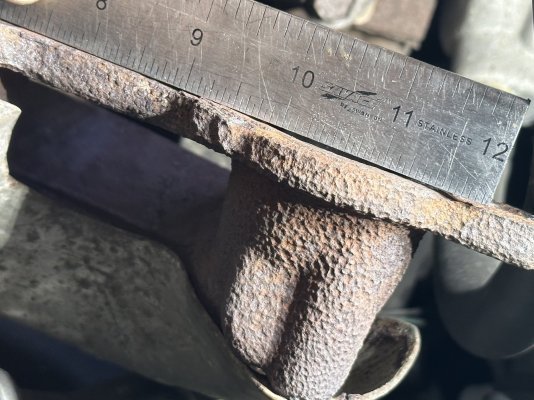
Exhaust manifold leak part 2. Unbolted the manifold again to try to see why its leaking from the gasket. Got a straight edge and checked to see if I had warpage.

Found some corrosion that was giving me a gap.

IMG_4331.jpg


Doesn't look like much but it was enough to give me the leak.

A little grinding/sanding later...


IMG_4332.jpg


Ok back together, O2 readings back to normal, fuel trim back to normal.
 

Attachments

  • IMG_4331.jpg
    IMG_4331.jpg
    358.9 KB · Views: 20

iamdub

Full Access Member
Joined
Apr 23, 2016
Posts
20,821
Reaction score
45,013
Location
Li'l Weezyana
Exhaust manifold leak part 2. Unbolted the manifold again to try to see why its leaking from the gasket. Got a straight edge and checked to see if I had warpage.

Found some corrosion that was giving me a gap.

View attachment 407034

Doesn't look like much but it was enough to give me the leak.

A little grinding/sanding later...


View attachment 407037

Ok back together, O2 readings back to normal, fuel trim back to normal.


Exhaust manifolds made of coral- fancy!
 

iamdub

Full Access Member
Joined
Apr 23, 2016
Posts
20,821
Reaction score
45,013
Location
Li'l Weezyana
Hush boy, u wouldn’t know wut it’s like living in this salty s h i T t y state…. I’d take missing wire loom over rust on eerythang any day…


Rust? Oh. I thought he had his ivory dealer hook him up with manifolds of coral.

BTW, I fixed my crusty loom during your hiatus :D


ivin74

05 NBS Nali
Joined
Aug 3, 2014
Posts
2,420
Reaction score
2,557
Location
Htown, Texas
Wanted to change the look of the rear tail lights, so last week I bought the C bar leds. The new ones came in today, if I have time tomorrow I'm going to install them.

Might sell the old rear leds tail lights.
 

Attachments

  • Screenshot_20230826_231117.jpg
    Screenshot_20230826_231117.jpg
    117.9 KB · Views: 26

mattbta

Full Access Member
Joined
Jun 19, 2012
Posts
1,194
Reaction score
2,241
Location
Frisco, TX
Will someone tell Al Gore we are tired of the heat? This summer has been third hottest. Do.not.like.

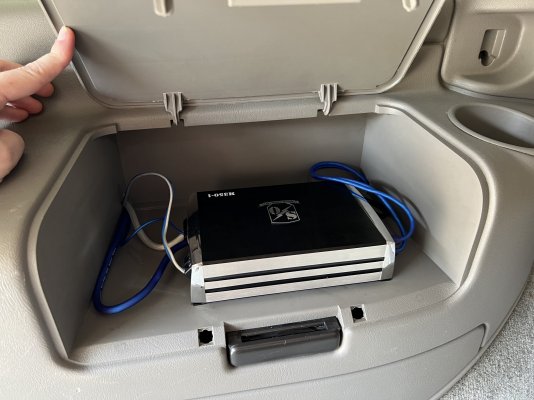
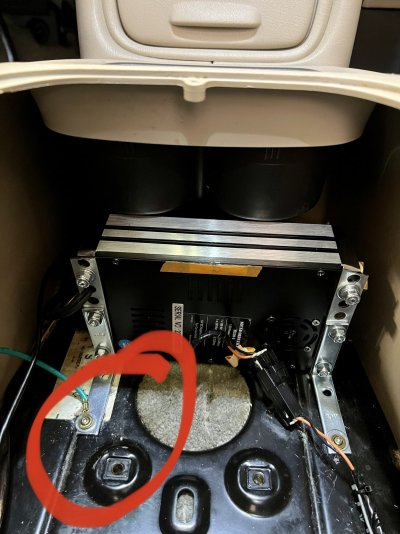
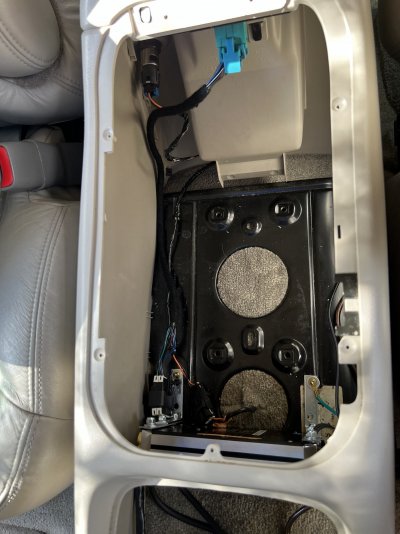
Put everything back together. Still need to figure out how to run the RCA from the front, but power and remote turn on are under the left sill plates. Future Matt’s problem.
IMG_2937.jpegIMG_2938.jpeg

It’s obviously not competition but good enough for me, for now. :D
 

Gmg0547

Full Access Member
Joined
Sep 8, 2022
Posts
116
Reaction score
292
Today I tried dropping the transmission pan. I didn't get past the removal of the shift linkage bracket. I was able to get a torx 40 into the bolts nice and snug but couldn't get any room to turn the ratchet. I found a "how to" to disconnect the front drive shaft to get some more room. Is there anything I need to by disconnecting and reconnecting other then lining everything back up correctly?
 

treehan77

TYF Fiend
Joined
Feb 1, 2015
Posts
1,446
Reaction score
1,216
Location
Crestview, FL
Will someone tell Al Gore we are tired of the heat? This summer has been third hottest. Do.not.like.

Put everything back together. Still need to figure out how to run the RCA from the front, but power and remote turn on are under the left sill plates. Future Matt’s problem.
View attachment 407112View attachment 407113

It’s obviously not competition but good enough for me, for now. :D
Same place I put my amp nicely done
 

Scott in AZ

Full Access Member
Joined
Mar 23, 2023
Posts
194
Reaction score
363
Location
Arizona
Will someone tell Al Gore we are tired of the heat? This summer has been third hottest. Do.not.like.

Put everything back together. Still need to figure out how to run the RCA from the front, but power and remote turn on are under the left sill plates. Future Matt’s problem.
View attachment 407112View attachment 407113

It’s obviously not competition but good enough for me, for now. :D
I thought long and hard about that cubby but ended up installing that same amp under the cup holder because was concerned about heat buildup. Are you going to install some type of louvre vent to get some air on there? Since the cooling fan is on the bottom you might want to ride it up just a little on spacers. Good clean setup. Overall though. Nice work on the sub. Here’s my amp and sub
IMG_1635.jpeg
install.
 

Attachments

  • IMG_2357.jpeg
    IMG_2357.jpeg
    386 KB · Views: 30
  • IMG_2388.jpeg
    IMG_2388.jpeg
    303.5 KB · Views: 36
  • IMG_2398.jpeg
    IMG_2398.jpeg
    250.6 KB · Views: 28

latvius

Full Access Member
Joined
Nov 17, 2014
Posts
581
Reaction score
986
Location
Ariton Alabama
Today I tried dropping the transmission pan. I didn't get past the removal of the shift linkage bracket. I was able to get a torx 40 into the bolts nice and snug but couldn't get any room to turn the ratchet. I found a "how to" to disconnect the front drive shaft to get some more room. Is there anything I need to by disconnecting and reconnecting other then lining everything back up correctly?
I mark the driveshaft with paint or chalk so the yoke lines up with the shaft the way it was. Just undo the ubolts and you have to pry the driveshaft rearward to clear the yoke. Those short swivel ratchets can help in tight areas like those torx are located.
 

mattbta

Full Access Member
Joined
Jun 19, 2012
Posts
1,194
Reaction score
2,241
Location
Frisco, TX
Same place I put my amp nicely done
Cheers!
I thought long and hard about that cubby but ended up installing that same amp under the cup holder because was concerned about heat buildup. Are you going to install some type of louvre vent to get some air on there? Since the cooling fan is on the bottom you might want to ride it up just a little on spacers. Good clean setup. Overall though. Nice work on the sub. Here’s my amp and sub install.
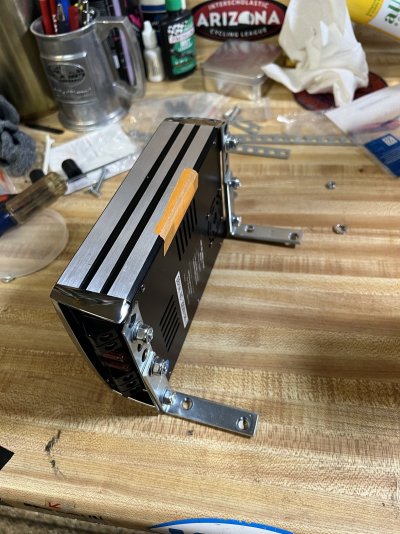
I'm still engineering in my mind what I want to do. It isn't secured right now and while the frame provides the 1/4" air gap the manual states is required, it doesn't do two things: allow enough airflow (IMO) nor make it easy for me to tweak the settings since it requires a tiny flathead.

My buddy has some fancy (read expensive) 3D printers that I'd like to come up with a solution and try printing. However, I'm not able to explain enough over text message for him to understand the goal. I will look around on thingiverse and maybe download a CAD program or something.

My Bose Lux amp and subwoofer are in the center console where you have yours, so that wasn't an option. Sure would have made for shorter power run!
 

Gmg0547

Full Access Member
Joined
Sep 8, 2022
Posts
116
Reaction score
292
I mark the driveshaft with paint or chalk so the yoke lines up with the shaft the way it was. Just undo the ubolts and you have to pry the driveshaft rearward to clear the yoke. Those short swivel ratchets can help in tight areas like those torx are located.
Thanks for the tips! I'll pick up one of those smaller ratchets and go from there.
 

Forum statistics

Threads
138,042
Posts
1,997,721
Members
102,981
Latest member
Towmaster
Back
Top