bkboatnsleds
Full Access Member
Can it be done? Or its going to take some re-arranging ,, huh?
Disclaimer: Links on this page pointing to Amazon, eBay and other sites may include affiliate code. If you click them and make a purchase, we may earn a small commission.
yes it can be done. a little cutting. you can get a 03+ dash bezel so you dont have to cut your stock one. a little moving of the ac controls.

I'll be doing this in my 2002 Tahoe in the next week. I'll take pictures of it all. I have a 2004 Bezel now. You can use a metra kit for double din also to fill the DD gap in the bezel. The HVAC controls you move down about a 1/4 inch or so. You have to cut the click snaps on the HVAC controls off and then just use the screws to move the HVAC around. Its not hard at all. I'll get ya pictures soon.
get pics by any chance? my DD pioneer is on the way and im debating buying the 03+ bezel or trimming mine down
I stuck with the 02 bezel because I didn't want to have the ash tray covered and lose the door for the 12v plugs.
To start, I bought the single din installation kit for the 02. I cut the top and bottom pieces/bars off the installation kit piece in order to use the side pieces. Since single din and double din units are still the same width, I figured this was easier than creating spacers.
My next decision was whether to try the 03 cage or stay with the 02. I figured I would try the 02 before messing around with locating an 03 bezel.
Taking off the radio bezel, I mounted the side pieces I had cut from the installation kit on my X930BT to test fit. I did this without attaching any of the harness wires just to get an idea. I found the depth (without making alterations) was not going to be enough to slide the unit all the way back, but knew that I could have it stick out a bit further was a possibility.
On the X930BT, you'll see that the front piece of the radio isn't as tall or wide as it is moving back. I had hoped the radio would slide back further so that I wouldn't have to trim as much off the bezel. Since I didn't want to mess with the cage if I didn't have too, I decided to trim the bezel to the size of the larger portion of the radio (about 7 x4) and have the smaller portion be the part that would stick out.
This was where it got fun and I got a little worried about what it would look like. With the radio slid in to where it seemed it would work best, I began to put the unaltered bezel back into position to see where I would need to trim the bezel down. By where I had attached the installation kit brackets, the bottom of my X930BT was set at the same height of the factory stereo. I knew this meant I would still need to trim from the bottom since part of the factory stereo was covered by the cross piece of the bezel and my new one would be sticking out a little.
Between holding the untrimmed bezel against the new radio and measuring where the bezel hit against the factory radio, I had a pretty good idea of what I needed to cut. I felt best about my measurements at the bottom and what I would need to trim off the cross piece between the A/C controls and radio.
Taking measurements from the center of the factory cut outs, I marked 3.5" to each side of center on the bottom. Of course I have thrown away my measurements, but I believe I cut about half the height off that piece. Measuring up from my new bottom, I marked out the height of the new stereo, measured off center for my top cuts, and made those as well.
I then got the radio hooked up and wired. After the stereo was in, I made a couple test fittings, filing down the edges to get them looking straight. After my first test fit, I found I needed to cut a little more off the top. I had figured as much when cutting since I tried to err on the side of needing to file off more since less would not be an option.
The pictures show it about 98% done. I purchased a sheet of ABS plastic to clean up the small gaps that you can still see between the bezel and stereo. I just haven't gotten around to cutting the ABS sheet. Honestly, probably just because to me it doesn't look that bad without it. Without the flash of the camera, you don't notice the gaps when in the car. Still, I already bought the ABS and I know it will look better with that part done.
I also installed a Pioneer TS-SW841D in place of the factory sub since it had basically fallen apart. Also put new door speakers in. What a difference from the factory sound.
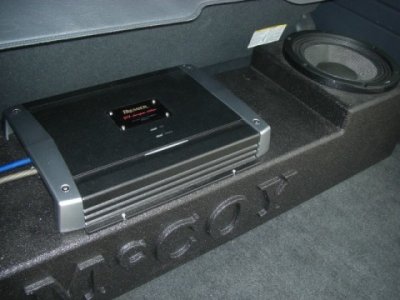
Then for a little extra, I built a custom box for the back with the Pioneer Stage 4 10' sub and Pioneer amp. I picked up some wood letters from the local craft store and glued those to the box before having it sprayed with a bed liner spray. It also has a tailgate hook mounted on the back where I have a steel cable looped through the frame and locked on the back of the box. With the amp mounted on the box, I have what is basically a fuse disconnect for the power and ground cables on the back as well. To remove, I just pull the power cables off the back, unlock it, and it comes right out.