Did this tonight with my step dad. We kinda banged our heads a little trying to figure out what the How To's were getting at (the pictures were unfortunately not too helpful, and the text not clear enough to make me want to cut a wire), but we did succeed in the end. I just wanted to make a quick n' dirty procedure here with a picture of what we did.
1. It is possible to do this mod at the XM Receiver end OR at the Head Unit. Personally, I suggest the Head Unit as it seems the easiest to reach and uses less material to reach more possible locations. On that note, I'll do these steps for the Head Unit option.
2. Block the truck (saying this now, I'm remembering that I forgot to take the blocks off mine!), set the steering column at its lowest position, and shift out of Park and into 1. This will give you the needed space to remove the dash bezel.
3. The dash bezel is the obvious trim of the dash extending from the left of the cabin to the end of the vent to the right of the radio and AC. It is held in place by a few simple clips. Start pulling on it above the gauge cluster and work your way around as you see where it comes off. Eventually you'll work it straight back, maybe a little up to avoid the steering wheel. Be smart when pulling it; it WILL go clip by clip, and you WILL have trouble with the shifter being in the way. Just figure out where it is being captured and work it loose.
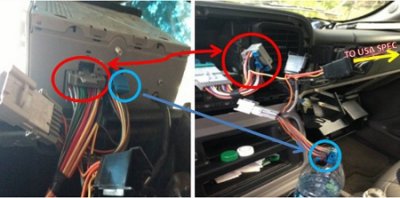
4. With the bezel off, first put the truck back in park and remove the keys. You'll see the HU being held in by 2 bolts on its immediate right and 1 bolt on its immediate left (your right) (small bolts, can't remember if they were 5, 6, or 7 mm, sorry!). Unbolt and keep them safe. Next, pull the Head Unit straight out. It may need some wiggling as wires often get stuck, but it will shake loose.
5. With the HU out, you will find a large blue connection, a slightly smaller black connection, and the antenna connection. Remove them all (may need flathead assistance) and set the HU aside.
6. Lets talk wires. The set of wires in the black connection are from the XM Receiver. Identify the Black/White (Common/Ground) wire, the Green/White (Right Audio) wire, and the Brown/White (Left Audio) wire. These are the only 3 wires you will be handling. Cut the Green/White and Brown/White wire with enough room left over to tie in with the wires that will be coming from the jack. Do not cut the black/white wire.
7. Time to add wires to your jack. If you got the 5-prong jack like me, this info is for you. If you got the 3 prong, the concept is here, but for soldering sites you'll need to see the OP (sorry!). I'll be referencing the image below, which I found from another tutorial on this mod. For all of the following wires, I recommend starting with at least 2 feet, and trimming as you please from there. Solder a Brown wire to 2 and 3, as this will continue the Left Audio. Solder a Green wire to 4 and 5, as this will continue the Right Audio. The image says to solder individual wires that eventually link in the same place, but this is not necessary, at all. Save time and wire and just solder 4 to 5 or 5 to 4 and have a wire coming from that solder. Do the same for 2 and 3. Solder a Black wire to 1. 3-prong jackers: Same concept, you just need to know which is left, right, and ground.

8. Though the wiring is not yet finished, at this point we will begin placement and mounting. In order to fit the jack into the spare dash space (see below pic of final result), we used an assortment of tools to drill the hole and then flatten/trim the cover from the dash enough to allow for a good fit, and eventually crammed it in. Both items are durable, so don't be shy. Once this is complete, feed the wires from the back of where the cover will be to up behind where the HU goes and back out where the Radio is.
9. Now, tie your Green wire to your Green/White wire, and your Brown wire to your Brown/White wire. Then, solder your Black wire from the jack to the Black/White wire from the XM Receiver harness (I recommend something to catch any solder oopses in the truck).
10. Test it. XM1 and XM2 on the "Radio ID" (Channel 0) channel will work if done correctly. If you only here left and not right or vice versa, check your 2/3 and 4/5 connections and the wire ties. If you don't hear anything, check all solders and ties, specifically the ground/common (Black).
11. Assuming all is well, its clean up time. Clip the cover, with the jack now mounted, back into the dash. Plug the connections carefully back into the HU. Position the HU and push it straight back in (it's a struggle, but as long as no wires are stuck, just wiggle and force it back). Once the pin on either side of the HU and all the 3 bolt holes are aligned, bolt the HU tightly back into place. Shift from Park back to 1 and align the dash bezel down then straight forward, getting it under the dash/above the gauge cluster and above the steering column, using the bezel position around the buttons as a guide. With time and attention, it will clip in. Give it a good beating around the edges to ensure a proper fit, and blast your favorite music.
I hope this procedure clears up any confusion that some of you folks who are as electrically challenged as myself may be experiencing.
Confession: This was my first time to ever solder and even tie wires. To those of you who are hesitant, just watch some quick youtube videos and give it a shot. In the end, its just a $2 jack, right?