Ok, I've read back through the archives but can't seem to find the answer for this. I figured I'd check before I damage something (or replace something needlessly). I'm not a mechanic but very handy.
I've got a 1999 Tahoe with rear AC. Several years back the system lost charge and a quick test seemed to indicate the compressor. So, I flushed the system and replaced the compressor, accumulator, OT and related orings, pulled a vacuum and it held. Refilled it with oil, charge, and all looked good. But, 6 months later the charge was gone.
So, I did a can of charge, with some UV green dye (I've got a good UV light). Couldn't find the problem. Traced all the lines, nothing. The only point of dye was the low side schrader where the dye went in (obviously). Replaced low side schrader on a hunch (couldn't see how the high side could be replaced), pulled vacuum and again it held for a day. Charged again (remember, dye still in system) but charge failed after two weeks. Again no sign of any leaks along all the lines.
So there it sat for two years. Now after suffering earlier in the summer of some nice 100+ heat index days in Chicago, I'm looking at it again. Checking the system I see that there is still a small positive pressure on the system, perhaps 5-10 psi. So I pull a vacuum on the system for 20 minutes (my vacuum only will go to about 23 inHg, but that might be my manifold gauge error). It holds well for two days. Another can of charge with a shot of dye. One 14oz can was enough to get the compressor to kick on and off periodically. Again no sign of leaks (arg!).
I tried some bubble solution on the two port valves again (high and low pressure side). Hmm, perhaps a small few bubbles on the high side. So I took two water balloons, put some bubble solution on the inside of them (sort of a cheap sealer like hi-float), and snapped the small balloons tightly over the port stems and left it. After two days, the high side is starting to inflate the size of a walnut. I've got a second car so letting the Tahoe sit for the repair is convenient. Looking at the high side inlet, and then again on what's available at Rock auto, it looks like the high side port doesn't have a serviceable schrader, but the entire connector unscrews. There are hex flats on the port, but I swear it looks like the fitting is factory brazed onto the manifold piece. Attempting to carefully unscrew it showed that it was not moving. So, before I snap off a brazed part trying to unscrew it, I thought I'd check here.
Questions:
1. Does this high side port actually unscrew? Any tips on not breaking it? Or do I have to replace the whole manifold tube?
2. If I do replace it, can I do it without having to replace the accumulator? Remember there was still residual pressure in the system.
3. Likewise, since the leak was VERY slow (heck, even the dye wasn't coming out), do I need to flush and recharge the oil.
4. Is 23inHg enough vacuum pull? I might be able to borrow another pump, but it'll be a pain.
5. Am I fooling myself and there should be another massive leak somewhere? The cap was on the port, and I honestly can't see how that much charge can leak out of the port, with cap, and not be noticed, in two weeks. I checked the front evaporator from the bottom by prying down the bottom cover, not removing the entire dash. I even traced all the lines leading to the rear AC.
Any hints, tips, etc welcome.
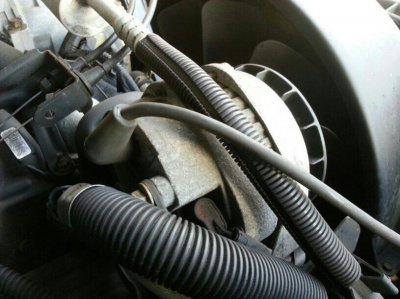
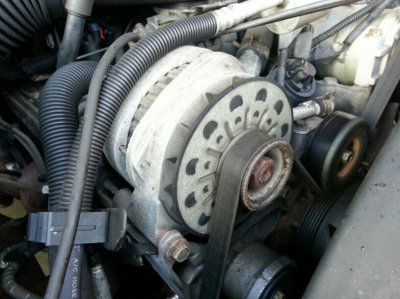
One last question. How can double check size (amperage) alternator I've got? I need to replace my serpentine belt and there are two possible ones (based on alternator size). I didn't see any obvious markings on it.
Thanks!
I've got a 1999 Tahoe with rear AC. Several years back the system lost charge and a quick test seemed to indicate the compressor. So, I flushed the system and replaced the compressor, accumulator, OT and related orings, pulled a vacuum and it held. Refilled it with oil, charge, and all looked good. But, 6 months later the charge was gone.
So, I did a can of charge, with some UV green dye (I've got a good UV light). Couldn't find the problem. Traced all the lines, nothing. The only point of dye was the low side schrader where the dye went in (obviously). Replaced low side schrader on a hunch (couldn't see how the high side could be replaced), pulled vacuum and again it held for a day. Charged again (remember, dye still in system) but charge failed after two weeks. Again no sign of any leaks along all the lines.
So there it sat for two years. Now after suffering earlier in the summer of some nice 100+ heat index days in Chicago, I'm looking at it again. Checking the system I see that there is still a small positive pressure on the system, perhaps 5-10 psi. So I pull a vacuum on the system for 20 minutes (my vacuum only will go to about 23 inHg, but that might be my manifold gauge error). It holds well for two days. Another can of charge with a shot of dye. One 14oz can was enough to get the compressor to kick on and off periodically. Again no sign of leaks (arg!).
I tried some bubble solution on the two port valves again (high and low pressure side). Hmm, perhaps a small few bubbles on the high side. So I took two water balloons, put some bubble solution on the inside of them (sort of a cheap sealer like hi-float), and snapped the small balloons tightly over the port stems and left it. After two days, the high side is starting to inflate the size of a walnut. I've got a second car so letting the Tahoe sit for the repair is convenient. Looking at the high side inlet, and then again on what's available at Rock auto, it looks like the high side port doesn't have a serviceable schrader, but the entire connector unscrews. There are hex flats on the port, but I swear it looks like the fitting is factory brazed onto the manifold piece. Attempting to carefully unscrew it showed that it was not moving. So, before I snap off a brazed part trying to unscrew it, I thought I'd check here.
Questions:
1. Does this high side port actually unscrew? Any tips on not breaking it? Or do I have to replace the whole manifold tube?
2. If I do replace it, can I do it without having to replace the accumulator? Remember there was still residual pressure in the system.
3. Likewise, since the leak was VERY slow (heck, even the dye wasn't coming out), do I need to flush and recharge the oil.
4. Is 23inHg enough vacuum pull? I might be able to borrow another pump, but it'll be a pain.
5. Am I fooling myself and there should be another massive leak somewhere? The cap was on the port, and I honestly can't see how that much charge can leak out of the port, with cap, and not be noticed, in two weeks. I checked the front evaporator from the bottom by prying down the bottom cover, not removing the entire dash. I even traced all the lines leading to the rear AC.
Any hints, tips, etc welcome.
One last question. How can double check size (amperage) alternator I've got? I need to replace my serpentine belt and there are two possible ones (based on alternator size). I didn't see any obvious markings on it.
Thanks!
")