$65 Phone Mirroring to Dash and Rear Screens

Disclaimer: Links on this page pointing to Amazon, eBay and other sites may include affiliate code. If you click them and make a purchase, we may earn a small commission.

WBHMSU

Seagal Enthusiast
Supporting Member
Joined
Mar 31, 2015
Posts
121
Reaction score
5
Cool, thanks for posting.
 

WBHMSU

Seagal Enthusiast
Supporting Member
Joined
Mar 31, 2015
Posts
121
Reaction score
5
I finally got all my parts for the phone mirroring. The parts I got was:
1. HDMI2AV
2. EZ-cast M2 wireless mirroring.
3. MHL cable for Samsung S4
4. Keystone wall plate with HDMI and USB.
Total cost little over $50

The wireless EZ-cast (about 18 bucks) working pretty good. It does have little hiccups here and there but overall it works pretty good. I bought a MHL just in case EZ cast fails. Picture quality is ok not as good as playing it on USB or DVD but it will do. No green line on this HDMI2AV. This is a $18 AV2HDMI so no complains.
Now to mount the HDMI2AV behind the panel and install the keystone face plate for that clean look.

Video on the setup and some pics.

https://youtu.be/HLSlm4yTLlo

I'd like to see your pics once you get the face plate set up if you don't mind.

I finally go the right cables and set mine up for my Galaxy S5. Easy and works like a charm. Just trying to figure out the best way to clean it all up.
 

WBHMSU

Seagal Enthusiast
Supporting Member
Joined
Mar 31, 2015
Posts
121
Reaction score
5
I finished cleaning up my phone mirror kit today. I don't like wires. I don't even like having them tucked away in the little cubby on the back of the center console or inside the console itself.

I decided to take the back panel of the center console off. There were not a lot of resources I could find online, but I figured it out.

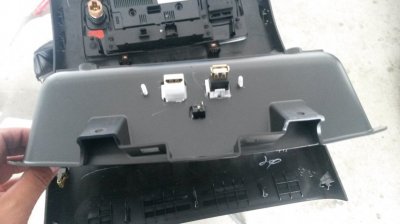
It's held on simply by these 4 screws and a bunch of clips. Take the rubber molding out of the cubby. Use a hex key to remove these four screws.

17173230380_18f3eca853_z.jpg

The best way get started on popping the clips out and removing the panel is to start from the top here. Use a flat head screwdriver to pry the panels apart (see the diagonal line between the two hinges for the console lid? right there.), and then when you get a little gap you can use the heel of your hand and hit it up and away with a little thrust. It will start to pop out and you can pretty much just lift it out after that. Be careful, of course. There are wires and plugs attaching it to the console.

17153340277_85b7a589f2_z.jpg

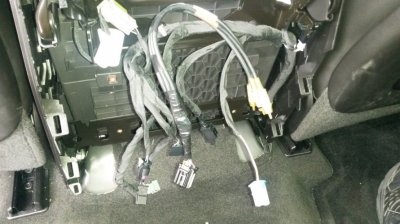
So once I got it out and onto the ground, the gears started churning on how I could clean things up. I'm not a big a/v guy or mobile electronic guy but I figured out a neat little low tech solution to clean it up.

When I was trying to figure out how to get the back panel off, I happened to pick up the rubber mat on the floor of the console. I decided I could make a false floor for the console and hide everything in there.

To get started I drilled a hole here in the floor of the console. Feed your RCA cable through here.

17334835156_ffe1fec73c_z.jpg

The cables will come through like this.

17174583339_de1029884a_z.jpg

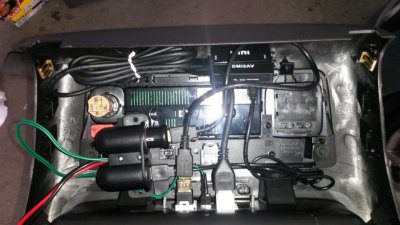
Next I drilled a hole through the top of the "cubby" on the rear console panel. What you're looking at here is you are looking down on the top of the rear panel. You can see how the cubby bubbles out. I removed a couple of the plugs for easier drill access.

17174579309_54688b7653_z.jpg

Feed your cables through and put the panel back on.

16738275044_2272729250_z.jpg

For my 'false floor' I bought this weird plastic board stuff at Lowes. In theory, anything that is flat, semi sturdy and 9.5 x 12 would work (drywall, plywood, etc). The mat hides the material quite well. I found this stuff over by where the plexiglass is at Lowes.

16740522253_3322c35fab_z.jpg

This stuff was thin enough that I cut it with a razor blade. You might prefer something sturdier but this will do the job.

16738268664_737750d79d_z.jpg

I bought these rubber grommet thingies to hold up my false floor. They are 1 " tall and I think 1 13/16" at the base. They are in one of the drawers at Lowes by where all the screws, bolts, etc are. I also bought some 3m double sided clear adhesive tape in the tape aisle (go figure)

17174568909_5a2fe09a13_z.jpg

Here's the floor of the console with the grommets in, the adapter set up, etc. (also used the tape on the bottom of the adapter so it won't slide around. Used some twist ties and heat shrink tube to clean up the wires a bit.

17334816996_507ed67c10_z.jpg

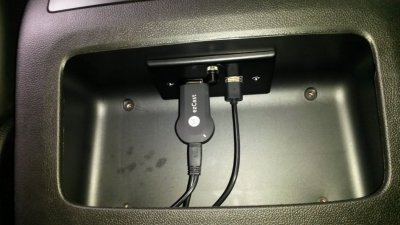
The wires at the top are both USBs. One to power the adapter, one to power the HDMI to Samsung cable. The red wire at the bottom is out to my phone. There is actually a nice little built in notch at the front of the console beneath the lid where you can run this cable out.

Mat back in and some final pics.

16740513293_3163ed22ef_c.jpg

17358851652_193fe01625_z.jpg

17172966968_2b771169f9_z.jpg
 

jl449

Full Access Member
Joined
Nov 25, 2014
Posts
284
Reaction score
42
Location
Salinas, Ca.
I finally got my HDMI2AV installed. Thanks WBH for the last post. Help me out! I took the MVI route for the install but bought my own parts. I decided to mount the keystone plate on top instead mounting it on the back. This avoided extra cutting/dremel on the plastic. Also, I installed a video selector switch so I can select HDMI or composite AV. Also installed a couple of 2A USB ports. One for the HDMI2AV and one external. Ran the USB for the HDMI2AV box to a on/off switch. This way I'll be able to select HDMI or the stock composite AV. Power was tapped from the cigarette plug.

Installed EZ Cast.. works great. It does take some time to setup but it works pretty good. Went
 

Attachments

  • first.jpg
    first.jpg
    92.5 KB · Views: 161
  • second.jpg
    second.jpg
    90.5 KB · Views: 141
  • third rca.jpg
    third rca.jpg
    100.4 KB · Views: 145
  • fourth wire.jpg
    fourth wire.jpg
    97.9 KB · Views: 155
  • fith Finish.jpg
    fith Finish.jpg
    98.3 KB · Views: 148

felixgun

Full Access Member
Joined
Oct 7, 2010
Posts
9,742
Reaction score
124
Location
Lafayette, LA
Damn looks clean! I got all this in the mail now all I need is the HMI unlock. Did you get that before installing all of this?
 

jl449

Full Access Member
Joined
Nov 25, 2014
Posts
284
Reaction score
42
Location
Salinas, Ca.
For me... I still need to get the hdmi unlock. I'm still debating to get it or not. I got the kids entertained with netflix and with them wearing the headphones ... the wife and I can listen to some music when we go on our weekend trips. The bluetooth headphones are a life saver for me!! :party52:
 

nemloc

TYF Newbie
Joined
Dec 14, 2014
Posts
28
Reaction score
0
For me... I still need to get the hdmi unlock. I'm still debating to get it or not. I got the kids entertained with netflix and with them wearing the headphones ... the wife and I can listen to some music when we go on our weekend trips. The bluetooth headphones are a life saver for me!! :party52:

can you not run multiple videos with the unlock? (different front, mid, back?)
 

jl449

Full Access Member
Joined
Nov 25, 2014
Posts
284
Reaction score
42
Location
Salinas, Ca.
can you not run multiple videos with the unlock? (different front, mid, back?)

When you put the vehicle in drive the front screen turns off the video. In park you can view on both front and back screen.
 

Forum statistics

Threads
129,475
Posts
1,816,408
Members
92,681
Latest member
Redoak76
Top