Scott in AZ
Full Access Member
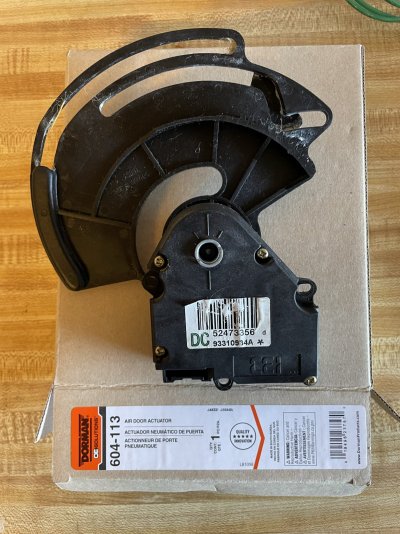
So I had the HVAC only blowing out the defroster only, which usually means the actuator wedged under the driver side dash had failed. I replaced with a Dorman 604-113 aftermarket actuator and think these tips and photos will be helpful.
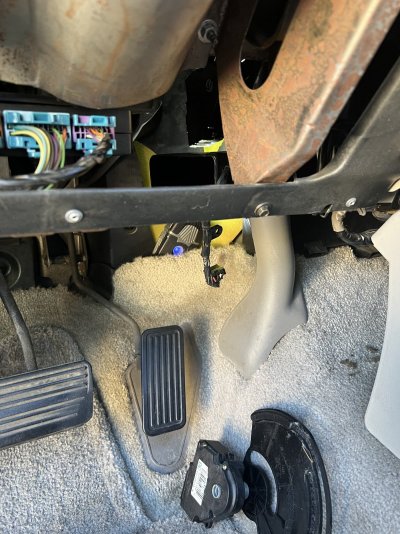
- I removed the driver’s side kick panel under the steering wheel. Not for access but for visibility and light. It’s two 7mm screws low (left near parking brake) and two clips high. Be careful, the clips might stay in the dash. One of mine did.
- Two screws hold the actuator in place, both 5.5mm hex head.
- I was able to access and unscrew the diabolical “upper screw” using a short throw 5.5mm socket on a 3 inch extension and loosened it by hand. Based on this I tightened it only finger firm tight when reinstalling so in twenty-two years, in 2045, I’ll be able to use the same technique next time this chronic problem part fails.
- When installing the new replacement I set the failed OEM model on the floorboard in exactly same orientation as installing and this was a good reference for finding the blind upper screw.
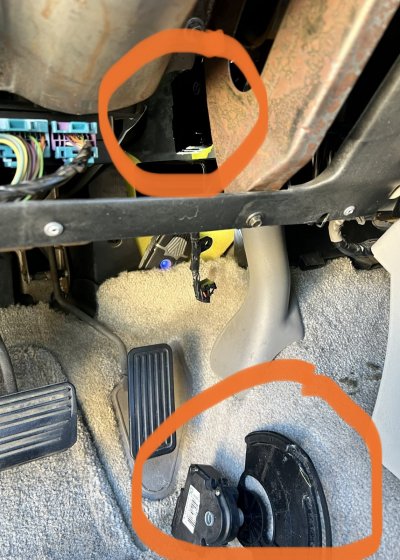
- Like the Loch Ness Monster and Bigfoot, photo evidence would end the argument. Yes, you really can get a socket wrench on the upper screw, photos attached.
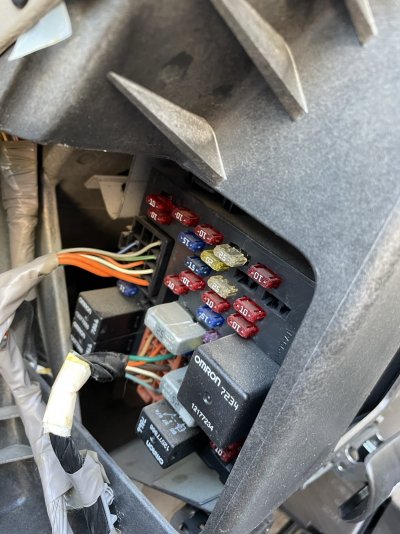
- Don’t forget to calibtate the actuator so it runs full stroke and resets the blend door actuator to “HOME”. I snapped a pic of the HVAC control and HVAC fuses I removed prior to calibration. The calibration procedure is turn HVAC switches to off, remove fuses, install actuator, reconnect electrical to the new actuator, install fuses ,
power on vehicle for 40 seconds without adjusting HVAC controls from OFF, then start HVAC. Wow was I ever happy when mine worked.
Lurked for a while, my first real thread, hope this helps.
- I removed the driver’s side kick panel under the steering wheel. Not for access but for visibility and light. It’s two 7mm screws low (left near parking brake) and two clips high. Be careful, the clips might stay in the dash. One of mine did.
- Two screws hold the actuator in place, both 5.5mm hex head.
- I was able to access and unscrew the diabolical “upper screw” using a short throw 5.5mm socket on a 3 inch extension and loosened it by hand. Based on this I tightened it only finger firm tight when reinstalling so in twenty-two years, in 2045, I’ll be able to use the same technique next time this chronic problem part fails.
- When installing the new replacement I set the failed OEM model on the floorboard in exactly same orientation as installing and this was a good reference for finding the blind upper screw.
- Like the Loch Ness Monster and Bigfoot, photo evidence would end the argument. Yes, you really can get a socket wrench on the upper screw, photos attached.
- Don’t forget to calibtate the actuator so it runs full stroke and resets the blend door actuator to “HOME”. I snapped a pic of the HVAC control and HVAC fuses I removed prior to calibration. The calibration procedure is turn HVAC switches to off, remove fuses, install actuator, reconnect electrical to the new actuator, install fuses ,
power on vehicle for 40 seconds without adjusting HVAC controls from OFF, then start HVAC. Wow was I ever happy when mine worked.
Lurked for a while, my first real thread, hope this helps.
Attachments
-
 0041686C-8034-499F-8B64-3A2D884DF2F3.jpeg311.4 KB · Views: 298
 -
 494384C3-0AD3-4FFC-BB5F-5164EF347268.jpeg210 KB · Views: 227
 -
 DA5348DE-94B7-4056-9574-3FACF79B9E22.jpeg373.6 KB · Views: 285
 -
 091127F9-68E2-4E82-AD8F-067D70ABC4BE.jpeg412.9 KB · Views: 280
 -
 41B7A026-9B00-46F8-9EBA-3FB41DB87D12.jpeg384.6 KB · Views: 252
Last edited:
