YukonJak
TYF Newbie
- Joined
- Oct 8, 2014
- Posts
- 13
- Reaction score
- 1
Here are the parts I used for Dual Battery Install on my 2014 Yukon
1-CABLE 2.0; NEGATIVE AUX BAT TO GROUND (length to fit)
1-CABLE 2.0; POSITIVE AUX BAT TO REAR OF VEHICLE (length to fit)
1-CABLE 2.0; POSITIVE AUX BAT RH TO COACH BATTERY
1-RELAY; MOUNTED PASSENGER SIDE NEAREST COACH BATTERY
1- AUX BATTERY (I USED A DEEP CYCLE BATTERY HERE)
1-COVER; AUX BAT POS JUNCTION BLOCK
1-RETAINER; AUX BAT HOLDOWN
2- SMALL BUSS BARS – TO CONNECT MEGA FUSE HOLDERES TOGETHER
2-MEGA FUSE HOLDERS-[Inline-To Battery Positive Cable Connectors]; Aux ; Aux Camper Bat
14 & 12 gauge wire, connectors, speed screws other shop supplies
Installation instructions;
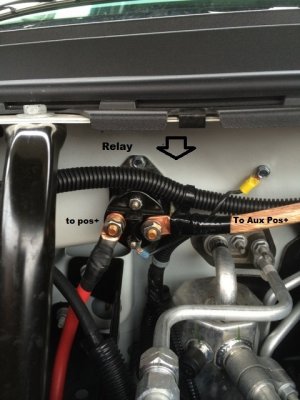
Install a standard 4 post relay on the firewall nearest the Coach (original) Battery shown in first picture.
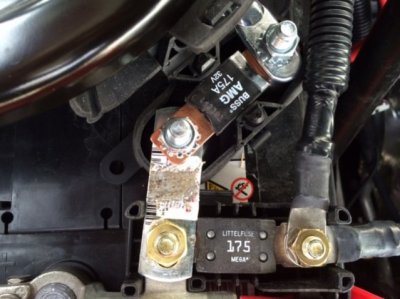
Run one short positive 2.0 cable from the relay to the Mega fuse from the passenger side post of the relay. Run second 2.0 battery cable from second post to the Auxiliary battery follow route in picture 5. There is an existing mega fuse holder near the passenger hood hinge on the original coach battery. Verify that you have two mega fuses, 175 AMP for the cable to fuse box and 125 or 175 AMP for the aux battery relay cable. I reused the existing 175 AMP fuse on the original coach battery and connected the second one using a small metal buss bar. I put the aux battery cable on the second post on the driver’s side of the relay with the 175 AMP fuse. Leave the alternator cable where it is from the factory, same for the starter cable.
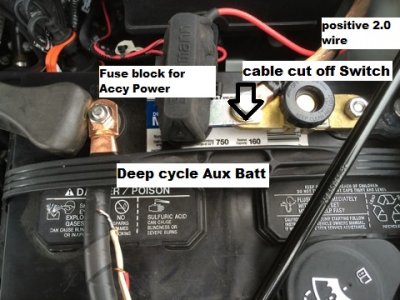
The large relay connections with 4 wires (red, orange clear and black, again your choice on colors used) this is what isolates the aux battery from the charging system. I chose to use a standard 4 post relay and installed a cutoff switch on the positive Aux Battery post. I did this because I could easily disconnect the connector which cuts the aux battery off from the charging system. In retrospect, I probably would not use it, though. (see photo 6)
Using terminal connectors, the red Positive cable wire goes to coach battery positive (see photo 3). The clear 2.0 wire goes to the positive of aux battery. The black wire goes to ground on the vehicle. I grounded it directly to firewall make sure you have a good ground here.
The orange wire (not shown) connects to the top small stud and is connected to Ignition-ON positive connection. (red arrow picture 1)
You can hear the relay "clunk" when you turn the key to run. The auxiliary battery is isolated until the key is in the run position. It remains isolated when the ignition is cranking as well, so you don't have to worry about a fully drained aux battery hampering starting if it's extremely cold outside or your main battery isn't in fantastic shape. I can now use the 2.0 wire that runs from the aux battery to a junction block in the back of the truck where I can run any auxiliary power to converters or extra lighting (your choice as to what you power from here) and not worry about running down my starting battery.
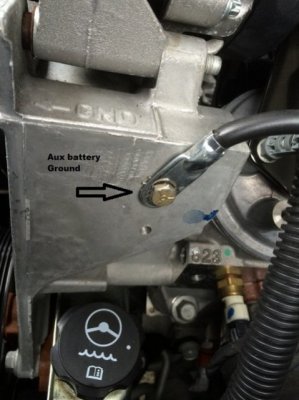
For the Auxiliary battery ground, I chose one of the threaded holes on the engine block near the alternator bracket for the ground using a 10x1.25 bolt (photo 7).
Make sure you have enough slack in the battery cables and relay plug before you mount the relay. You don't want to mount it only to find out the cables won't reach!
The second mega fuse is mounted on the Aux battery next to the cutoff switch (photo 6 & 7) protects rear power Junction block.
Run your Positive 2.0 cable from the auxiliary battery mega fuse to the rear of the vehicle. (photo 6 or 7)
I followed the wiring down the firewall along the frame (driver’s side) to the rear and entered the rear compartment with the cable through the existing body wire grommet.
I also use proper size fuses on each item I power from the Positive block setup in the rear of the vehicle. Please do this to protect your investments you are powering and prevent wire fires.
I spent just under $200 to do this not including the deep cycle battery.
1-CABLE 2.0; NEGATIVE AUX BAT TO GROUND (length to fit)
1-CABLE 2.0; POSITIVE AUX BAT TO REAR OF VEHICLE (length to fit)
1-CABLE 2.0; POSITIVE AUX BAT RH TO COACH BATTERY
1-RELAY; MOUNTED PASSENGER SIDE NEAREST COACH BATTERY
1- AUX BATTERY (I USED A DEEP CYCLE BATTERY HERE)
1-COVER; AUX BAT POS JUNCTION BLOCK
1-RETAINER; AUX BAT HOLDOWN
2- SMALL BUSS BARS – TO CONNECT MEGA FUSE HOLDERES TOGETHER
2-MEGA FUSE HOLDERS-[Inline-To Battery Positive Cable Connectors]; Aux ; Aux Camper Bat
14 & 12 gauge wire, connectors, speed screws other shop supplies
Installation instructions;
Install a standard 4 post relay on the firewall nearest the Coach (original) Battery shown in first picture.
Run one short positive 2.0 cable from the relay to the Mega fuse from the passenger side post of the relay. Run second 2.0 battery cable from second post to the Auxiliary battery follow route in picture 5. There is an existing mega fuse holder near the passenger hood hinge on the original coach battery. Verify that you have two mega fuses, 175 AMP for the cable to fuse box and 125 or 175 AMP for the aux battery relay cable. I reused the existing 175 AMP fuse on the original coach battery and connected the second one using a small metal buss bar. I put the aux battery cable on the second post on the driver’s side of the relay with the 175 AMP fuse. Leave the alternator cable where it is from the factory, same for the starter cable.
The large relay connections with 4 wires (red, orange clear and black, again your choice on colors used) this is what isolates the aux battery from the charging system. I chose to use a standard 4 post relay and installed a cutoff switch on the positive Aux Battery post. I did this because I could easily disconnect the connector which cuts the aux battery off from the charging system. In retrospect, I probably would not use it, though. (see photo 6)
Using terminal connectors, the red Positive cable wire goes to coach battery positive (see photo 3). The clear 2.0 wire goes to the positive of aux battery. The black wire goes to ground on the vehicle. I grounded it directly to firewall make sure you have a good ground here.
The orange wire (not shown) connects to the top small stud and is connected to Ignition-ON positive connection. (red arrow picture 1)
You can hear the relay "clunk" when you turn the key to run. The auxiliary battery is isolated until the key is in the run position. It remains isolated when the ignition is cranking as well, so you don't have to worry about a fully drained aux battery hampering starting if it's extremely cold outside or your main battery isn't in fantastic shape. I can now use the 2.0 wire that runs from the aux battery to a junction block in the back of the truck where I can run any auxiliary power to converters or extra lighting (your choice as to what you power from here) and not worry about running down my starting battery.
For the Auxiliary battery ground, I chose one of the threaded holes on the engine block near the alternator bracket for the ground using a 10x1.25 bolt (photo 7).
Make sure you have enough slack in the battery cables and relay plug before you mount the relay. You don't want to mount it only to find out the cables won't reach!
The second mega fuse is mounted on the Aux battery next to the cutoff switch (photo 6 & 7) protects rear power Junction block.
Run your Positive 2.0 cable from the auxiliary battery mega fuse to the rear of the vehicle. (photo 6 or 7)
I followed the wiring down the firewall along the frame (driver’s side) to the rear and entered the rear compartment with the cable through the existing body wire grommet.
I also use proper size fuses on each item I power from the Positive block setup in the rear of the vehicle. Please do this to protect your investments you are powering and prevent wire fires.
I spent just under $200 to do this not including the deep cycle battery.