Replacing Exhaust Manifold Bolts

Disclaimer: Links on this page pointing to Amazon, eBay and other sites may include affiliate code. If you click them and make a purchase, we may earn a small commission.

JonnyTahoe

Full Access Member
Joined
Apr 14, 2011
Posts
1,249
Reaction score
771
Location
Minneapolis
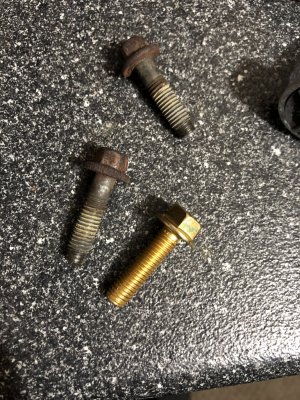
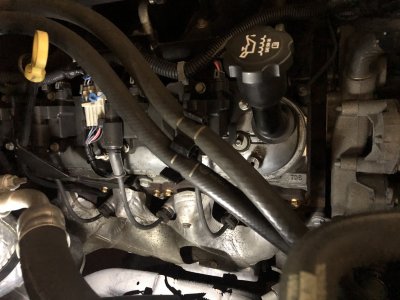
All my manifold bolts were rusty but not broken. Decided to replace them with FEL-PRO replacement exhaust manifold bolts before they start to fail. First one I tried to remove with a 10mm socket was really tight and broke off with the majority of the bolt still in the head. I warmed the engine up to operating temperature and it still broke off.
 
Last edited:

George B

¯\_(ツ)_/¯
Joined
Feb 5, 2020
Posts
7,637
Reaction score
18,095
Location
Oconomowoc, Wisconsin 53066
All my manifold bolts were fine rusty but not broken. Decided to replace them with FEL-PRO replacement exhaust manifold bolts before they start to fail. First one I tried to remove with a 10 mm socket was really tight and broke right off about 3 threads into the head. I warmed the engine up to operating temperature before I tried to remove the bolt. Not the outcome I had in mind.
That sucks but it was probably close to letting go then. Some of the ones I pulled out were noticeably stretched where yours broke and I got lucky. You will need to be committed to pulling the manifold if you choose to continue.
 
OP
OP
JonnyTahoe

JonnyTahoe

Full Access Member
Joined
Apr 14, 2011
Posts
1,249
Reaction score
771
Location
Minneapolis
I wish I would of just left it alone. I would like to try another one but better safe than sorry at this point.
 
Last edited:

iamdub

Full Access Member
Joined
Apr 23, 2016
Posts
20,780
Reaction score
44,687
Location
Li'l Weezyana
All my manifold bolts were fine rusty but not broken. Decided to replace them with FEL-PRO replacement exhaust manifold bolts before they start to fail. First one I tried to remove with a 10 mm socket was really tight and broke right off about 3 threads into the head. I warmed the engine up to operating temperature before I tried to remove the bolt. Not the outcome I had in mind.

I place a large punch (5/16") in the center of the bolt head and give it few decent whacks with a hammer. A bolt held with vise-grips works the same if you don't have a punch. You don't hit it hard enough to risk cracking the aluminum head, just enough to shock the bolt in it's threads. Then I use a small 3/8" impact since it's weak to hammer the bolt in the tightening direction a few hits first, then a few hits in reverse, a few hits tightening, then reverse. Repeat a few times then continue to hammer it in reverse for a little while in attempt to remove it. If it doesn't wanna back out, repeat the process. Sometimes, the 3/8" impact isn't strong enough, so I'll use a box end wrench and hit it with a hammer. Shocking it to turn the bolt rather than slowly torquing it is much more effective in preventing it from twisting apart.

Once you get the bolts out and manifold out the way, you can put a nut over that broken one and weld it in place, then try the removal technique again. I'd tap the broken piece with a hammer a few times before welding the nut over it. Just don't hit it hard enough to flatten it into the head.
 
OP
OP
JonnyTahoe

JonnyTahoe

Full Access Member
Joined
Apr 14, 2011
Posts
1,249
Reaction score
771
Location
Minneapolis
I place a large punch (5/16") in the center of the bolt head and give it few decent whacks with a hammer. A bolt held with vise-grips works the same if you don't have a punch. You don't hit it hard enough to risk cracking the aluminum head, just enough to shock the bolt in it's threads. Then I use a small 3/8" impact since it's weak to hammer the bolt in the tightening direction a few hits first, then a few hits in reverse, a few hits tightening, then reverse. Repeat a few times then continue to hammer it in reverse for a little while in attempt to remove it. If it doesn't wanna back out, repeat the process. Sometimes, the 3/8" impact isn't strong enough, so I'll use a box end wrench and hit it with a hammer. Shocking it to turn the bolt rather than slowly torquing it is much more effective in preventing it from twisting apart.

Once you get the bolts out and manifold out the way, you can put a nut over that broken one and weld it in place, then try the removal technique again. I'd tap the broken piece with a hammer a few times before welding the nut over it. Just don't hit it hard enough to flatten it into the head.
Great advice Thanks.
 

OR VietVet

Multnomah Falls
Supporting Member
Military
Joined
Oct 8, 2014
Posts
19,277
Reaction score
31,762
Location
Willamette Valley
I place a large punch (5/16") in the center of the bolt head and give it few decent whacks with a hammer. A bolt held with vise-grips works the same if you don't have a punch. You don't hit it hard enough to risk cracking the aluminum head, just enough to shock the bolt in it's threads. Then I use a small 3/8" impact since it's weak to hammer the bolt in the tightening direction a few hits first, then a few hits in reverse, a few hits tightening, then reverse. Repeat a few times then continue to hammer it in reverse for a little while in attempt to remove it. If it doesn't wanna back out, repeat the process. Sometimes, the 3/8" impact isn't strong enough, so I'll use a box end wrench and hit it with a hammer. Shocking it to turn the bolt rather than slowly torquing it is much more effective in preventing it from twisting apart.

Once you get the bolts out and manifold out the way, you can put a nut over that broken one and weld it in place, then try the removal technique again. I'd tap the broken piece with a hammer a few times before welding the nut over it. Just don't hit it hard enough to flatten it into the head.

Yep, it's a great trick that we used in my shops in KC, Mo. Lots of salt on the roads and rusted parts. We would "shock" the bolt and threads and then tighten and loosen a bit at a time and also spray penetrant in there when the head backed out enough for clearance. Did not save them all but I know we made the job a little easier doing it that way. Good call, Chris.

Hell, if we had the room we would use an air chisel with a flat nose round bit to shock them with.
 

George B

¯\_(ツ)_/¯
Joined
Feb 5, 2020
Posts
7,637
Reaction score
18,095
Location
Oconomowoc, Wisconsin 53066
Do yall think that a cold engine is better?
My theory is that if the exhaust leaks we hear occur when the engine is cold and things haven’t expanded then the bolts would be “looser” as opposed to heated up and expanded and tightened up. Just a thought. I changed mine cold.
 

Rocket Man

Mark
Supporting Member
Joined
Dec 25, 2014
Posts
25,966
Reaction score
50,662
Location
Oregon
FYI if all else fails and you end up with a broken bolt or two there are clamps that work great, it’s just not the perfectly visually pleasing solution.

And also for the replacement bolts I highly recommend ARP bolts, they will never break guaranteed.
 

corvette744

2004 Z-71
Joined
Jul 11, 2017
Posts
739
Reaction score
768
Location
Northern illinois
Im doing the same thing i have been thinking about this known problem.I only got the passenger side done so far.Alot of loctite on them from the factory.Was told not to use any on the new dorman replacement bolts i got.They are very tight in the head did seem to help a tad warming the engine up first.

led nav lights 041.JPG led nav lights 057.JPG
 

Forum statistics

Threads
129,276
Posts
1,813,150
Members
92,384
Latest member
rick9667
Top